background image

TECHNICAL SPECIFICATIONS

CONTENTS

2

Warnings

................................................Page

3

Description of the appliance

........Page

4

Installation

.............................................Page

5

Positioning .................................................Page

5

Door reversal .............................................Page

6

Electrical connection .................................Page

Stacking kit ................................................Page

6

Use

.............................................................Page

7

Control panel .............................................Page

7

Use of controls ..........................................Page

7

Programme table.......................................Page

9

Drying sequence .......................................Page

10

Useful hints ...............................................Page

11

Maintenance

.........................................Page  

12

External cleaning.......................................Page  

12

Cleaning the filter ......................................Page  

12

Cleaning the condenser ............................Page  

13

Emptying water container..........................Page  

13

Servicing

................................................Page  

14

DIMENSIONS Height  85 

cm 

Width 60 

cm 

Depth 60 

cm 

ELECTRICAL CONNECTION 

Voltage

220-230 V/50 Hz

Max. power absorbed

2200 W (10A)

DRYING CAPACITY 

Cotton, linen 

5 kg 

Synthetics 2 

kg 

This appliance complies with the following E.E.C. Directives:
- 73/23 EEC of 19.2.73 (Low Voltage Directive) and subsequent modifications;
- 89/336 EEC of 3.5.89 (Electromagnetic Compatibility Directive) and subsequent modifications.

i

Summary of Contents for TCS 674 E

Page 1: ...125996800 INSTALLATION AND INSTRUCTION MANUAL INSTRUCCIONES PARA INSTALACION Y USO INSTRUÇÕES DE INSTALAÇÃO E UTILISAÇÃO TUMBLE DRYER SECADORA SECADOR TCS 674 E ...

Page 2: ... 12 External cleaning Page 12 Cleaning the filter Page 12 Cleaning the condenser Page 13 Emptying water container Page 13 Servicing Page 14 DIMENSIONS Height 85 cm Width 60 cm Depth 60 cm ELECTRICAL CONNECTION Voltage 220 230 V 50 Hz Max power absorbed 2200 W 10A DRYING CAPACITY Cotton linen 5 kg Synthetics 2 kg This appliance complies with the following E E C Directives 73 23 EEC of 19 2 73 Low V...

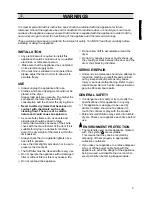
Page 3: ...uld get stuck between the door and the drum thus blocking the latter SERVICE REPAIR Under no circumstances should you attempt to repair the machine yourself Repairs carried out by inexperienced persons may cause injury or serious malfunctioning Refer to your local Zanussi Service Centre Always insist on genuine Zanussi spare parts GENERAL SAFETY It is dangerous to modify or try to modify the speci...

Page 4: ...rt button 07 Control lights 08 Programme selector dial 09 Mains on light 10 Fluff filter 11 Lock 12 Rating plate 13 Ventilation grid 14 Condenser 15 Adjustable feet 12 14 15 1 345 2 11 13 6 8 7 9 10 B C D A SYNTET SKÅPSTO RRT BOMUL L LINNE STRYKTO RRT SKÅPSTO RRT EXTRA TORRT Tidsinstäl ld torkning från 20 till 90 minuter A U T O R E V E R S E T C S 6 7 4 E ...

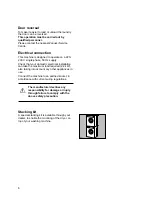
Page 5: ...in its permanent operating position check that the dryer is absolutely level with the aid of a spirit level If it is not raise or lower the feet until it is The feet must never be removed Do not restrict the floor clearance through deep pile carpets strips of wood or similar This might cause heat build up which would interfere with the operation of the appliance Important The hot air emitted by th...

Page 6: ...eck that your domestic electrical installation can take the maximum load required 2 2 kW also taking into account any other appliances in use Connect the machine to an earthed socket in accordance with current wiring regulations The manufacturer declines any responsibility for damage or injury through failure to comply with the above safety precaution Stacking kit A special stacking kit is availab...

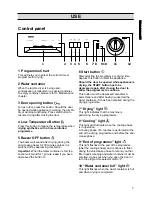
Page 7: ...depress this button to start the appliance Should the door be opened while appliance is drying the START button has to be depressed again after closing the door to allow the programme to continue This button must be depressed also after a power failure and after having re inserted the water container if it has been emptied during the drying programme 7 Drying light This light indicates that the ma...

Page 8: ...rying You can select a time up to 90 mins to finish off drying if necessary or to use your tumble dryer independently of the electronic control system When selecting a short drying time remember that during the last 9 mins of operation the heat is cut off in order to carry out a cooling phase To cancel a programme in operation turn the selector dial to 0 When drying is completed switch off the app...

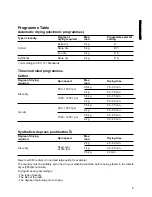
Page 9: ...1121 Standards Degree of drying required Extra dry 5 kg A Store dry 5 kg B Iron dry 5 kg C Store dry 2 kg D Max load Programme selector setting Time controlled programmes Cotton Degree of drying required Store dry Spin speed 800 1000 r p m 3 5 kg 75 90 min 2 kg 60 75 min 1000 1200 r p m 3 5 kg 60 75 min 2 kg 45 60 min Iron dry 800 1000 r p m 3 5 kg 60 75 min 2 kg 45 60 min 1000 1200 r p m 3 5 kg 4...

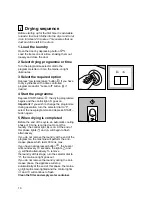
Page 10: ...change the programme during operation turn the selector dial to 0 select the new programme and depress START button again 5 When drying is completed Before the end of the cycle an automatic cooling phase of 9 mins is carried out to cool the laundry the control light is on At the end of this phase lights and will begin to flash alternatively If you do not remove the laundry at the end of the progra...

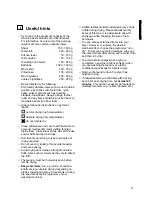
Page 11: ...ng required Do not over dry laundry this avoids creasing and saves energy Avoid drying dark clothes with light coloured fluffy items such as towels as they could attract the fluff The laundry must be thoroughly spun before tumble drying Easy care items too e g shirts should be briefly pre spun before drying depending on crease resistance approx 30 seconds or using the special brief spin programme ...

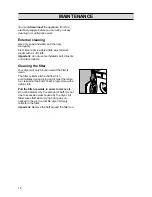
Page 12: ...s Cleaning the filter Your dryer will only function well if the filter is clean The filter collects all the fluff which accumulates during drying and it must therefore be cleaned at the end of each programme with a damp cloth Pull the filter upwards in order to remove it Do not be alarmed by the amount of fluff It is not due to excessive wear caused by the dryer All fabric loses fluff when drying ...

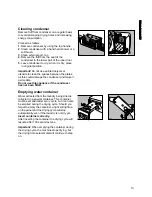
Page 13: ... damage the condenser and make it permeable Do not use this appliance if the condenser has not been fitted Emptying water container Water extracted from the laundry being dried is collected in a special container This container must be emptied after every cycle but it can also be emptied during the drying cycle Should you forget to empty the container a light will light up on the panel and the dry...

Page 14: ...t start up The door is open The plug is not fitted into the wall socket There is no electricity supply from the wall socket The selector dial is not set correctly The water container is full The start button has not been depressed The dryer does not dry properly The filter is clogged The water container is full The condenser is clogged Insufficient drying time The selected cycle is not suitable fo...

Page 15: ...e o secador não funcionar A porta está aberta A ficha não está inserida na tomada Não há corrente eléctrica O selector de secagem não está posicionado correctamente O recipiente da água está cheio A tecla de arranque não foi premida Se o secador não seca correctamente O filtro está entupido O recipiente da água está cheio O condensador está entupido O tempo de secagem é insuficiente Foi selecciona...

Reviews: