background image

Ha

Hc

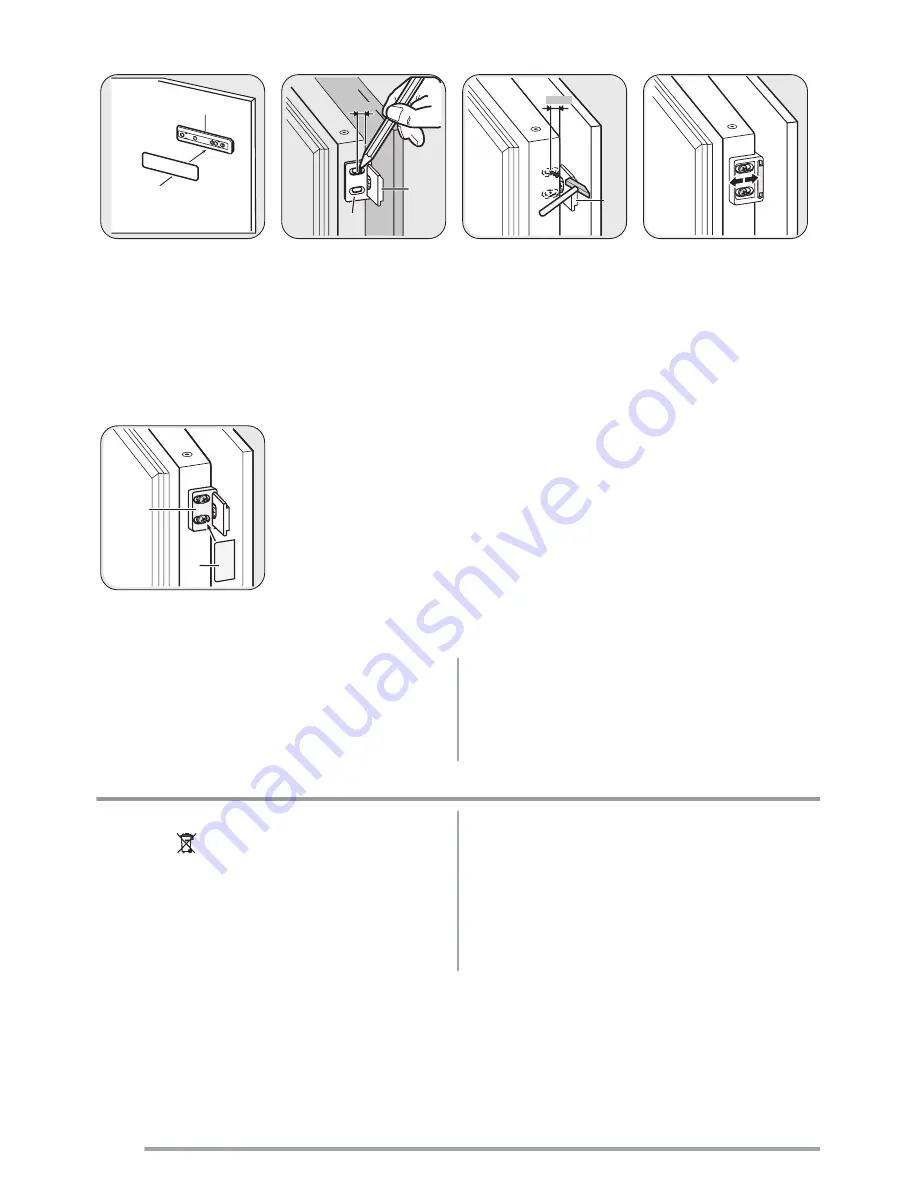
Push the part (Hc) on the

part (Ha).

Ha

Hb

8 mm

Open the appliance door

and the kitchen furniture

door at an angle of 90°.

Insert the small square (Hb)

into guide (Ha).

Put together the appliance

door and the furniture door

and mark the holes.

Ha

K

8 mm

Remove the brackets and

mark a distance of 8 mm

from the outer edge of the

door where the nail must be

fitted (K).

Hb

Place the small square on

the guide again and fix it

with the screws supplied.

Align the kitchen furniture

door and the appliance

door by adjusting the part

Hb.

Hb

Hd

Press the part (Hd) on the

part (Hb).


Do a final check to make sure that:
• All screws are tightened.
• The magnetic sealing strip is attached tightly to the

cabinet.

Important!  If the ambient temperature is low (for example,

in the Winter), the size of the gasket decreases. The size

of the gasket increases when the ambient temperature

increases.

Environmental concerns

The symbol     on the product or on its packaging

indicates that this product may not be treated as

household waste. Instead it should be taken to the

appropriate collection point for the recycling of electrical

and electronic equipment. By ensuring this product is

disposed of correctly, you will help prevent potential

negative consequences for the environment and human

health, which could otherwise be caused by inappropriate

waste handling of this product. For more detailed

information about recycling of this product, please

contact your local council, your household waste disposal

service or the shop where you purchased the product.

10


Summary of Contents for ZBA7190A

Page 1: ...EN User manual 2 Refrigerator ZBA7190A ...

Page 2: ...from children There is risk of suffocation If you are discarding the appliance pull the plug out of the socket cut the connection cable as close to the appliance as you can and remove the door to prevent playing children to suffer electric shock or to close themselves into it If this appliance featuring magnetic door seals is to replace an older appliance having a spring lock latch on the door or ...

Page 3: ...e place you bought it In that case retain packing It is advisable to wait at least four hours before con necting the appliance to allow the oil to flow back in the compressor Adequate air circulation should be around the appli ance lacking this leads to overheating To achieve sufficient ventilation follow the instructions relevant to installation Wherever possible the back of the product should be...

Page 4: ...frosting and therefore reduced energy consumption First use Cleaning the interior Before using the appliance for the first time wash the interior and all internal accessories with lukewarm water and some neutral soap so as to remove the typical smell of a brand new product then dry thoroughly Important Do not use detergents or abrasive powders as these will damage the finish Daily use Movable shel...

Page 5: ...hedoorsealsandwipecleantoensure they are clean and free from debris rinse and dry thoroughly Important Do not pull move or damage any pipes and or cables inside the cabinet Neveruse detergents abrasive powders highlyperfumed cleaning products or wax polishes to clean the interior as this will damage the surface and leave a strong odour Clean the condenser black grill and the compressor at thebacko...

Page 6: ...door The lamp is defective Refer to Replacing the lamp The compressor operates con tinually The temperature is not set correctly Set a higher temperature The door is not closed correctly Refer to Closing the door The door has been opened too fre quently Do not keep the door open longer than necessary The product temperature is too high Let the product temperature decrease to room temperature befor...

Page 7: ...e lamp cover 4 Install the lamp cover 5 Tighten the screw to the lamp cover 6 Connect the plug to the mains socket 7 Open the door Make sure that the light comes on Closing the door 1 Clean the door gaskets 2 If necessary adjust the door Refer to Installation 3 Ifnecessary replacethedefective doorgaskets Con tact the Service Center Technical data Dimension of the recess Height 1030 mm Width 560 mm...

Page 8: ...facturer declines all responsibility if the above safety precautions are not observed This appliance complies with the E E C Directives Door reversibility The door of the appliance opens to the right If you want to open the door to the left do these steps before you install the appliance Loosen the upper pin and remove the spacer Remove the upper pin and the door Remove the door Loosen the lower p...

Page 9: ...wer hinge cover in theaccessoriesbag makes sure that the distance be tweentheapplianceandthe kitchen furniture is correct Open the door Put the low er hinge cover in position I I Attach the appliance to the niche with 4 screws Push the sealing strip be tweenthe applianceandthe adjacent cabinet Remove the correct part from the hinge cover E Make sure to remove the part DX in the case of right hinge...

Page 10: ...hed tightly to the cabinet Important If the ambienttemperature is low for example in the Winter the size of the gasket decreases The size of the gasket increases when the ambient temperature increases Environmental concerns The symbol on the product or on its packaging indicates that this product may not be treated as household waste Instead it should be taken to the appropriate collection point f...

Page 11: ...11 ...

Page 12: ...www zanussi com 212719211 00 16112009 ...

Reviews: