Contents
Safety information _ _ _ _ _ _ _ _ _ _ _ _ _ _ _ _ _ _ 2
Operation _ _ _ _ _ _ _ _ _ _ _ _ _ _ _ _ _ _ _ _ _ _ 4
First use _ _ _ _ _ _ _ _ _ _ _ _ _ _ _ _ _ _ _ _ _ _ 4
Daily use _ _ _ _ _ _ _ _ _ _ _ _ _ _ _ _ _ _ _ _ _ _ 4
Helpful hints and tips _ _ _ _ _ _ _ _ _ _ _ _ _ _ _ _ 5
Care and cleaning _ _ _ _ _ _ _ _ _ _ _ _ _ _ _ _ _ _ 6
What to do if… _ _ _ _ _ _ _ _ _ _ _ _ _ _ _ _ _ _ _ 7
Technical data _ _ _ _ _ _ _ _ _ _ _ _ _ _ _ _ _ _ _ 9
Installation _ _ _ _ _ _ _ _ _ _ _ _ _ _ _ _ _ _ _ _ _ 9
Environmental concerns _ _ _ _ _ _ _ _ _ _ _ _ _ _ 13
Subject to change without notice
Safety information
In the interest of your safety and to ensure the correct use,
before installing and first using the appliance, read this
user manual carefully, including its hints and warnings.
To avoid unnecessary mistakes and accidents, it is impor-
tant to ensure that all people using the appliance are thor-
oughly familiar with its operation and safety features. Save
these instructions and make sure that they remain with the
appliance if it is moved or sold, so that everyone using it
through its life will be properly informed on appliance use
and safety.
For the safety of life and property keep the precautions of
these user's instructions as the manufacturer is not re-
sponsible for damages caused by omission.
Children and vulnerable people safety
• This appliance is not intended for use by persons (in-
cluding children) with reduced physical, sensory or
mental capabilities, or lack of experience and knowl-
edge, unless they have been given supervision or in-
struction concerning use of the appliance by a person
responsible for their safety.
Children should be supervised to ensure that they do
not play with the appliance.
• Keep all packaging well away from children. There is
risk of suffocation.
• If you are discarding the appliance pull the plug out of
the socket, cut the connection cable (as close to the
appliance as you can) and remove the door to prevent
playing children to suffer electric shock or to close
themselves into it.
• If this appliance featuring magnetic door seals is to re-
place an older appliance having a spring lock (latch)
on the door or lid, be sure to make that spring lock un-
usable before you discard the old appliance. This will
prevent it from becoming a death trap for a child.
General safety
Caution! Keep ventilation openings clear of
obstruction.
• The appliance is intended for keeping foodstuff and/or
beverages in a normal household as explained in this
instruction booklet.
• Do not use a mechanical device or any artificial means
to speed up the thawing process.
• Do not use other electrical appliances (such as ice
cream makers) inside of refrigerating appliances, un-
less they are approved for this purpose by the manu-
facturer.
• Do not damage the refrigerant circuit.
• The refrigerant isobutane (R600a) is contained within
the refrigerant circuit of the appliance, a natural gas
with a high level of environmental compatibility, which
is nevertheless flammable.
During transportation and installation of the appliance,
be certain that none of the components of the refriger-
ant circuit become damaged.
If the refrigerant circuit should become damaged:
– avoid open flames and sources of ignition
– thoroughly ventilate the room in which the appli-
ance is situated
• It is dangerous to alter the specifications or modify this
product in any way. Any damage to the cord may cause
a short-circuit, fire and/or electric shock.
Warning! Any electrical component (power cord,
plug, compressor) must be replaced by a certified
service agent or qualified service personnel to avoid haz-
ard.
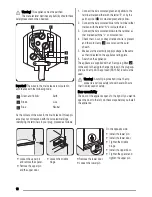
1. Power cord must not be lengthened.
2. Make sure that the power plug is not squashed or
damaged by the back of the appliance. A squashed
2

