background image

20

Zanussi 818 14 55-02/6

Cabinet is placed at a location whose ambient
temperature corresponds to the climate
classification*, for which the appliance is designed.
* See on the raiting plate on the inside of the
appliance.
The following table shows which ambient
temperature is correct for each climate classifacation.

Climate

classification

for an ambient temperature of

+10°C to +32°C

+16°C to +32°C

+18°C to +38°C

+18°C to +43°C

SN

N

ST

T

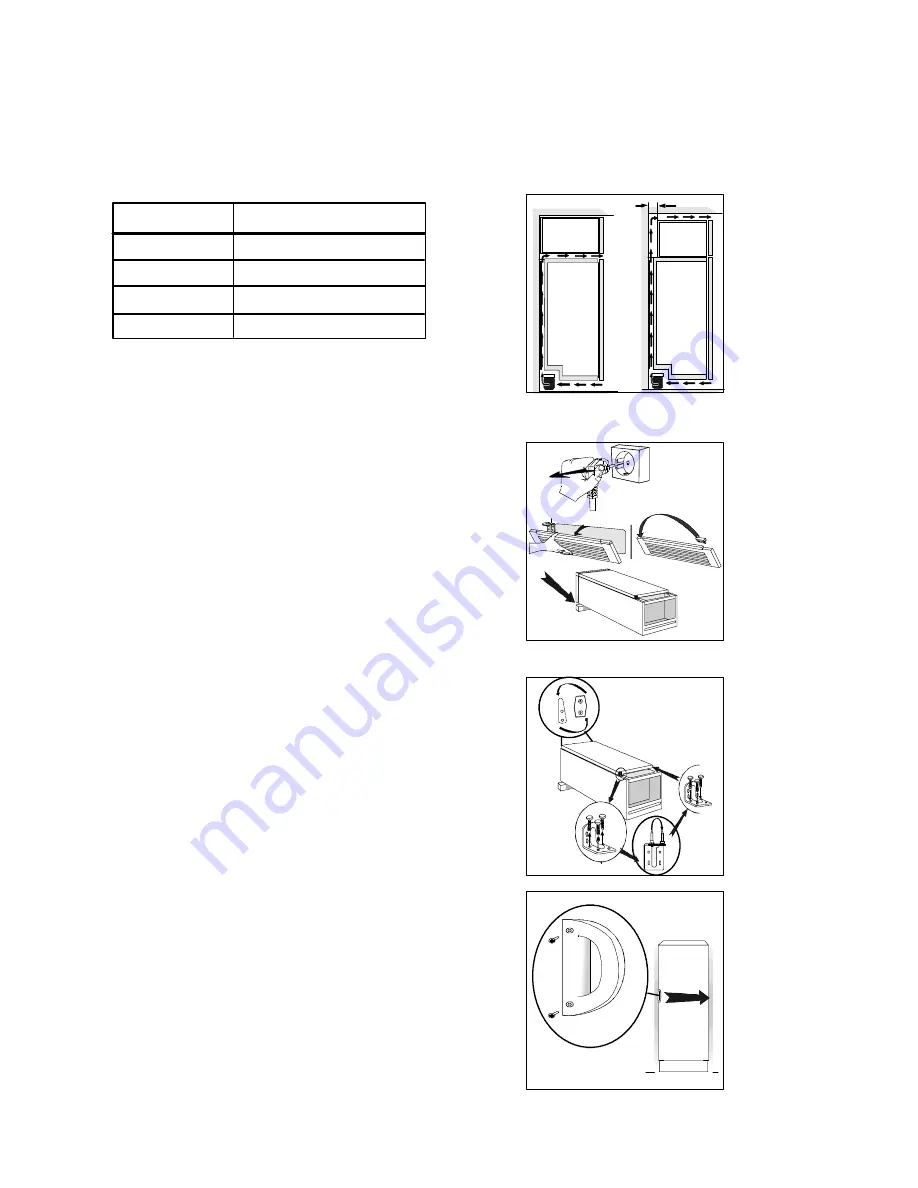
If the cabinet is placed in a corner and the side with
the hinges facing the wall, the distance between the
wall and the cabinet must be at least 10 mm to allow
the door to open enough so that the shelves can be
removed.
Check that the drain hose at the rear of the cabinet
discharges into the drip tray.
The power plug must be accessible after installation
of the cabinet.

Door Reversal

1. Close the cabinet and remove the plug from the
electrical socket.
2. Remove the ventilation grille. There is a part on
the grille that can be removed. Reposition it and put
it on the other side.
3. Put the cabinet on a wooden board when it is laid
down. Later, when raising the cabinet, it will be
easier to grip under the cabinet thanks to the board.
4. On the upper part of the cabinet. Put the hinge pin
on the other side.
On the lower part of the cabinet. Unscrew the hinge.
Move the hinge pin and plastic cover. Secure the
hinge on the other side.
5. Raise the cabinet and replace the ventilation grille.
6. Unscrew the handle. Carefully press in the plastic
plugs on the opposite side using a drift. Secure the
handle in the plug holes. Then press the supplied
plastic plugs into the holes to which the handle was
previously fitted.
7. Put the cabinet in position. Check that it stands
straight. See the section "Positioning the cabinet".

Electrical connection

Connect the cabinet to a grounded electrical outlet.
Voltage: 230 V.
Fuse: 10 A.
Refer to the rating plate on the left inside the
cabinet.

50mm

a)

b)

1

2

3

4

6

Summary of Contents for ZC345P-1

Page 1: ...FRIGORIFICO REFRIGERATOR ZC345P 1 ZC345R ZC395P 1 ZC395R INSTRUCCIONES DE USO INSTRUCTION BOOKLET 8181455 02 6 ...

Page 2: ...s in the freezer compartment The glass bottles may break The cabinet is heavy The edges and projecting parts of the cabinet may be sharp Be careful when moving the cabinet and always use gloves Child Safety Pay attention so that small children do not gain access to the operating controls or the inside of the cabinet Scrapping old cabinets When discarding the cabinet hand it over to a recycling sta...

Page 3: ...lf 8 Bottle shelf 1 2 3 6 7 8 1 1 1 4 5 3 3 7 8 1 2 3 6 7 8 Modell ZC395R ZC395P 1 1 Wire shelf 2 Glass shelf 3 Vegitable drawer 4 Egg tray 5 Dairy compartment butter box 6 Ventilation grille 7 Door shelf 8 Bottle shelf 1 1 1 1 4 5 3 3 7 7 8 Control Panel A B A Green indicator lamp Lights when the fridge is operating B Thermostat control Use to switch on and set the desired temperature in the frid...

Page 4: ...ff Allow the cabinet to run for a period of 24 hours whenever the temperature setting is changed This will allow the temperature to stabilise inside the cabinet Temperature inside the fridge A suitable temperature inside the fridge is approx 5 C If the thermostat control is set to a too cold temperature food with a high water content may start to freeze if it has been placed in the coldest places ...

Page 5: ...See the section Installation When installed correctly the cabinet will consume less energy Try to avoid keeping the door open for long periods or opening the door too frequently as warm air will enter the cabinet and cause the compressor to switch on unnecessarily often Ensure there are no obstructions preventing the door from closing properly Thaw frozen food in the fridge This will ensure safer ...

Page 6: ... pulling outward downward Then pull the grille straight out to completely remove it Defrosting the fridge The fridge is defrosted automatically every time the compressor stops Frost formation can be prevented by not putting warm foodstuff inside the cabinet avoiding frequently opening the door or keeping it open too long do not place foodstuffs directly against the cold cooling plate Cleaning Clea...

Page 7: ... will be kept on ask somebody to check it once in a while to prevent the food inside from spoiling in case of a power failure Something Not Working GB Before contacting your local Service Force Centre check the following point Problem Possible cause Remedy It is too warm inside the refrigerator Set a lower temperature Put food products in the right place inside the refrigerator See the chapter Tem...

Page 8: ...essor switches on and off The sound level varies depending on the operation of the cabinet If you feel the sound level is incorrect Make sure the pipes at the back of the cabinet not touch each other Carefully bend them if they do If the cushion spacers between the cabinet wall and pipes come loose put them back in place again Carefully follow the instructions in the chapter Installing the cabinet...

Page 9: ...y pushing the support forward along the edge of the shelf until it stops Take hold of the rear edge of the glass shelf and pull the shelf and transport support forward until the shelf tilts and the transport support can be removed Some models are fitted with a silencing pad under the cabinet Do not remove this pad Installing the cabinet To obtain the best performance from the cabinet ensure the ca...

Page 10: ...g from the electrical socket 2 Remove the ventilation grille There is a part on the grille that can be removed Reposition it and put it on the other side 3 Put the cabinet on a wooden board when it is laid down Later when raising the cabinet it will be easier to grip under the cabinet thanks to the board 4 On the upper part of the cabinet Put the hinge pin on the other side On the lower part of th...

Page 11: ...ïë åÇ ä ïå ãçïÉêëF êÉ ëçäÇ É ÅÜ óÉ ê íç î äìÉ çÑ ééêçñK rpa NQ Äáääáçå áå ãçêÉ íÜ å NRM ÅçìåíêáÉë êçìåÇ íÜÉ ïçêäÇK bä dêìéç bäÉÅíêçäìñ Éë Éä ã óçê Ñ ÄêáÅ åíÉ ÇÉä ãìåÇç ÇÉ é ê íçë é ê ä ÅçÅáå I äáãéáÉò ó ìëç ÉñíÉêáçêK j ë ÇÉ RR ãáääçåÉë ÇÉ éêçÇìÅíçë ÇÉä dêìéç bäÉÅíêçäìñ EÑêáÖçêáÑáÅçëI ÅçåÖÉä ÇçêÉëI ÅçÅáå ëI ä î Ççê ëI ëéáê ÇçêÉëI ãçíçëáÉêê ë ó Åçêí Å ëéÉÇÉëF ëÉ îÉåÇÉå Å Ç ç éçê ìå î äçê éêçñáã Çç Ç...

Reviews: