background image

Climate

class

Ambient temperature

ST

+16°C to + 38°C

T

+16°C to + 43°C

Some functional problems might occur

for some types of models when

operating outside of that range. The

correct operation can only be

guaranteed within the specified

temperature range.

LOCATION

The appliance should be installed well away from

any sources of heat, such as radiators, boilers,

direct sunlight, etc.
• Place the appliance in a horizontal position on a

solid surface.

• Make sure that the appliance stands level and

on all four feet. This can be achieved by two

adjustable feet at the bottom in front.

• To achieve the best performance, do not place

the appliance below overhanging wall units.

• Make sure the air can circulate freely around the

appliance.

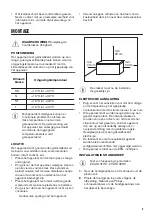
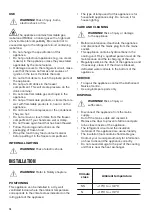
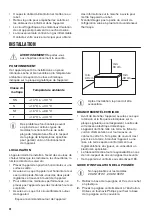
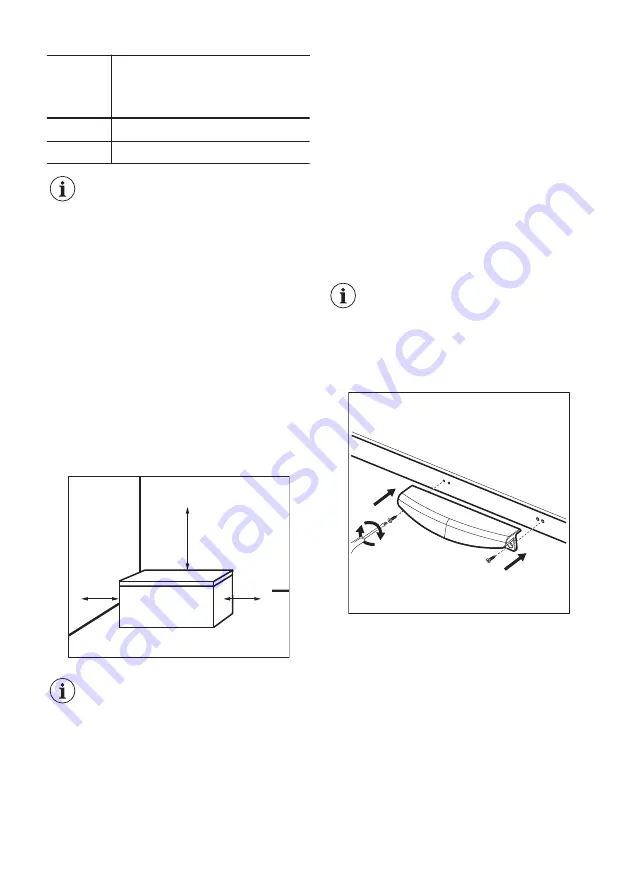
Recommended clearance around the appliance:

min. 
40 cm

min. 
40 cm

min. 
80 cm

The plug should be accessible after

the installation.

ELECTRICAL CONNECTION

• Before plugging in, ensure that the voltage and

frequency shown on the rating plate correspond

to your domestic power supply.

• The appliance must be earthed. The power

supply cable plug is provided with a contact for

this purpose. If the domestic power supply

socket is not earthed, connect the appliance to

a separate earth in compliance with current

regulations, consulting a qualified electrician.

• The manufacturer declines all responsibility if

the above safety precautions are not observed.

• This appliance complies with the E.E.C.

Directives.

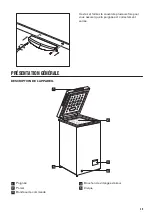
HANDLE INSTALLATION GUIDE

Not applicable for models

ZCAN10FW1, ZCAN10EW1.

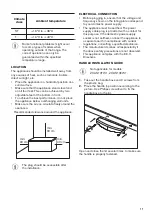
1.

Take out the handle base and 2 screws from

the plastic bag.

2.

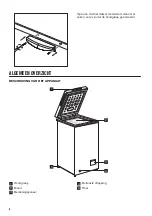
Place the handle in position according to the

picture. Use Phillips screwdriver to fix the

handle base to the lid.

Open and close the lid several times to make sure

the handle is properly fastened.

17

Summary of Contents for ZCAN10FW1

Page 1: ...CAN14FW1 ZCAN20FW1 ZCAN26FW1 ZCAN31FW1 ZCAN38FW1 NL Gebruiksaanwijzing 2 Vrieskist EN User Manual 14 Chest Freezer FR Notice d utilisation 25 Congélateur coffre DE Benutzerinformation 38 Gefriertruhe ES Manual de instrucciones 51 Arcón congelador ...

Page 2: ...an het apparaat en indien zij de eventuele gevaren begrijpen Kinderen tussen de 3 en 8 jaar oud en personen met zware en complexe beperkingen dienen altijd uit de buurt van het apparaat te worden gehouden tenzij ze voortdurend onder toezicht staan Kinderen jonger dan 3 jaar dienen mits zij voortdurend onder toezicht staan bij het apparaat uit de buurt te worden gehouden Laat kinderen niet met het ...

Page 3: ...RSCHUWING Alleen een erkende installatietechnicus mag het apparaat installeren Verwijder alle verpakkingsmaterialen Installeer en gebruik geen beschadigd apparaat Volg de installatie instructies op die zijn meegeleverd met het apparaat Pas altijd op bij verplaatsing van het apparaat want het is zwaar Gebruik altijd veiligheidshandschoenen en gesloten schoeisel Zorg ervoor dat rond het apparaat luc...

Page 4: ...udende dranken in het vriesvak Dit zal extra druk in de drankfles veroorzaken Bewaar geen ontvlambare gassen en vloeistoffen in het apparaat Plaats geen ontvlambare producten of items die vochtig zijn door ontvlambare producten in bij of op het apparaat Raak de compressor of condensator niet aan Ze zijn heet Zorg ervoor dat u nooit met natte of vochtige handen items uit het vriesvak verwijderd of ...

Page 5: ...eten staat Deze stand kan bereikt worden met de twee afstelbare voetjes die aan de voorkant en onderkant van het apparaat bevestigd zijn Plaats het apparaat niet onder overhangende wandunits om de beste prestaties te bereiken Zorg ervoor dat rond het apparaat lucht vrij kan circuleren Aanbevolen speling rond het apparaat min 40 cm min 40 cm min 80 cm De stekker moet na de installatie toegankelijk ...

Page 6: ...uit het deksel meerdere malen om er zeker van te zijn dat de handgreep goed vastzit ALGEMEEN OVERZICHT BESCHRIJVING VAN HET APPARAAT 1 5 2 3 4 1 Handgreep 2 Mand 3 Bedieningspaneel 4 Buitenste aftapplug 5 Wiel 6 ...

Page 7: ...wenste opwarming De functie inschakelen 1 Druk herhaaldelijk op de SET knop totdat de SUPER indicator oplicht 2 De functie wordt 5 seconden na de laatste druk ingesteld De SUPER functie stopt automatisch na 52 uur en dan gaat de temperatuur terug naar de vorige instelling U kunt de functie vóór die tijd handmatig stoppen door op de SET knop te drukken en de gewenste temperatuur in te stellen WERKI...

Page 8: ...WING Raadpleeg de hoofdstukken Veiligheid TIPS VOOR HET INVRIEZEN Om u te helpen om het beste van het invriesproces te maken volgen hier een paar belangrijke tips De maximale hoeveelheid voedsel die in 24 uur ingevroren kan worden is vermeld op het typeplaatje Start de SUPER functie 24 uur voordat u voedsel in het apparaat plaatst Het invriesproces duurt 24 uur Voeg gedurende deze periode niet mee...

Page 9: ...in een paar lagen krantenpapier en leg het op een koele plaats 3 Maak het apparaat en toebehoren regelmatig schoon met warm water en neutrale zeep Maak de afsluiting van het deksel voorzichtig schoon 4 Maak het apparaat volledig droog 5 Steek de stekker in het stopcontact 6 Schakel het apparaat in 7 Stel de temperatuur in op MAX en sluit het deksel Wacht twee of drie uur voordat u eerder verwijder...

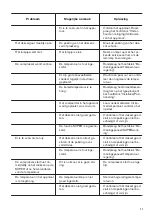
Page 10: ...araat in De stekker zit niet goed in het stopcontact Controleer of de stekker van het apparaat correct in het stopcontact zit Er staat geen spanning op het stopcontact Sluit het apparaat aan op een ander stopcontact Neem con tact op met een gekwalificeer de elektricien Het apparaat maakt lawaai Het apparaat is niet stevig en stabiel geplaatst Controleer of het apparaat sta biel staat Raadpleeg het...

Page 11: ...n het apparaat werd geplaatst was te warm Laat voedsel afkoelen tot ka mertemperatuur voordat u het opslaat Het deksel is niet goed geslo ten Controleer of het deksel goed sluit en de pakkingen niet be schadigd of vuil zijn De functie SUPER is ingescha keld Raadpleeg het hoofdstuk Be dieningspaneel SUPERwerk ing Er is te veel vorst en ijs Het deksel is niet correct ge sloten of de pakking is ver v...

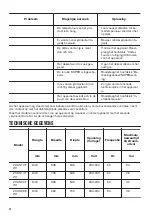
Page 12: ...lkaar geplaatst Zorg ervoor dat er koude luchtcirculatie in het apparaat is Het apparaat bevindt zich in de buurt van de warmtebron Raadpleeg het hoofdstuk In stallatie Locatie Als het apparaat nog steeds niet naar behoren werkt na uitvoeren van de bovenstaande controles neem dan contact op met het dichtstbijzijnde erkende servicecentrum Geef het model en serienummer van uw apparaat op wanneer u c...

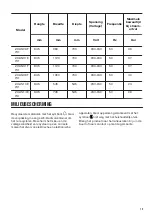
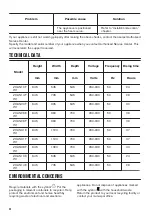
Page 13: ...5 230 240 50 24 ZCAN14E W1 845 705 545 230 240 50 26 MILIEUBESCHERMING Recycleer de materialen met het symbool Gooi de verpakking in een geschikte afvalcontainer om het te recycleren Bescherm het milieu en de volksgezondheid en recycleer op een correcte manier het afval van elektrische en elektronische apparaten Gooi apparaten gemarkeerd met het symbool niet weg met het huishoudelijk afval Breng h...

Page 14: ...nd complex disabilities shall be kept away from the appliance unless continuously supervised Children of less than 3 years of age should be kept away from the appliance unless continuously supervised Do not let children play with the appliance Children shall not carry out cleaning and user maintenance of the appliance without supervision Keep all packaging away from children and dispose of it appr...

Page 15: ...to allow the oil to flow back in the compressor Before carrying out any operations on the appliance e g reversing the door remove the plug from the power socket Do not install the appliance close to radiators or cookers ovens or hobs Do not expose the appliance to the rain Do not install the appliance where there is direct sunlight Do not install this appliance in areas that are too humid or too c...

Page 16: ...he type of lamp used for this appliance is for household appliances only Do not use it for house lighting CARE AND CLEANING WARNING Risk of injury or damage to the appliance Before maintenance deactivate the appliance and disconnect the mains plug from the mains socket This appliance contains hydrocarbons in the cooling unit Only a qualified person must do the maintenance and the recharging of the...

Page 17: ...m min 40 cm min 80 cm The plug should be accessible after the installation ELECTRICAL CONNECTION Before plugging in ensure that the voltage and frequency shown on the rating plate correspond to your domestic power supply The appliance must be earthed The power supply cable plug is provided with a contact for this purpose If the domestic power supply socket is not earthed connect the appliance to a...

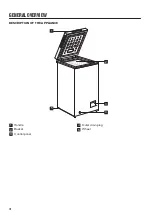
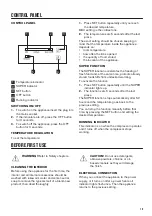
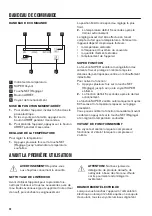
Page 18: ...GENERAL OVERVIEW DESCRIPTION OF THE APPLIANCE 1 5 2 3 4 1 Handle 2 Basket 3 Control panel 4 Outer drain plug 5 Wheel 18 ...

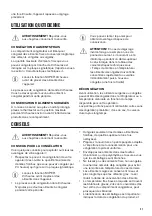
Page 19: ...d warming To activate the function 1 Press SET button repeatedly until the SUPER indicator lights up 2 The function sets 5 seconds after the last press The SUPER function stops automatically after 52 hours and the temperature goes back to the previous setting You can stop the function manually before that time by pressing the SET button and setting the desired temperature RUNNING INDICATOR This in...

Page 20: ...freezing process here are some hints The maximum quantity of food which can be frozen in 24 hours is shown on the rating plate Start the SUPER function 24 hours before placing food in the appliance The freezing process takes 24 hours No further food to be frozen should be added during this period Freeze only top quality fresh and thoroughly cleaned foodstuffs Prepare food in small portions to enab...

Page 21: ... Clean the lid seal carefully 4 Fully dry the appliance 5 Connect the mains plug to the mains socket 6 Switch on the appliance 7 Set the temperature to MAX setting and close the lid Wait two or three hours before you reload previously removed food into the appliance 8 Set the temperature to the desired setting DEFROSTING THE FREEZER CAUTION Never use sharp metal tools to scrape off frost as you co...

Page 22: ... electri cian The appliance is noisy The appliance is not supported properly Check if the appliance stands stable Refer to Installation Location chapter The appliance touches the wall or other objects Slightly move the appliance Refer to Installation Location chapter Temperature indicator flashes from left to right Temperature sensor error Contact the Authorised Serv ice Center The lid does not cl...

Page 23: ...lation chap ter The compressor does not start immediately after pressing the SUPER or after changing the temperature This is normal no error has oc curred The compressor starts after a period of time The temperature in the appli ance is too low too high The temperature regulator is not set correctly Set a higher lower tempera ture The lid is not closed properly Check if the lid closes properly and...

Page 24: ...CAN14F W1 845 705 545 230 240 50 26 ZCAN20F W1 845 905 545 230 240 50 30 ZCAN26E W1 845 960 700 230 240 50 36 ZCAN26F W1 845 960 700 230 240 50 36 ZCAN31E W1 845 1120 700 230 240 50 37 ZCAN31F W1 845 1120 700 230 240 50 37 ZCAN38F W1 845 1300 700 230 240 50 40 ZCAN10E W1 845 545 545 230 240 50 24 ZCAN14E W1 845 705 545 230 240 50 26 ENVIRONMENTAL CONCERNS Recycle materials with the symbol Put the ...

Page 25: ...pareil et de comprendre les risques encourus Les enfants entre 3 et 8 ans et les personnes ayant un handicap très important et complexe doivent être tenus à l écart de l appareil à moins d être surveillés en permanence Les enfants de moins de 3 ans doivent être tenus à l écart de l appareil à moins d être surveillés en permanence Ne laissez pas les enfants jouer avec l appareil Les enfants ne doiv...

Page 26: ... un danger CONSIGNES DE SÉCURITÉ INSTALLATION AVERTISSEMENT L appareil doit être installé uniquement par un professionnel qualifié Retirez l intégralité de l emballage N installez pas et ne branchez pas un appareil endommagé Suivez scrupuleusement les instructions d installation fournies avec l appareil Soyez toujours vigilants lorsque vous déplacez l appareil car il est lourd Utilisez toujours de...

Page 27: ...t contact d éléments chauds avec les parties en plastique de l appareil Ne placez jamais de boissons gazeuses dans le congélateur Cela engendrerait une pression sur le récipient de la boisson Ne stockez jamais de gaz ou de liquide inflammable dans l appareil Ne placez pas de produits inflammables ou d éléments imbibés de produits inflammables à l intérieur ou à proximité de l appareil ni sur celui...

Page 28: ...s la lumière directe du soleil etc Placez l appareil en position horizontale sur une surface solide Assurez vous que l appareil est horizontal et sur ses quatre pieds Servez vous des deux pieds réglables se trouvant à l avant de l appareil Pour obtenir les meilleures performances ne placez pas l appareil sous des meubles hauts en surplomb Assurez vous que l air circule librement autour de l appare...

Page 29: ...ouvercle plusieurs fois pour vous assurer que la poignée est correctement serrée PRÉSENTATION GÉNÉRALE DESCRIPTION DE L APPAREIL 1 5 2 3 4 1 Poignée 2 Panier 3 Bandeau de commande 4 Bouchon de vidange extérieur 5 Disque 29 ...

Page 30: ...ées déjà entreposées contre un réchauffement indésirable Pour activer la fonction 1 Appuyez plusieurs fois sur la touche SET Réglage jusqu à ce que le voyant SUPER s allume 2 La fonction définit 5 secondes après le dernier actionnement La fonction SUPER s arrête automatiquement après 52 heures et la température repasse au réglage précédent Vous pouvez arrêter la fonction manuellement avant ce déla...

Page 31: ...réfrigérateur ou à température ambiante en fonction du temps disponible pour cette opération Les petites portions peuvent même être cuites sans décongélation préalable dans ce cas la cuisson durera plus longtemps CONSEILS AVERTISSEMENT Reportez vous aux chapitres concernant la sécurité CONSEILS POUR LA CONGÉLATION Voici quelques conseils pour exploiter au mieux les avantages de votre appareil Resp...

Page 32: ...caustiques pour nettoyer l intérieur de votre appareil N utilisez pas de nettoyeur vapeur pour nettoyer l appareil Veillez à ne pas endommager le système de réfrigération 1 Éteignez l appareil 2 Sortez les denrées congelées enveloppez les dans plusieurs feuilles de papier journal et conservez les dans un endroit frais 3 Nettoyez régulièrement l appareil et les accessoires avec de l eau tiède et un...

Page 33: ...ez deux ou trois heures avant de remettre dans l appareil les aliments précédemment sortis 11 Réglez la température à la valeur souhaitée DÉPANNAGE AVERTISSEMENT Reportez vous aux chapitres concernant la sécurité QUE FAIRE SI Des bruits peuvent se produire pendant le fonctionnement de l appareil par exemple pétillement ronronnement craquement ou cliquetis ce qui est normal Problème Cause probable ...

Page 34: ...ctement les emballages Il y a trop de givre dans l appa reil Dégivrez l appareil Reportez vous au chapitre Entretien et nettoyage Dégivrage de l ap pareil Le couvercle est difficile à ou vrir Le joint du couvercle est sale ou collant Nettoyez le joint du couvercle L éclairage ne fonctionne pas L éclairage est défectueux Contactez le service après vente agréé pour remplacer l éclairage LED Le compr...

Page 35: ...émarre au bout d un certain temps La température à l intérieur de l appareil est trop basse élevée Le thermostat n est pas réglé correctement Augmentez réduisez la tempé rature Le couvercle n est pas correc tement fermé Vérifiez si le couvercle ferme correctement et si les joints ne sont pas endommagés ou sa les La température des produits est trop élevée Laissez refroidir les aliments à températu...

Page 36: ...quence Autonomie de fonction nement mm mm mm Volts Hz Heures ZCAN10F W1 845 545 545 230 240 50 24 ZCAN14F W1 845 705 545 230 240 50 26 ZCAN20F W1 845 905 545 230 240 50 30 ZCAN26E W1 845 960 700 230 240 50 36 ZCAN26F W1 845 960 700 230 240 50 36 ZCAN31E W1 845 1120 700 230 240 50 37 ZCAN31F W1 845 1120 700 230 240 50 37 ZCAN38F W1 845 1300 700 230 240 50 40 ZCAN10E W1 845 545 545 230 240 50 24 ZCA...

Page 37: ...les appareils portant le symbole avec les ordures ménagères Emmenez un tel produit dans votre centre local de recyclage ou contactez vos services municipaux 37 ...

Page 38: ...here Verwendung des Geräts eingewiesen wurden und die mit dem Gerät verbundenen Gefahren verstanden haben Kinder zwischen 3 und 8 Jahren und Personen mit schweren Behinderungen oder Mehrfachbehinderung müssen vom Gerät ferngehalten werden wenn sie nicht ständig beaufsichtigt werden Halten Sie Kinder unter 3 Jahren vom Gerät fern wenn sie nicht ständig beaufsichtigt werden Kinder dürfen nicht mit d...

Page 39: ...TSANWEISUNGEN MONTAGE WARNUNG Die Montage des Geräts darf nur von einer qualifizierten Fachkraft durchgeführt werden Entfernen Sie das gesamte Verpackungsmaterial Montieren Sie ein beschädigtes Gerät nicht und benutzen Sie es nicht Halten Sie sich an die mitgelieferte Montageanleitung Seien Sie beim Umsetzen des Gerätes vorsichtig da es sehr schwer ist Tragen Sie stets Sicherheitshandschuhe und fe...

Page 40: ...tte sicher dass es keine Flammen und Zündquellen im Raum gibt Belüften Sie den Raum Stellen Sie keine heißen Gegenstände auf die Kunststoffteile des Geräts Legen Sie Erfrischungsgetränke nicht in das Gefrierfach Dadurch entsteht Druck auf den Getränkebehälter Bewahren Sie keine entzündbaren Gase und Flüssigkeiten im Gerät auf Laden Sie keine entflammbaren Produkte oder Gegenstände die mit entflamm...

Page 41: ...ngegebenen Temperaturbereichs gewährleistet STANDORT Stellen Sie das Gerät weit entfernt von Wärmequellen wie Heizungskörpern Boilern direktem Sonnenlicht usw auf Stellen Sie das Gerät in horizontaler Position auf einen festen Untergrund Achten Sie darauf dass das Gerät waagerecht und auf allen vier Füßen steht Dies lässt sich mit zwei Schraubfüßen am vorderen Sockel des Gerätes erreichen Um einen...

Page 42: ...e Griffgrundplatte und 2 Schrauben aus dem Kunststoffbeutel 2 Bringen Sie den Griff gemäß Abbildung in Position Bringen Sie die Griffgrundplatte am Deckel mit einem Kreuzschlitzschraubendreher an Öffnen und schließen Sie den Deckel mehrmals um sicherzustellen dass der Griff richtig angebracht ist 42 ...

Page 43: ...GESAMTANSICHT GERÄTEBESCHREIBUNG 1 5 2 3 4 1 Griff 2 Korb 3 Bedienfeld 4 Äußerer Ablassstopfen 5 Rad 43 ...

Page 44: ...ittel vor unerwünschter Erwärmung schützt Einschalten der Funktion 1 Drücken Sie die Taste SET wiederholt bis die Anzeige SUPER leuchtet 2 Die Funktion wird 5 Sekunden nach der letzten Betätigung eingestellt Nach 52 Stunden wird die Funktion SUPER automatisch ausgeschaltet und die Temperatur kehrt zur vorherigen Einstellung zurück Sie können die Funktion manuell vor Ablauf dieser Zeit durch Drücke...

Page 45: ...eile können sogar direkt aus dem Gefriergerät entnommen und anschließend sofort gekocht werden In diesem Fall dauert der Garvorgang allerdings etwas länger TIPPS UND HINWEISE WARNUNG Siehe Kapitel Sicherheitshinweise HINWEISE ZUM EINFRIEREN Im Folgenden finden Sie wertvolle Tipps für das optimale Einfrieren von Lebensmitteln Die maximale Menge an Lebensmitteln die in 24 Stunden eingefroren werden ...

Page 46: ...n Sie das Gerät nicht mit einem Dampfstrahlreiniger Bitte achten Sie darauf das Kühlsystem nicht zu beschädigen 1 Schalten Sie das Gerät aus 2 Entfernen Sie das gesamte Gefriergut packen Sie es in mehrere Schichten Zeitungspapier und lagern Sie es an einen kühlen Ort 3 Reinigen Sie Gerät und Zubehörteile regelmäßig mit warmem Wasser und neutraler Seife Wischen Sie vorsichtig die Deckeldichtung ab ...

Page 47: ... schließen Sie den Deckel Nachdem das Gerät zwei bis drei Stunden in Betrieb ist können Sie die ausgelagerten Lebensmittel wieder in das Gerät hineinlegen 11 Stellen Sie die gewünschte Temperatur ein FEHLERSUCHE WARNUNG Siehe Kapitel Sicherheitshinweise WAS TUN WENN Während des Gerätebetriebs können Geräusche auftreten z B Blubbern Surren Knacken oder Klicken Diese sind normal Störung Mögliche Urs...

Page 48: ...t hat sich zu viel Reif oder Eis gebildet Tauen Sie das Gerät ab Siehe Kapitel Reinigung und Pflege Abtauen des Geräts Der Deckel lässt sich nur schwer öffnen Die Deckeldichtung ist ver schmutzt oder klebrig Reinigen Sie die Deckeldich tung Die Lampe funktioniert nicht Die Lampe ist defekt Kontaktieren Sie den autori sierten Kundendienst und las sen Sie die LED Leuchte aus tauschen Der Kompressor ...

Page 49: ...h tig geschlossen ist und die Dichtungen nicht beschädigt oder verschmutzt sind Die Temperatur der zu kühlen den Lebensmittel ist zu hoch Lassen Sie die Lebensmittel vor dem Einlagern auf Raum temperatur abkühlen Es wurden zu viele Produkte auf einmal eingelegt Legen Sie weniger Produkte auf einmal ein Die Reifschicht ist dicker als 4 5 mm Tauen Sie das Gerät ab Siehe Kapitel Reinigung und Pflege ...

Page 50: ...40 50 37 ZCAN31F W1 845 1120 700 230 240 50 37 ZCAN38F W1 845 1300 700 230 240 50 40 ZCAN10E W1 845 545 545 230 240 50 24 ZCAN14E W1 845 705 545 230 240 50 26 UMWELTTIPPS Recyceln Sie Materialien mit dem Symbol Entsorgen Sie die Verpackung in den entsprechenden Recyclingbehältern Recyceln Sie zum Umwelt und Gesundheitsschutz elektrische und elektronische Geräte Entsorgen Sie Geräte mit diesem Symb...

Page 51: ...tener alejados del aparato a los niños entre 3 y 8 años así como a las personas con minusvalías importantes y complejas salvo que estén bajo supervisión continua Es necesario mantener alejados del aparato a los niños de menos de 3 años salvo que estén bajo supervisión continua No deje que los niños jueguen con el aparato La limpieza y mantenimiento de usuario del aparato no podrán ser realizados p...

Page 52: ...empre guantes de protección y calzado cerrado Asegúrese de que el aire pueda circular alrededor del aparato En la primera instalación otras invertir el sentido de apertura de la puerta espere al menos 4 horas antes de conectar el aparato a la alimentación eléctrica Esto es para permitir que el aceite regrese al compresor Desenchufe siempre el aparato antes de llevar a cabo cualquier operación por ...

Page 53: ...dor Están calientes No retire ni toque elementos del compartimento congelador con las manos húmedas o mojadas No vuelva a congelar alimentos que se hayan descongelado Siga las instrucciones del envase de los alimentos congelados Envuelva los alimentos en cualquier material adecuado antes de ponerlos en el congelador LUZ INTERNA ADVERTENCIA Riesgo de descarga eléctrica El tipo de luz utilizada para...

Page 54: ... no coloque el aparato debajo de los muebles colgados Asegúrese de que el aire pueda circular libremente alrededor del aparato Espacio libre recomendado alrededor del aparato min 40 cm min 40 cm min 80 cm El enchufe debe ser accesible después de la instalación CONEXIÓN ELÉCTRICA Antes de conectar el aparato compruebe que el voltaje y la frecuencia indicados en la placa de datos técnicos se corresp...

Page 55: ...cierre la tapa varias veces para asegurarse de que la manilla esté bien sujeto DESCRIPCIÓN GENERAL DESCRIPCIÓN DEL APARATO 1 5 2 3 4 1 Tirador 2 Cesto 3 Panel de control 4 Tapón de drenaje exterior 5 Rueda 55 ...

Page 56: ...ivar la función 1 Pulse el botón SET repetidamente hasta que se encienda el indicador SUPER 2 La función se ajusta 5 segundos después de la última pulsación La función SUPER se detiene automáticamente después de 52 horas y la temperatura vuelve al ajuste anterior Puede detener la función manualmente antes de ese tiempo presionando el botón SET y ajustando la temperatura deseada INDICADOR DE FUNCIO...

Page 57: ...diendo del tiempo de que se disponga Es posible incluso cocinar piezas pequeñas congeladas tomadas directamente del congelador en tal caso el tiempo de cocción será más prolongado CONSEJOS ADVERTENCIA Consulte los capítulos sobre seguridad CONSEJOS SOBRE LA CONGELACIÓN Estos consejos son importantes para poder aprovechar al máximo el proceso de congelación La cantidad máxima de alimentos que puede...

Page 58: ...iar el aparato Procure no dañar el sistema de refrigeración 1 Apagar el aparato 2 Retire los alimentos congelados envuélvalos en varias hojas de papel de periódico y colóquelos en un sitio fresco 3 Limpie periódicamente el aparato y los accesorios con agua templada y jabón neutro Limpie cuidadosamente el sello de la tapa 4 Seque a fondo el aparato 5 Conecte el enchufe a la toma de corriente 6 Enci...

Page 59: ...El aparato no funciona El aparato se apaga Encienda el electrodoméstico El aparato no está correcta mente enchufado a la toma de corriente Compruebe si el aparato está conectado correctamente No hay tensión en la toma de corriente Conecte el aparato a otra to ma de corriente Llame a un electricista cualificado El aparato hace ruido El aparato no está bien apoya do en el suelo Compruebe que los sop...

Page 60: ... placa de carac terísticas o en el capítulo Ins talación Posición Los alimentos introducidos en el aparato estaban demasiado calientes Permita que los alimentos se enfríen a temperatura ambien te antes de almacenarlos La tapa no se ha cerrado co rrectamente Compruebe si la tapa cierra correctamente y si las juntas no están dañadas o sucias La función SUPER está activa da Consulte el capítulo Panel...

Page 61: ...stá activa da Consulte el capítulo Panel de control función SUPER Los productos para congelar estaban demasiado cerca unos de otros Compruebe que el aire frío cir cula libremente en el aparato El aparato está situado cerca de la fuente de calor Consulte el capítulo Instala ción Ubicación Si después de las comprobaciones anteriores el aparato no funciona correctamente póngase en contacto con el cen...

Page 62: ...45 230 240 50 24 ZCAN14E W1 845 705 545 230 240 50 26 ASPECTOS MEDIOAMBIENTALES Recicle los materiales con el símbolo Coloque el material de embalaje en los contenedores adecuados para su reciclaje Ayude a proteger el medio ambiente y la salud pública así como a reciclar residuos de aparatos eléctricos y electrónicos No deseche los aparatos marcados con el símbolo junto con los residuos domésticos...

Page 63: ...63 ...
Page 64: ...WWW ZANUSSI COM SHOP 804182721 A 482019 ...

Reviews: