background image

12

Preheat the oven the knob on position  

 for

about 10 min.

Insert the meal.

Top oven element only


This function is suitable for finishing cooked
dishes, e.g. lasagne, shepherds pie, cauliflower
cheese etc.

It is not necessary to preheat the oven.

Insert the meal on the level superior.

Turn the knob on position 

.

During use the appliance becomes hot.

Care should be taken to avoid touching
heating elements inside the oven.

Main pilot light

This light will illuminate when the oven function
control knob is set or


the hotplate knob is turned

on and remains lit while these are in use.

Hints and Tips

There should always be at least 2.5 cm between
the top of the food and the element. This gives
the best cooking results and allows room for rise
in yeast mixtures, Yorkshire puddings, etc.
When cooking cakes, pastry, scones, bread,
etc., place the tins or baking trays centrally
below element.

Ensure that food is placed centrally on the shelf
and there is sufficient room around the baking
tray/dish to allow for maximum circulation.

Stand dishes on suitably sized baking trays to
prevent spillage onto the oven base and to help
reduce cleaning.

The material and finish of the baking tray and
dishes will affect the degree of base browning of
the food.

Enamelware, dark, or heavy utensils increase
base browning. Shiny aluminium or polished
steel trays reflect the heat away and give less
base browning.

DO NOT 

place dishes directly onto the oven

base as it becomes very hot and damage may
occur.

DO NOT 

use the grill pan or meat tin as a

baking tray as this will increase base browning
of the food.
For economy leave the door open for the
shortest possible time, particularly when placing
food into a preheated oven.

Grilling 

 When grilling, the accessible parts of

the appliance are hot and the appliance
should not be left unattended. Take care that
children do not play near it.

The grill pan will become hot during

use, always use oven gloves when removing
or replacing a hot grill pan.

All grilling must be carried out with the

oven door closed 

.

To switch on the grill, turn the oven

function control knob to GRILL.

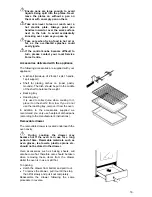
Most foods should be placed on the grid in the
grill pan to allow maximum circulation of air to lift
the food out of the fats and juices. Food such as
fish, liver and kidneys may be placed directly on
the grill pan, if preferred.

Adjust the grid and grill pan runner position to
allow for different thicknesses of food.

Food should be thoroughly dried before grilling
to minimise splashing. Brush lean meats and
fish lightly with a little oil or melted butter to keep
them moist during cooking.

Accompaniments such as tomatoes and
mushrooms may be placed underneath the grid
when grilling meats.

When toasting bread, we suggest that the top
runner position is used with the grid in its 'high'
position.

Preheat the grill on a full setting for a few
minutes before sealing steaks or toasting. Adjust
the heat setting and the shelf as necessary,
during cooking.

The food should be turned over during cooking,
as required.

NOTE: For safety in use, the grill element is
controlled by the thermostat. During cooking,
the grill cycles on and off to prevent
overheating.

Cooking time depends on the thickness of the
meat and not on its weight.

Summary of Contents for ZCC 5607

Page 1: ...INSTRUCTION BOOK MIXED FUEL COOKER ZCC 5607 ZCC 5608B HR SI ...

Page 2: ...g device Do not use this cooker if it is in contact with water Do not operate the cooker with wet hands An intensive and prolonged use of the cooker could necessitate a supplementary airing by opening the window or a more effective ventilation by increasing the mechanical device power if there is When using other electrical appliances ensure the cable does not come into contact with the hot surfac...

Page 3: ...he oven Electric oven Hints and Tips Grilling Rotisserie Using the hob Maintenance and cleaning Oven bulb remplacement Something not working Guarantee conditions After sales service 3 4 4 5 6 7 9 10 11 12 12 13 14 17 18 19 20 20 How to read the instruction book The symbols below will guide you when reading the instruction book Safety instructions Step by Step Operation Advice and recommendations E...

Page 4: ...eating element Top heating element Grill element Light in the oven Turn spit Sound power level Minute minder Cleaning 700 W 1000 W 1900 W Lamp 25W type E14 4 W 42 dB mechanic manual Total oven rating 1929 W Supply Rated voltage Rated frequency 230 400 V 50 Hz Accessories Oven shelf Roasting tray Backing tray Enamelled Enamelled Total cooker rating 3429 6 W This appliance complies with the followin...

Page 5: ...ion The adjusting conditions of this appliance are mentioned on the rating plate Connection to gas supply Check that the gas flow and the diameter of the supply pipe is sufficient to supply all the appliances of the installation Check that all connections are tight Install an accessible and visible gas tap to isolate the appliance LOCATION The cooker has been registered as a Class X appliance acco...

Page 6: ...maged it must be replaced by the manufacturer or its service agent or a similarly qualified person in order to avoid a hazard After installation and connecting the cable must be placed so that it cannot at any point reach a temperature of more than 50 C above the ambient temperature supply cable Before connecting check that fuse and household electric installation can bear the charge of the applia...

Page 7: ...s to the unit Gas feeding pipe fitting is Gc 1 2 If the pipe to reach the cock must run behind the range connection to the gas supply should be carried out using only rigid pipes in conformity with rules in force Connection using flexible non metal pipes When the connection can be easily inspected in its full extent there is the chance to use a flexible pipe according to the rules in force The fle...

Page 8: ...S NOM POWER kW Reduced power kW By pass mm TYPE OF GAS PRESSURE mbar NOZZLE DIAM mm m3 h g h RAPID 3 00 0 72 0 42 Natural gas G20 Butane G30 Propane G31 20 28 30 37 1 19 0 88 0 88 0 267 218 1 214 2 SEMI RAPID 2 00 0 43 0 32 Natural gas G20 Butane G30 Propane G31 20 28 30 37 0 96 0 71 0 71 0 190 145 4 142 8 AUXILIARY 1 00 0 35 0 29 Natural gas G20 Butane G30 Propane G31 20 28 30 37 0 70 0 50 0 50 0...

Page 9: ...rrectly adjusted when the flame is stable silent and goes out without any noise When changing the type of gas check that the minimum level is correct The air admission is correct when the flame is about 4 mm in length The top burners do not need adjustment of primary air Check that turning the knob quickly from the maximum position to the minimum one the flame does not go out Hob burners To adjust...

Page 10: ...eft burner control knob 3 Front right burner control knob 4 Back right burner control knob 5 Ignition switch 6 Minute minder 7 Main pilot light 8 Oven thermostat pilot light 9 Oven function control knob Hob 1 2 4 3 1 Hotplate 145 2 Front left burner semi rapid 3 Front right burner rapid 4 Back right burner auxiliary ...

Page 11: ...ted by a suitably rated fuse or circuit breaker The rating of the cooker is given on the rating plate About condensation and steam When food is heated it produces steam in the same way as a boiling kettle The oven vents allow some of this steam to escape However always stand back from the oven when opening the oven door to allow any build up of steam or heat to release If the steam comes into cont...

Page 12: ... between those marked The maxim setting is particularly suitable for grilling Oven thermostat pilot light Once the oven temperature has been selected the oven thermostat pilot light will come on and remain on until the oven has reached the correct setting after that it will go on and off with the thermostat showing how the temperature is being maintained If you want more heat coming from the botto...

Page 13: ...eat tin as a baking tray as this will increase base browning of the food For economy leave the door open for the shortest possible time particularly when placing food into a preheated oven Grilling When grilling the accessible parts of the appliance are hot and the appliance should not be left unattended Take care that children do not play near it The grill pan will become hot during use always us...

Page 14: ...e and close the door 6 Select grill with the function control knob and check that the spit is rotating 7 When the food is cooked switch off the grill and refit the handle Remove the skewer from the motor after releasing the front support bracket It is advisable to remove the grill pan at the same time to ensure that any dripping fat is contained in the pan 8 It is advisable to wear protective oven...

Page 15: ...ner has ignited until the safety valve automatically keeps the burner lit Upon ignition adjust the flame as required If for any reason the flame should extinguish turn off the relevant control knob leave for at least one minute and then re ignite If after a few attempts the burner does not ignite check that the burner ring and its cap are correctly positioned Extinguishing of burners Turn the knob...

Page 16: ... flat bottom pots We recommend the flame is lowered as soon as the liquid starts boiling For a correct ignition always keep the burner ring and the spark plugs clean The following diameter pans can be used Good use Bad use Power waste Diameter mm Burner Power kW min max Rapid 3 00 160 280 Semi Rapid 2 00 140 240 Auxiliary 1 00 120 180 Hints and Tips Saucepans for use on solid hotplates should have...

Page 17: ... shelf to balance the weight Backing tray Roasting tray It is used to collect juice when cooking in it place it on the shelf 2 from low If you do not use the roasting tray remove it from the oven In addition to the accessories supplied we recommend you only use heatproof dishes pans according to the manufacturer s instructions Removable drawer The removable drawer is located underneath the oven ca...

Page 18: ...ing using a proprietary oven cleaner Oven Shelves and shelf support To clean the oven shelves and shelf support soak in warm soapy water and remove stubborn marks with a well wetted soap impregnated pad Rinse well and dry with a soft cloth Cleaning the Oven door For a more complete cleaning of the oven door it is advisable to disassemble it in the following way Open the door completely Turn the tw...

Page 19: ...excess Heat the hotplate on a medium setting for 1 minute To apply restorative agent first heat the hotplate on a medium setting for 30 seconds then turn off Apply a very thin coating of Collo Electrol using the applicator Heat a hotplate on a high setting for 2 3 minutes to cure Some smoke will occur this is normal and nontoxic NB this product is a restorative agent not a cleanser It is available...

Page 20: ...aning The gas ring burns unevenly Check that The main jet is not blocked and the ring burner is clean of food particles The burner cap and ring burner have been replaced correctly after cleaning The oven does not come on Check check if a cooking function temperature has been selected correctly the socket switch or the switch from the mains supply to the cooker are ON It takes too long to finish th...

Page 21: ...e or wrong installation non conforming to the rules imposed by the power gas distributor if the user modified the material or took off the marking or the serial numbers if the person who made the repairing is not certified by the manufacturer or the dealer if the appliance was used for commercial or industrial purpose or other household purposes than what it was conceived for if the appliance was ...

Reviews: