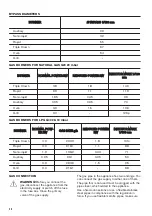
background image

GAS CONNECTION
• All gas connections must be made by a qualified

person.

• Before installation, make sure that the local

distribution conditions (nature of the gas and

gas pressure) and the adjustment of the

appliance are compatible.

• Make sure that there is air circulation around the

appliance.

• The information about the gas supply is on the

rating plate.

• This appliance is not connected to a device,

which evacuates the products of combustion.

Make sure to connect the appliance according

to current installation regulations. Follow the

requirements for adequate ventilation.
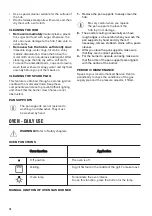
USE

WARNING! Risk of injury and burns.

Risk of electrical shock.

CAUTION! The use of a gas cooking

appliance results in the production of

heat, moisture and products of

combustion in the room in which it is

installed. Ensure that the kitchen is

well ventilated especially when the

appliance is in use.

Prolonged intensive use of the

appliance may require additional

ventilation, for example the increasing

of mechanical ventilation where

present, additional ventilation to safely

remove the products of combustion to

outside (external) air whilst also

providing room air changes with

additional ventilation. Consult a

qualified person before installation of

the additional ventilation.

• Do not change the specification of this

appliance.

• Make sure that the ventilation openings are not

blocked.

• Do not let the appliance stay unattended during

operation.

• Deactivate the appliance after each use.

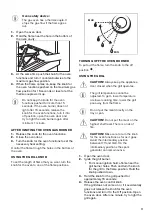
• Be careful when you open the appliance door

while the appliance is in operation. Hot air can

release.

• Do not operate the appliance with wet hands or

when it has contact with water.

• Do not use the appliance as a work surface or

as a storage surface.

WARNING! Risk of fire and explosion

• Fats and oil when heated can release flammable

vapours. Keep flames or heated objects away

from fats and oils when you cook with them.

• The vapours that very hot oil releases can cause

spontaneous combustion.

• Used oil, that can contain food remnants, can

cause fire at a lower temperature than oil used

for the first time.

• Do not put flammable products or items that are

wet with flammable products in, near or on the

appliance.

• Do not let sparks or open flames to come in

contact with the appliance when you open the

door.

• Open the appliance door carefully. The use of

ingredients with alcohol can cause a mixture of

alcohol and air.

WARNING! Risk of damage to the

appliance.

• To prevent damage or discoloration to the

enamel:

– do not put ovenware or other objects in the

appliance directly on the bottom.

– do not put aluminium foil on the appliance

or directly on the bottom of cavity.

– do not put water directly into the hot

appliance.

– do not keep moist dishes and food in the

appliance after you finish the cooking.

– be careful when you remove or install the

accessories.

• Discoloration of the enamel or stainless steel

has no effect on the performance of the

appliance.

• Use a deep pan for moist cakes. Fruit juices

cause stains that can be permanent.

• Do not keep hot cookware on the control panel.

• Do not let cookware boil dry.

• Be careful not to let objects or cookware fall on

the appliance. The surface can be damaged.

• Never leave a burner on with empty cookware or

without cookware.

• Cookware made of cast iron, aluminium or with

a damaged bottom can cause scratches. Always

lift these objects up when you have to move

them on the cooking surface.

• Provide good ventilation in the room where the

appliance is installed.

• Use only stable cookware with the correct

shape and diameter larger than the dimensions

of the burners.

5

Summary of Contents for ZCG91016XA

Page 1: ...GETTING STARTED EASY User Manual ZCG91016XA EN User Manual Cooker EG ...

Page 2: ...the use of the appliance in a safe way and understand the hazards involved Children of less than 8 years of age and persons with very extensive and complex disabilities shall be kept away from the appliance unless continuously supervised Children should be supervised to ensure that they do not play with the appliance Keep all packaging away from children and dispose of it appropriately WARNING The...

Page 3: ... g a fire blanket or lid CAUTION The cooking process has to be supervised A short term cooking process has to be supervised continuously WARNING Danger of fire Do not store items on the cooking surfaces Do not use a steam cleaner to clean the appliance Do not use harsh abrasive cleaners or sharp metal scrapers to clean the glass door or the glass of hinged lids of the hob since they can scratch th...

Page 4: ...pliances or units with the same height Do not install the appliance adjacent to a door or under a window This prevents hot cookware to fall from the appliance when the door or the window is opened ELECTRICAL CONNECTION WARNING Risk of fire and electric shock All electrical connections should be made by a qualified electrician The appliance must be earthed Make sure that the parameters on the ratin...

Page 5: ...rface or as a storage surface WARNING Risk of fire and explosion Fats and oil when heated can release flammable vapours Keep flames or heated objects away from fats and oils when you cook with them The vapours that very hot oil releases can cause spontaneous combustion Used oil that can contain food remnants can cause fire at a lower temperature than oil used for the first time Do not put flammabl...

Page 6: ...all burners off Do not close the lid until the hob and oven are completely cold Glass lid can shatter when heated if applicable Keep the lid glass open while the oven is in operation if applicable INTERNAL LIGHTING WARNING Risk of electric shock Concerning the lamp s inside this product and spare part lamps sold separately These lamps are intended to withstand extreme physical conditions in househ...

Page 7: ...er 2 Semi rapid burner 3 Semi rapid burner 4 Triple Crown burner 5 Rapid burner ACCESSORIES Wire shelf For cookware cake tins roasts Storage compartment The storage compartment is below the oven cavity To use the compartment lift the lower front door then pull it down WARNING The storage compartment can become hot when the appliance operates BEFORE FIRST USE WARNING Refer to Safety chapters INITIA...

Page 8: ...er installation or a power cut It is normal In the absence of electricity you can ignite the burner manually Ignition of a hob burner with the thermocouple For manual ignition put the flame near the burner Push the knob for the hob down and turn it counterclockwise to the maximum gas flow position For ignition with spark generator button push and hold the spark generator button At the same time pu...

Page 9: ...ge of the cooktop CAUTION Make sure that the pots are placed centrally on the burner in order to get the maximum stability and a lower gas consumption DIAMETERS OF COOKWARE WARNING Use cookware with diameters applicable to the size of burners Burner Diameter of cookware mm Triple Crown 160 260 Rapid 160 240 Semi rapid 140 240 Auxiliary 120 180 ENERGY SAVING If it is possible always put the lids on...

Page 10: ...he pan supports are not resistant to washing in a dishwasher They must be washed by hand 1 Remove the pan supports to easily clean the hob Be very careful when you replace the pan supports to prevent the hob top from damage 2 The enamel coating occasionally can have rough edges so be careful when you wash the pan supports by hand and dry them If necessary remove stubborn stains with a paste cleane...

Page 11: ...of flame that you want turn the knob for the oven to one of the flame positions MAX MIN TURNING OFF THE OVEN BURNER To put out the flame turn the knob to the off position USING THE GRILL CAUTION Always keep the appliance door closed when the grill operates The grill temperature cannot be adjusted To get a lower temperature or slower cooking time lower the grill pan away from the flame Do not put t...

Page 12: ...ays stand back from the appliance when you open the appliance door while cooking To decrease the condensation operate the appliance for 10 minutes before cooking Clean the moisture after each use of the appliance Do not put the objects directly on the appliance floor and do not put aluminium foil on the components when you cook This can change the baking results and cause damage to the enamel BAKI...

Page 13: ... Preheating time min Time min Shelf position Lasagna 1 5 2 5 1 2 10 40 50 3 Cannelloni 1 5 2 5 1 2 10 30 40 3 Potato gratin 1 5 2 5 1 2 10 85 95 3 Macaroni oven 1 5 2 5 1 2 10 40 50 3 Kebab Hala 1 5 2 5 1 2 10 40 50 3 Meat Food Quantity kg Knob position Preheating time min Time min Shelf position Sheep 1 5 2 0 2 10 80 1001 3 Chicken 1 2 1 8 2 10 85 1051 3 Duck 1 8 2 5 2 10 90 1101 3 Goose 2 5 3 0 ...

Page 14: ...ntity kg Knob position Preheating time min Time min Shelf position Biscuits 0 3 0 5 1 2 10 10 15 3 Flat cake 0 6 1 0 1 2 10 25 35 3 Orange cake 1 0 1 5 1 2 10 110 120 3 Feter Mshalted 1 0 1 5 1 2 10 45 55 3 Salty cake 1 0 1 2 1 2 10 45 55 3 Yeast cake 1 0 1 5 1 2 10 35 45 3 Apple pie 1 0 1 5 1 2 10 70 90 3 Grilling Food Quantity kg Grill position Preheating time min Time min Shelf position Sheep c...

Page 15: ...ause damage to the nonstick coating Clean the moisture from the cavity after each use STAINLESS STEEL OR ALUMINIUM OVENS Clean the oven door with a damp cloth or sponge only Dry it with a soft cloth Do not use steel wool acids or abrasive materials as they can damage the oven surface Clean the oven control panel with the same precautions CLEANING THE OVEN DOOR The oven door has two panels of glass...

Page 16: ...ent to open the inner door Hold the outer door and push the inner door against the top edge of the door Lift the inner door 2 2 3 7 Clean the oven door with water and soap Clean the inner side of the door Dry the oven door carefully When the cleaning is completed install the glass panels and the oven door To install the oven door do the above steps in the opposite sequence 4 4 6 6 5 6 Make sure th...

Page 17: ... lamp 1 Turn the lamp glass cover to remove it 2 Clean the glass cover 3 Replace the lamp with a suitable 300 C heat resistant lamp 4 Install the glass cover TROUBLESHOOTING WARNING Refer to Safety chapters WHAT TO DO IF Problem Possible cause Remedy There is no spark when you try to activate the spark generator The hob is not connected to an electrical supply or it is con nected incorrectly Check...

Page 18: ...when they heat up or cool down The noises are normal The flame colour is orange or yellow The flame can look orange or yellow in some areas of the burner This is normal The lamp does not operate The lamp is defective Replace the lamp Steam and condensation settle on the food and in the cavity of the oven You left the dish in the oven for too long Do not leave the dishes in the oven for longer than...

Page 19: ...distance of about 1 cm between the appliance and the back wall to make sure that the lid opens For minimal distances for fitting check the table A C D D B Minimum distances Dimension mm A 400 Dimension mm B 650 C 150 D 20 TECHNICAL DATA Voltage 220 240 V Frequency 50 60 Hz Appliance class 1 Dimension mm Height 850 870 Width 900 Depth 600 OTHER TECHNICAL DATA Appliance category II2H3B P Gas origina...

Page 20: ...90 9 1 8 101o Rapid 3 0 218 1 1 1 88 Semi rapid 1 9 138 2 0 43 71 Auxiliary 0 95 69 1 0 35 50 Oven 3 9 283 6 1 5 95 Grill 3 0 218 1 88 GAS CONNECTION WARNING Before you connect the gas disconnect the appliance from the electricity supply or switch off the fuse in the fuse box Close the primary valve of the gas supply The gas pipe in the appliance has two endings You can connect the gas supply to e...

Page 21: ... the fastening clamps are not rusted expired term is not due If one or more defects are visible do not repair the pipe but replace it The gas supply ramp is on the rear side of the control panel ADJUSTMENT TO DIFFERENT TYPES OF GAS WARNING Let only an authorized person do the adjustment to different types of gas The appliance is set for liquid gas You can change it to natural gas with the correct ...

Page 22: ...tural gas to liquid gas 1 Fully tighten the bypass screw 2 Put the knob back Changing from liquid gas to natural gas 1 Unscrew approximately one turn the bypass screw position A 2 Put the knob for the hob back 3 Connect the appliance to the electricity WARNING Put the mains plug into the mains socket only if all parts are back into their initial position There is a risk of injury 4 Light the burne...

Page 23: ...nect the appliance to the electricity WARNING Put the mains plug into the mains socket only if all parts are back into their initial position There is a risk of injury 4 Light the burner Refer to Oven Daily use chapter 5 Turn the knob for the oven functions on the minimum position 6 Remove the knob for the oven functions again 7 Screw on slowly the bypass screw till the flame becomes minimum and s...

Page 24: ...e 1 Open the lid of the appliance and disassemble it 2 Disassemble the pan supports and all the burner assemblies 3 Tilt the cooker backwards 30 degrees 30 4 With the help of a second person who supports the cooker from falling fold the front feet into the holes in the plinth 5 Tilt the cooker forward 30 degrees and repeat the previous step for the back feet 6 Carefully lay the cooker on the floor...

Page 25: ...not touch the part of the appliance shaded in the illustration ENVIRONMENTAL CONCERNS Recycle materials with the symbol Put the packaging in relevant containers to recycle it Help protect the environment and human health by recycling waste of electrical and electronic appliances Do not dispose of appliances marked with the symbol with the household waste Return the product to your local recycling ...

Page 26: ......

Page 27: ......

Page 28: ...WWW ZANUSSI COM SHOP 867365416 B 202022 ...

Reviews: