background image


4


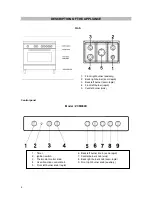
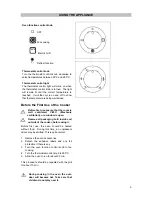
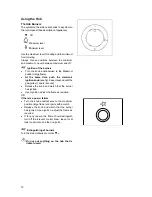
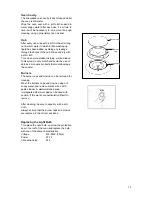
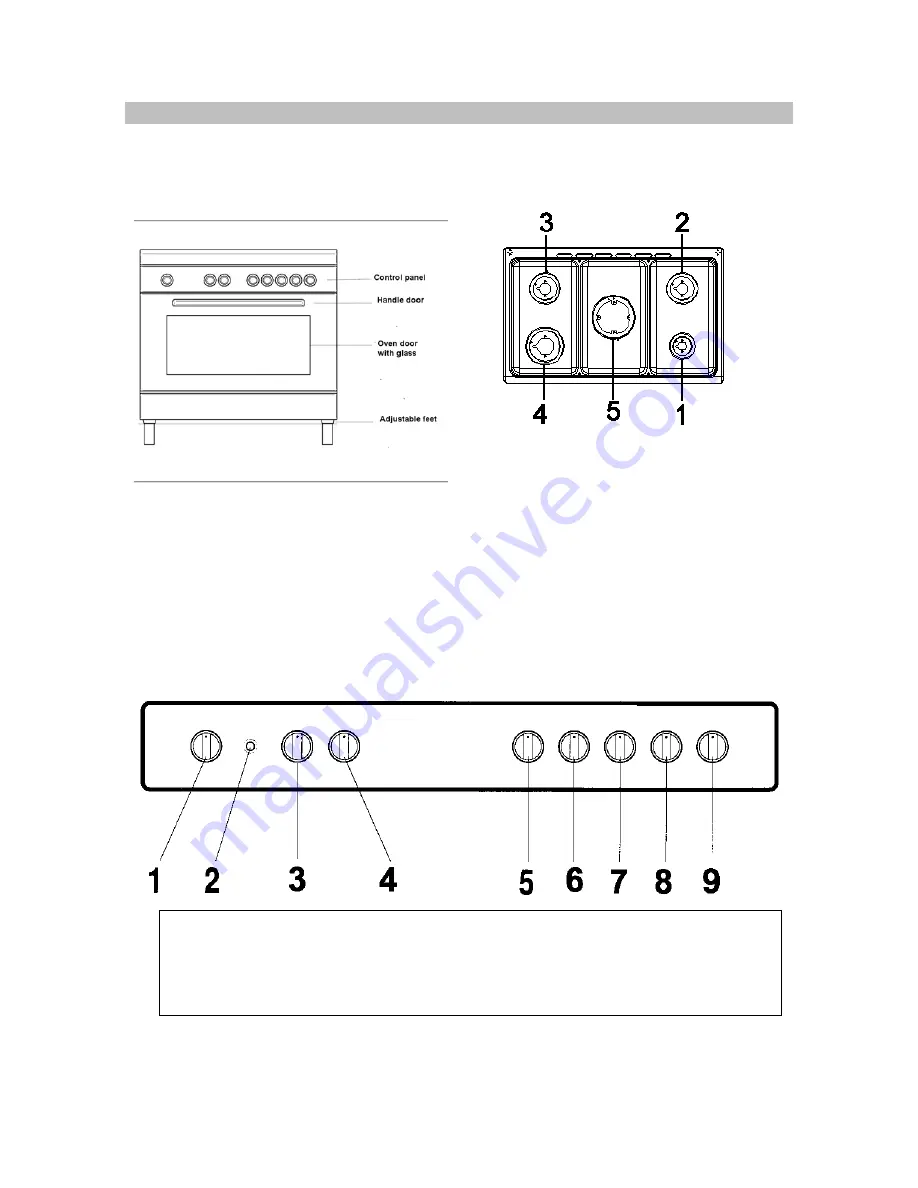
DESCRIPTION OF THE APPLIANCE 


Hob 


1.  Front right burner (auxiliary) 
2.  Back right burner (semi-rapid) 
3.  Back left burner (semi-rapid) 
4.  Front left burner (rapid) 
5.  Central burner (wok) 
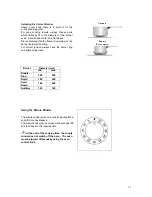


Control panel 


Model : ZCM900X 


1.  Timer   


6.  Back left burner knob ( semi-rapid)    

2.  Ignition switch   


7.  Central burner knob (wok)    

3.  Thermostat control knob 


8.  Back right burner knob (semi-rapid)   

4.  Oven Function control knob 


9.  Front right burner knob (auxiliary)  

5.  Front left burner knob (rapid) 

Summary of Contents for ZCM900X

Page 1: ...INSTRUCTION BOOKLET Please read this instruction booklet before using the appliance GB MIXED FUEL COOKER ZCM900X ...

Page 2: ...ith wet hands The grill pan will become hot during use always use oven gloves when removing or replacing a hot grill pan Ensure the control knobs are in the OFF position when not in use When using other electrical appliances ensure the cable does not come into contact with the hot surfaces of the cooker Unstable or misshapen pans should not be used on the hob burners as unstable pans can cause an ...

Page 3: ...mething Not Working Service Spare Parts Customer Care Guarantee Conditions 2 4 5 7 8 9 10 12 14 15 15 16 Technical Features Safety Advice Electrical connection Technical Data Installation Positioning Ventilation Location Gas connections Gas Conversion 17 18 19 21 21 22 22 23 24 How to read the instruction book The symbols below will guide you when reading the instruction book Safety instructions S...

Page 4: ...apid 4 Front left burner rapid 5 Central burner wok Control panel Model ZCM900X 1 Timer 6 Back left burner knob semi rapid 2 Ignition switch 7 Central burner knob wok 3 Thermostat control knob 8 Back right burner knob semi rapid 4 Oven Function control knob 9 Front right burner knob auxiliary 5 Front left burner knob rapid ...

Page 5: ...fan cooking 4 Turn the thermostat control knob to 250 C 5 Allow the oven to run for about 30 min This procedure should be repeated with the grill for about 10 min During cooking in the oven the oven door will become hot Take care that children do not play near it Oven function control knob OFF Fan cooking Electric Grill Defrost function Thermostat control knob Turn the thermostat control knob cloc...

Page 6: ... dry carefully Main oven light This light will illuminate when the oven grill knob is turned on and remains lit while the oven is in operation Oven thermostat pilot light This light will illuminate when a temperature is selected and remain lit until the selected temperature has been reached It then cycles on and off to indicate that the temperature is being maintained ...

Page 7: ...ures Fan oven cooking generally requires temperatures 20 25 C lower than conventional cooking Even Heating for Baking The fan oven has even heating on all shelf positions This means that batches of the same food can be cooked in the oven at the same time There is no mixing of flavours Please note that shelf positions are counted from the top downwards Fan Oven Cooking Chart Food Shelf Position Tem...

Page 8: ...hick pieces to be roasted beef bacon large fish poultry When the first side is brown turn the meat without pricking it in order that the juices are not lost Grill the second side Flavour when ending the cooking Cooking time has to determined by the thickness of the piece to be grilled not by its weight Browning Turn the oven knob to the grill position Place the dish on the grid and slide it in the...

Page 9: ... Turn off the oven 5 minutes before the end of cooking time and use residual heat to complete the cooking The thickness the material and the colour of the pan will influence the cooking results When cooking certain dishes increase in volume ensure the pan is large enough To prevent fat dripping when roasting use tall rim pans proportional to the item being roasted Prick the skin of poultry and sau...

Page 10: ...onic ignition knob see fig Keep it pushed until the gas ignites 1 spark second Release the knob and watch that the burner has ignited Upon ignition adjust the flame as required OR If there is a power failure Turn the knob anticlockwise to the maximum position large flame and ignite with a match Release the knob and watch that the burner has ignited Upon ignition adjust the flame as required If for...

Page 11: ...ct ignition always keep the burner ring and spark plugs clean Good use Bad use Power waste Burner Diameter mm min max Double Ring 220 226 Rapid 180 260 Semi Rapid 140 260 Auxiliary 120 140 Using the Minute Minder The minute minder gives an acoustic signal after a specific time has elapsed The control knob must be turned clockwise past 55 and then back to the required time At the end of the cooking...

Page 12: ... Sink stain removers Stainless steel parts should be periodically cleaned with a proprietary stainless steel cleaner Oven Door The door can be dismantled for cleaning as follows Open the door completely Insert hook C into the hinged part D Partially close the door to approximately half way Using both hands pull the door towards you until it is released from the hinge To replace the door reverse th...

Page 13: ...h and avoid the use of abrasive or caustic products that could damage the enamel Burners The burner caps and crowns can be removed for cleaning Wash the burners caps and crowns using hot soapy water and remove marks with a mild paste cleaner A well moistened soap impregnated steel wool pad can be used with caution if the marks are particularly difficult to remove After cleaning be sure to wipe dry...

Page 14: ...s not blocked and the ring burner is clean of food particles The burner cap and ring burner have been replaced correctly after cleaning Check that a cooking function temperature have been selected Check that the thermostat is placed correctly the cooking time is adapted Check that the oven does not need cleaning the meal does not overflow there is no excessive fat juice projection on the oven side...

Page 15: ...purchase date to hand In guarantee customers should ensure that the checks under the heading Something Not Working have been made as the engineer will make a charge if the fault is not a mechanical or electrical breakdown Please note that it will be necessary to provide proof of purchase for any in guarantee service calls CUSTOMER CARE For general enquiries concerning your Zanussi appliance or for...

Page 16: ...lls to put right an appliance which is improperly installed or calls to appliance outside the United Kingdom Appliances found to be in use within a commercial or similar environment plus those which are the subject to rental agreements Products of Zanussi manufacture which are not marketed by Zanussi European Guarantee If you should move to another country within Europe then your guarantee moves w...

Page 17: ...romed Enamelled Chromed Supply Rated voltage Rated frequency 230 V 50 Hz Dimensions Height Width Depth 900 mm 900 mm 85 mm This appliance complies with the following EEC Directives 89 336 Electromagnetical Compatibility Directive and subsequent modifications 90 396 Gas Appliance Directive 93 68 General Directives and subsequent modifications This appliance can be installed as class 1 and as class ...

Page 18: ...pliance utilises a threaded gas cylindrical male fitting according to UNI ISO 228 1 To connect the appliance to the gas supply with a flexible rubber hose a supplemental hose nipple fitting is needed which is supplied with the appliance Installation of flues and ventilation for gas appliances of rated input not exceeding 60 kW 1 st 2 nd and 3 rd family gases Part 2 Specification for installation o...

Page 19: ...wire to the terminal in the plug which is marked with the letter E or the earth symbol or coloured green and yellow Connect the blue neutral wire to the terminal in the plug which is marked with the letter N or coloured black Connect the brown live wire to the terminal in the plug which is marked with the letter L or coloured red Upon completion there must be not cut or stray strands of wire prese...

Page 20: ...eplaced by the manufacturer or its Service Agent with a cable of the same type If the supply cable is replaced you must ensure that the earth wire is longer than the live and neutral wires and complies with all warnings regarding electrical connection Before connecting check that fuse and household electric installation can bear the charge of the appliance see rating plate The plug used for connec...

Page 21: ... Butane G30 28 95 254 3 5 3010 1 8 1548 65 Propane G31 37 95 250 3 5 3010 1 8 1548 65 INSTALLATION Positioning Remove all the packaging and install the cooker in a dry ventilated room not near curtains paper alcohol petrol etc The appliance must be set on a heatproof level floor This appliance is approved to class Y EN60335 2 6 plus subsequent amendments This means that the appliance can be instal...

Page 22: ...e volume exceeds 11m 3 no air vent is required However if the room has a door which opens directly to the outside no air vent is required even when the volume is between 5m 3 and 11m 3 If there are other fuel burning appliances in the same room B S 5440 Part 2 Current Editions should be consulted to determine the requisite air vent requirements Location The cooker may be located in a kitchen a kit...

Page 23: ...hall be by means of an appliance flexible connector for use with a self sealing plug in device complying with Flexible hoses end fittings and sockets for gas burning appliances BS 669 The appliance flexible connector should not be subjected to undue forces either in normal use or whilst connected or disconnected The socket which the plug of the appliance flexible connector fits should be permanent...

Page 24: ...ort Remove the caps and the burner crowns Using a No 7 socket spanner unscrew the nozzles and replace them with those required for the type of gas in use see table no 1 Reassemble the parts following the same procedure in reverse These burners do not need any primary air regulation Adjustment of minimum level for the hob burners The burner is correctly adjusted when the flame is stable silent and ...

Page 25: ...etely the by pass screw Reassemble the parts following the same procedure in reverse Check that when turning the knob quickly from the maximum position to the minimum one the flame does not go out AFTER COMPLETION OF ANY REPAIRS ADJUSTMENTS OR CONVERSION THE STATUTORY SAFETY TESTS MUST BE CARRIED OUT Stick the label supplied with the appliance in the nozzles bag onto the rating plate in accordance...

Page 26: ...26 ...

Page 27: ...27 ...

Page 28: ...28 Electrolux Household Appliances Limited 2002 310084 ...

Reviews: