background image


23

Summary of Contents for ZCV550

Page 1: ...EN User manual Cooker ZCV550 ...

Page 2: ...play with the appliance Keep all packaging away from children There is the risk of suffocation or physical injury Keep children and animals away from the appliance when the door is open or the appliance is in operation There is the risk of injury or other permanent disability If the appliance has Child lock or Key lock function use it It prevents children and animals from accidental operation of t...

Page 3: ...t or remove the accessories or pots The appliance and its accessible parts become hot dur ing use Take care to avoid touching the heating ele ments Young children must be kept away unless con tinuously supervised Open the door carefully The use of ingredients with al cohol can cause a mixture of alcohol and air There is the risk of fire Do not let sparks or open flames come near the appli ance whe...

Page 4: ...s can break and shatter When the door glass panels are damaged they become weak and can break You must replace them Contact the service centre Be careful when you remove the door from the appli ance The door is heavy Bulb lamps used in this appliance are special lamps selected for household appliances use only They can not be used for the full or partial illumination of a household room If it beco...

Page 5: ...ooling fan 3 Heating element 4 Rating plate 5 Oven lamp 6 Fan and heating element 7 Shelf positions of the main oven 8 Shelf positions of the top oven Control panel 1 2 4 5 6 3 1 1 Hob control knobs 2 Top oven Grill control 3 Electronic timer 4 Main oven control 5 Main oven indicator 6 Top oven Grill indicator 5 ...

Page 6: ...time The oven only operates after time set When you connect the appliance to the electrical supply or in case of a power cut the Time function indicator flashes automatically To set the current time use or button After approximately 5 seconds the flashing stops and the display shows the time of day set For time change you must not set an automatic function Duration or End at the same time Preheati...

Page 7: ... set ting Use to 1 Keeping warm 2 Gentle simmering 3 Simmering 4 Frying browning 5 Bringing to the boil 6 Bringing to the boil quick frying deep frying Hob Care and cleaning Warning Refer to Safety information chapter Clean the appliance after each use Always use cookware with clean bottom Scratches or dark stains on the glass ceramic have no effect on how the appliance operates To remove the dirt...

Page 8: ...d the knob for the main oven temperature to the Off position Top oven functions Oven function Application OFF position The appliance is OFF Oven lamp To light up the oven interior 100 250 Conventional Cook ing Particularly suitable for cooking larger quantities of food Single Circut Grill To grill flat food items in small quantities in the middle of the shelf To make toasts Dual Circuit Grill To g...

Page 9: ... Setting the clock functions 1 Push the Selection button again and again until nec essary function indicator flashes 2 To set the time for Minute minder Duration or End use or button The related function indicator comes on When the time period is completed the function in dicator flashes and an acoustic signal sounds for 2 minutes With the functions Duration and End the oven switches off automatic...

Page 10: ... cook smaller quantities of food It gives especially good results when used to cook fruitcakes sweets and savoury flants or quiche Main oven The main oven is particularly suitable for cooking larger quantities of food Baking General instructions Your new oven may bake or roast differently to the ap pliance you had before Adapt your usual settings temperature cooking times and shelf levels to the v...

Page 11: ...aking time Cake does not brown equally Oven temperature too high and baking time too short Set a lower oven temperature and a longer baking time Cake does not brown equally No equal mixture Put the mixture equally on the baking tray Cake does not cook in the baking time set Temperature too low Use a slightly higher oven temperature setting Top Oven Shelf Positions are not critical but ensure that ...

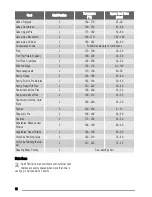
Page 12: ...0 190 30 40 Pastry Eclairs Profiteroles 2 180 190 30 40 Pastry Flaky Puff Pies 2 210 220 30 40 Shortcrusts Mince Pies 2 190 200 15 20 Shortcrusts Meat Pies 2 190 210 25 35 Shortcrusts Quiche Tarts Flans 2 180 200 25 50 Scones 3 220 230 8 12 Shepard s Pie 2 190 200 30 40 Souffles 2 170 180 20 30 Vegetables Baked Jacket Potatos 2 180 190 60 90 Vegetables Roast Potatos 2 180 190 60 90 Yorkshire Puddi...

Page 13: ...stry Flaky 180 190 30 40 3 Pastry Puff Follow manufacturer s instructions Reduce the tempera ture for Fan oven by 20 C 3 Plate Tarts 180 190 25 45 3 Quiches Flans 170 180 25 45 3 Scones 210 230 8 12 1 3 Roasting Meat Poultry 160 180 see Roasting Chart 2 Roasting Roasting dishes Use heat resistant ovenware to roast please read the instructions of the manufacturer Large roasting joints can be roaste...

Page 14: ...sant 170 190 35 40 minutes per 0 5 kb 1 lb and 35 40 minutes over Rabbit 170 190 20 minutes per 0 5 kb 1 lb and 20mi nutes over Grilling Always use the grilling function with maximum tempera ture setting Important Always grill with the oven door closed Always pre heat the empty oven with the grill func tions for 5 minutes Set the grilling set in the shelf level as recommended in the grilling table...

Page 15: ... dry If you have nonstick accessories do not clean them using an aggressive agents sharp edged objects or dishwasher It can destroy nonstick coating Stainless steel or aluminium appliances Clean the oven door with a wet sponge only Dry it with a soft cloth Do not use steel wool acids or abrasive materials as they can damage the oven surface Clean the oven control pan el with the same precautions C...

Page 16: ...iagrams The number of glasses can be different Removing the glass 1 Open the door 2 Push the door trim at both sides to release the clips Refer to the picture 3 Remove the glass panels 1 2 1 To replace the glass obey the procedure in opposite sequence Cleaning the oven door The door glass on your product can be different in type and shape from what you see in diagrams The number of glasses can be ...

Page 17: ...on the oven The oven does not heat up The clock is not set Set the clock The oven does not heat up The necessary settings are not set Control the settings The oven does not heat up The fuse in the fuse box is released Control the fuse If the fuse is re leased more than one time refer to a qualified electrician The oven lamp does not operate The oven lamp is defective Replace the oven lamp Steam an...

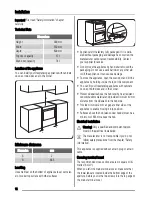
Page 18: ...the appliance by holding inside the top of the component You can fit your freestanding appliance with cabinets on one or both sides and in the corner Protect sidewalls above the hob level by heat resistant noncombustible material and provide minimum 40 mm distance from the sidewalls to the hob side Provide minimum 2 mm air gap at either side of the appliance to enable moving it into position Surfa...

Page 19: ...er Service Standard guarantee conditions We Electrolux undertake that if within 12 months of the date of the purchase this Electrolux appliance or any part thereof is proved to be defective by reason only of faulty workmanship or materi als we will at our option repair or replace the same FREE OF CHARGE for labour materials or carriage on condition that Appliance has been correctly installed and u...

Page 20: ...ser manual for the period specified in the appliance guarantee or otherwise by law If you move from one of these countries to another of the countries listed the ap pliance guarantee will move with you subject to the fol lowing qualifications The appliance guarantee starts from the date you first purchased the appliance which will be evidenced by production of a valid purchase document issued by t...

Page 21: ... Alphen aan den Rijn Norge 47 81 5 30 222 Risløkkvn 2 0508 Oslo Österreich 43 18 66 400 Herziggasse 9 1230 Wien Polska 48 22 43 47 300 ul Kolejowa 5 7 Warszawa Portugal 35 12 14 40 39 39 Quinta da Fonte Edificio Gonçalves Zarco Q 35 2774 518 Paço de Arcos Romania 40 21 451 20 30 Str Garii Progresului 2 S4 040671 RO Schweiz Suisse Svizzera 41 62 88 99 111 Industriestrasse 10 CH 5506 Mägenwil Sloven...

Page 22: ...22 ...

Page 23: ...23 ...

Page 24: ...www zanussi com shop 892941163 C 292011 ...

Reviews: