background image

INTERNAL LIGHTING

WARNING! Risk of electric shock.

• The type of light bulb or halogen lamp used for

this appliance is for household appliances only.

Do not use it for house lighting.

• Before replacing the lamp, disconnect the

appliance from the power supply.

• Only use lamps with the same specifications.

SERVICE
• To repair the appliance contact an Authorised

Service Centre.

• Use original spare parts only.

DISPOSAL

WARNING! Risk of injury or

suffocation.

• Disconnect the appliance from the mains

supply.

• Cut off the mains electrical cable close to the

appliance and dispose of it.

• Remove the door catch to prevent children or

pets from becoming trapped in the appliance.

INSTALLATION

WARNING! Refer to Safety chapters.

TECHNICAL DATA

Dimensions

Height

894 - 912 mm

Width

600 mm

Depth

600 mm

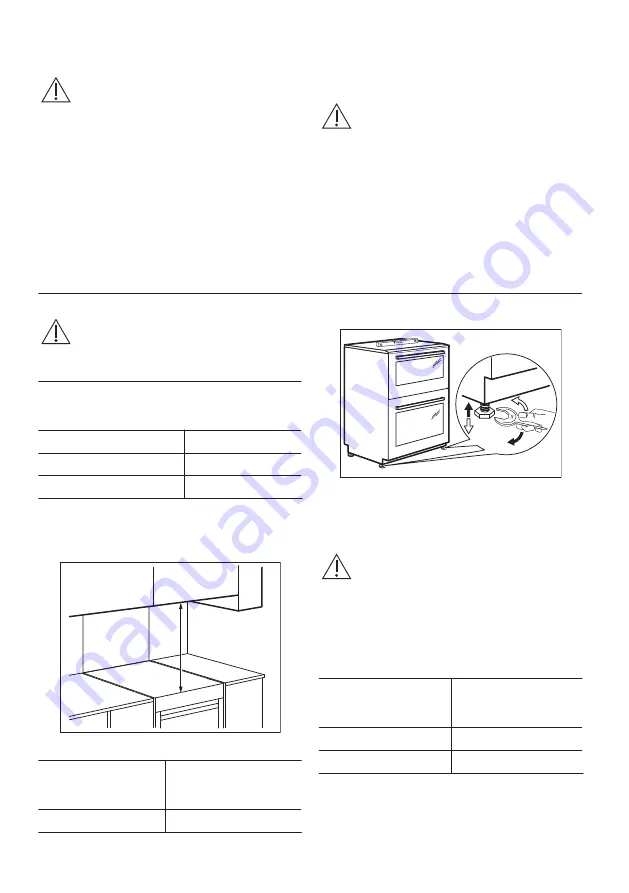
LOCATION OF THE APPLIANCE
You can install your freestanding appliance with

cabinets on one or two sides and in the corner.

A

Minimum distances

Dimension

mm

A

685

LEVELLING OF THE APPLIANCE

Use small feet on the bottom of appliance to set the

appliance top surface level with other surfaces.

ELECTRICAL INSTALLATION

WARNING! The manufacturer is not

responsible if you do not follow the

safety precautions from Safety

chapters.

This appliance is supplied without a main plug or a

main cable.
Applicable types of cables for different

phases:

Phase

Min. size cable

1

3x6.0 mm²

3 with neutral

5x1.5 mm²

6

Summary of Contents for ZCV66078WA

Page 1: ...GETTING STARTED EASY User Manual ZCV66078WA EN User Manual Cooker ...

Page 2: ... and understand the hazards involved Children between 3 and 8 years of age and persons with very extensive and complex disabilities shall be kept away unless continuously supervised Children of less than 3 years of age should be kept away unless continuously supervised Do not let children play with the appliance Keep all packaging away from children and dispose of it appropriately Keep children an...

Page 3: ...arsh abrasive cleaners or sharp metal scrapers to clean the glass door or the glass of hinged lids of the hob since they can scratch the surface which may result in shattering of the glass Metallic objects such as knives forks spoons and lids should not be placed on the hob surface since they can get hot If the glass ceramic surface glass surface is cracked switch off the appliance and unplug it f...

Page 4: ...th furniture to prevent touching the dangerous parts The sides of the appliance must stay adjacent to appliances or units with the same height Do not install the appliance adjacent to a door or under a window This prevents hot cookware to fall from the appliance when the door or the window is opened Make sure to install a stabilizing means in order to prevent tipping of the appliance Refer to Inst...

Page 5: ...move or install the accessories Discoloration of the enamel or stainless steel has no effect on the performance of the appliance Use a deep pan for moist cakes Fruit juices cause stains that can be permanent Do not keep hot cookware on the control panel Do not let cookware boil dry Be careful not to let objects or cookware fall on the appliance The surface can be damaged Do not activate the cookin...

Page 6: ... catch to prevent children or pets from becoming trapped in the appliance INSTALLATION WARNING Refer to Safety chapters TECHNICAL DATA Dimensions Height 894 912 mm Width 600 mm Depth 600 mm LOCATION OF THE APPLIANCE You can install your freestanding appliance with cabinets on one or two sides and in the corner A Minimum distances Dimension mm A 685 LEVELLING OF THE APPLIANCE Use small feet on the ...

Page 7: ...e before you fix the two screws into the top edge of the mains terminal cover Make sure that the cover is securely fastened To open the cover of terminal board obey the procedure in opposite sequence TERMINAL BOARD Do not remove blanking plates Make sure that the links are fitted as shown N N N L L PRODUCT DESCRIPTION GENERAL OVERVIEW 1 2 3 4 5 5 6 5 4 3 2 1 7 3 2 1 4 1 Control panel and hob 2 Air...

Page 8: ...For roasting and grilling Use the trivet only with the Grill roasting pan BEFORE FIRST USE WARNING Refer to Safety chapters INITIAL CLEANING Remove all accessories and removable shelf supports from the oven Refer to Care and cleaning chapter Clean the oven and the accessories before first use Put the accessories and the removable shelf supports back to their initial position SETTING AND CHANGING T...

Page 9: ...e to a necessary heat setting To complete the cooking process turn the knob to the off position RESIDUAL HEAT INDICATOR WARNING There is a risk of burns from residual heat The indicator comes on when a cooking zone is hot but it does not function if mains power is disconnected HOB HINTS AND TIPS WARNING Refer to Safety chapters COOKWARE The bottom of the cookware must be as thick and flat as possi...

Page 10: ...ficiently cool limescale rings water rings fat stains shiny metallic discoloration Clean the hob with a moist cloth and a non abrasive detergent After cleaning wipe the hob dry with a soft cloth Remove shiny metallic discoloration use a solution of water with vinegar and clean the glass surface with a cloth OVEN DAILY USE WARNING Refer to Safety chapters TOP OVEN FUNCTIONS Symbol Oven function App...

Page 11: ...turn the knob for the top main oven functions to the off position COOLING FAN When the oven operates the cooling fan turns on automatically to keep the surfaces of the oven cool If you turn off the oven the cooling fan can continue to operate until the oven cools down INSERTING THE OVEN ACCESSORIES Deep pan Push the deep pan between the guide bars of the shelf support Wire shelf and the deep pan t...

Page 12: ... Button Function Description MINUS To set the time CLOCK To set a clock function PLUS To set the time SETTING THE MINUTE MINDER 1 Press again and again until starts to flash 2 Press or to set the necessary time The Minute Minder starts automatically after 5 seconds 3 When the set time ends an acoustic signal sounds Press any button to stop the acoustic signal 4 Turn the knob for the oven functions...

Page 13: ...ring baking When the trays become cold again the distortions disappear TIPS ON BAKING Baking results Possible cause Remedy The bottom of the cake is not browned sufficiently The shelf position is incorrect Put the cake on a lower shelf The cake sinks and be comes soggy lumpy or streaky The oven temperature is too high The next time you bake set a slightly lower oven temperature The baking time is ...

Page 14: ...170 180 50 60 2 Casseroles Beef Lamb 160 170 150 180 2 Casseroles Chicken 160 180 80 90 2 Convenience Foods Follow manufacturer s instructions 2 Fish 170 190 20 30 2 Fish Pie Potato Topped 190 200 20 30 2 Fruit Pies Crumbles 190 200 30 50 2 Milk Puddings 150 170 90 120 2 Pasta Lasagne etc 170 180 40 50 2 Pastry Choux 180 190 30 40 2 Pastry Eclairs Profiteroles 180 190 30 40 2 Pastry Flaky Puff Pie...

Page 15: ...0 35 2 Cakes Small Queen 150 170 18 25 1 3 Cakes Sponges 160 170 20 25 3 Cakes Madeira 140 160 60 80 3 Cakes Rich Fruit 130 140 120 150 3 Cakes Christmas 130 140 180 270 3 Cakes Apple Pie 160 170 50 60 3 Shortbread 130 150 45 60 1 3 Fish 160 180 30 40 3 Fruit Pies Crumbles 170 180 30 50 3 Milk Puddings 140 160 60 90 3 Pastry Choux 180 190 30 40 3 Pastry Shortcrust 180 190 25 35 3 Pastry Flaky 180 ...

Page 16: ...mi nutes over Pork Veal Ham 170 190 30 40 minutes per 0 5 kg 1 lb and 30 40 mi nutes over Chicken 180 200 20 25 minutes per 0 5 kg 1 lb and 20 minutes over Turkey Goose 170 190 15 20 minutes per 0 5 kg 1 lb up to 3 5 kg 7 lb then 10 minutes per 0 5 kg 1 lb over 3 5 kg 7 lb Duck 180 200 25 35 minutes per 0 5 kg 1 lb and 25 30 mi nutes over Pheasant 170 190 35 40 minutes per 0 5 kg 1 lb and 35 40 mi...

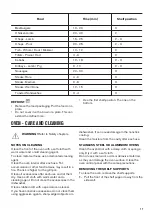
Page 17: ...he oven interior after each use Fat accumulation or other food remains may result in a fire The risk is higher for the grill pan Clean all accessories after each use and let them dry Use a soft cloth with warm water and a cleaning agent Do not clean the accessories in the dishwasher Clean stubborn dirt with a special oven cleaner If you have nonstick accessories do not clean them using aggressive ...

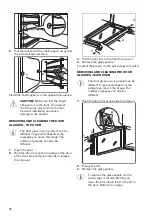
Page 18: ...erent 1 Open the door 2 Hold the door trim on the top edge of the door at the two sides and push inwards to release the clip seal 1 2 1 3 Pull the door trim to the front to remove it 4 Remove the glass panels To install the panels do the same steps in reverse REMOVING AND CLEANING THE DOOR GLASSES MAIN OVEN The door glass in your product can be different in type and shape from the example you see ...

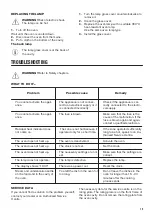
Page 19: ... and again contact a qualified electrician Residual heat indicator does not come on The zone is not hot because it operated only for a short time If the zone operated sufficiently long to be hot speak to an Au thorised Service Centre The oven does not heat up The oven is deactivated Activate the oven The oven does not heat up The clock is not set Set the clock The oven does not heat up The necessa...

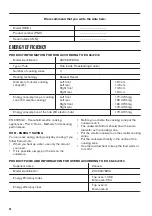
Page 20: ...N 60350 2 Household electric cooking appliances Part 2 Hobs Methods for measuring performance HOB ENERGY SAVING You can save energy during everyday cooking if you follow below hints When you heat up water use only the amount you need If it is possible always put the lids on the cookware Before you activate the cooking zone put the cookware on it The cookware bottom should have the same diameter as...

Page 21: ...y saving When possible do not preheat the oven before you put the food inside When the cooking duration is longer than 30 minutes reduce the oven temperature to minimum 3 10 minutes before the end of the cooking time depending on the duration of the cooking The residual heat inside the oven will continue to cook Use the residual heat to warm up other dishes Keep breaks between baking as short as p...

Page 22: ...22 ...

Page 23: ...23 ...

Page 24: ...WWW ZANUSSI COM SHOP 867337972 B 262019 ...

Reviews: