background image

1

2

1

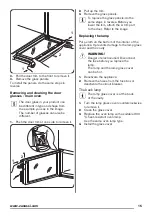
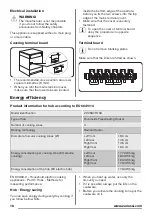
3. Pull the door trim to the front to remove it.

4. Remove the glass panels.

To install the panels, do the same steps in

reverse.

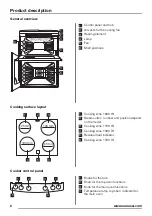
Removing and cleaning the door

glasses - main oven

The door glass in your product can

be different in type and shape from

the example you see in the image.

The number of glasses can also be

different.

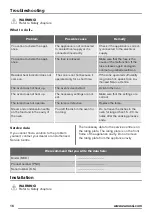
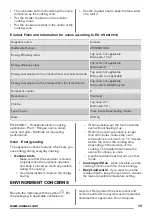
1. Push the door trim at one side to remove it.

1

2

A

2. Pull up the trim.

3. Remove the glass panels.

To replace the glass panels, do the

same steps in reverse. Before you

lower the trim, attach the A trim part

to the door. Refer to the image.

Replacing the lamp

Put a cloth on the bottom of the interior of the

appliance. It prevents damage to the lamp glass

cover and the cavity.

WARNING!

Danger of electrocution! Disconnect

the fuse before you replace the

lamp.

The lamp and the lamp glass cover

can be hot.

1. Deactivate the appliance.

2. Remove the fuses from the fuse box or

deactivate the circuit breaker.

The back lamp

The lamp glass cover is at the back

of the cavity.

1. Turn the lamp glass cover counterclockwise

to remove it.

2. Clean the glass cover.

3. Replace the oven lamp with a suitable 300

°C heat-resistant oven lamp.

Use the same oven lamp type.

4. Install the glass cover.

www.zanussi.com

15

Summary of Contents for ZCV680TCXA

Page 1: ...EN ZCV680TCXA User Manual Cooker ...

Page 2: ...RNING Risk of suffocation injury or permanent disability This appliance can be used by children aged from 8 years and above and persons with reduced physical sensory or mental capabilities or lack of experience and knowledge if they have been given supervision or instruction concerning use of the appliance in a safe way and understand the hazards involved Do not let children play with the applianc...

Page 3: ...the supply cord is damaged it must be replaced by the manufacturer its Authorised Service Centre or similarly qualified persons in order to avoid a hazard The means for disconnection must be incorporated in the fixed wiring in accordance with the wiring rules Safety instructions Installation WARNING Only a qualified person must install this appliance Remove all the packaging Do not install or use ...

Page 4: ...sure that the ventilation openings are not blocked Do not let the appliance stay unattended during operation Deactivate the appliance after each use Be careful when you open the appliance door while the appliance is in operation Hot air can release Do not operate the appliance with wet hands or when it has contact with water Do not use the appliance as a work surface or as a storage surface WARNIN...

Page 5: ...ean regularly the appliance to prevent the deterioration of the surface material Remaining fat or food in the appliance can cause fire Clean the appliance with a moist soft cloth Only use neutral detergents Do not use abrasive products abrasive cleaning pads solvents or metal objects If you use an oven spray obey the safety instructions on the packaging Do not clean the catalytic enamel if applica...

Page 6: ... mm 145 mm 145 mm 180 mm 1 3 4 5 6 2 1 Cooking zone 1200 W 2 Steam outlet number and position depend on the model 3 Cooking zone 1700 W 4 Cooking zone 1200 W 5 Residual heat indicator 6 Cooking zone 1700 W Cooker control panel 4 5 1 2 3 1 1 Knobs for the hob 2 Knob for the top oven functions 3 Knob for the main oven functions 4 Temperature lamp symbol indicator for the main oven 6 www zanussi com ...

Page 7: ...imum temperature 2 Let the appliance operate for 1 hour 3 Set the function 4 Let the appliance operate for 15 minutes Accessories can become hotter than usual The appliance can emit an odour and smoke This is normal Make sure that the airflow is sufficient Hob Daily use WARNING Refer to Safety chapters Heat setting Symbols Function Off position 1 6 Heat settings Use the residual heat to decrease e...

Page 8: ...ch use Always use cookware with clean bottom Scratches or dark stains on the surface have no effect on how the hob operates Use a special cleaner applicable for the surface of the hob Use a special scraper for the glass Cleaning the hob Remove immediately melted plastic plastic foil and food with sugar If not the dirt can cause damage to the hob Put the special scraper on the glass surface at an a...

Page 9: ... top main oven functions to the off position Top oven functions Symbol Oven function Application Off position The appliance is off Oven Lamp To activate the lamp without a cooking function Single Circuit Grill To grill flat food items in small quantities in the middle of the shelf To make toasts Dual Circuit Grill To grill food items in medium quantities in the middle of the shelf To make toasts F...

Page 10: ...and to toast 1 Put the trivet into the deep pan so that the supports of the wire shelf point down 2 Put the deep pan into the oven on the necessary shelf position Oven Hints and tips WARNING Refer to Safety chapters The temperature and baking times in the tables are guidelines only They depend on the recipes and the quality and quantity of the ingredients used Top oven The top oven is the smaller ...

Page 11: ...baking time is too short Set a longer baking time You cannot decrease baking times by setting higher tem peratures The cake sinks and becomes soggy lumpy or streaky There is too much liquid in the mixture Use less liquid Be careful with mixing times especially if you use a mixing machine The cake is too dry The oven temperature is too low The next time you bake set a higher oven temperature The ca...

Page 12: ...ng table 2 Roasting Use heat resistant ovenware to roast refer to the instructions of the manufacturer You can roast large roasting joints directly in the deep pan if present or on the wire shelf above the deep pan Roast lean meats in the roasting tin with the lid This keeps the meat more succulent All types of meat that can be browned or have crackling can be roasted in the roasting tin without t...

Page 13: ...s per 0 5 kb 1 lb and 35 40 minutes over Rabbit 170 190 20 minutes per 0 5 kb 1 lb and 20 minutes over Grilling in general WARNING Always grill with the oven door closed Always grill with the maximum temperature setting Set the shelf into the shelf position as recommended in the grilling table Always set the deep pan to collect the fat into the first shelf position Set the deep pan and the trivet ...

Page 14: ...he risk is higher for the grill pan Clean stubborn dirt with a special oven cleaner Clean all accessories after each use and let them dry Use a soft cloth with warm water and a cleaning agent If you have nonstick accessories do not clean them using aggressive agents sharp edged objects or a dishwasher It can cause damage to the nonstick coating Stainless steel or aluminium appliances Clean the ove...

Page 15: ...im attach the A trim part to the door Refer to the image Replacing the lamp Put a cloth on the bottom of the interior of the appliance It prevents damage to the lamp glass cover and the cavity WARNING Danger of electrocution Disconnect the fuse before you replace the lamp The lamp and the lamp glass cover can be hot 1 Deactivate the appliance 2 Remove the fuses from the fuse box or deactivate the ...

Page 16: ... up The oven is deactivated Activate the oven The oven does not heat up The necessary settings are not set Make sure that the settings are correct The lamp does not operate The lamp is defective Replace the lamp Steam and condensation settle on the food and in the cavity of the oven You left the dish in the oven for too long Do not leave the dishes in the oven for longer than 15 20 mi nutes after ...

Page 17: ...rotection has two parts A B You can find the anti tilt protection B on the right or left side of the rear wall of the appliance B 1 Install the anti tilt protection A on the wall Make sure that the wall is made of a solid material If not you need to make the wall sufficiently strong to hold the weight Make sure that the surface behind the appliance is smooth 2 Put the appliance in the middle of th...

Page 18: ... N L L Energy efficiency Product information for hob according to EU 66 2014 Model identification ZCV680TCXA Type of hob Hob inside Freestanding Cooker Number of cooking zones 4 Heating technology Radiant Heater Diameter of circular cooking zones Ø Left front Left rear Right front Right rear 18 0 cm 14 5 cm 14 5 cm 18 0 cm Energy consumption per cooking zone EC electric cooking Left front Left rea...

Page 19: ... Methods for measuring performance Oven Energy saving The appliance contains features which help you save energy during everyday cooking General hints Make sure that the oven door is closed properly when the appliance operates and keep it closed as much as possible during the cooking Use metal dishes to improve the energy saving When possible put the food inside the oven without heating it up When...

Page 20: ...appliances marked with the symbol with the household waste Return the product to your local recycling facility or contact your municipal office 20 www zanussi com ...

Page 21: ...www zanussi com 21 ...

Page 22: ...22 www zanussi com ...

Page 23: ...www zanussi com 23 ...

Page 24: ...www zanussi com shop 867319487 B 252015 ...

Reviews: