background image

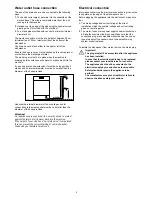
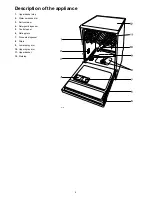
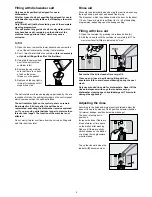
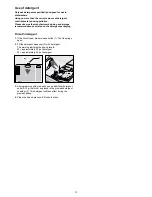
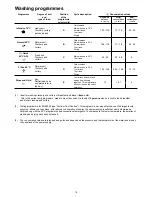
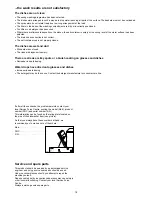
Water outlet hose connection

The end of the drain hose can be connected in the following
ways: 

1. To the sink outlet spigot, securing it to the underside of the 

work surface. This will prevent waste water from the sink 
running into the machine. 

2. Hooked over the edge of the sink using the special curved 

plastic guide 

(if provided with the machine).

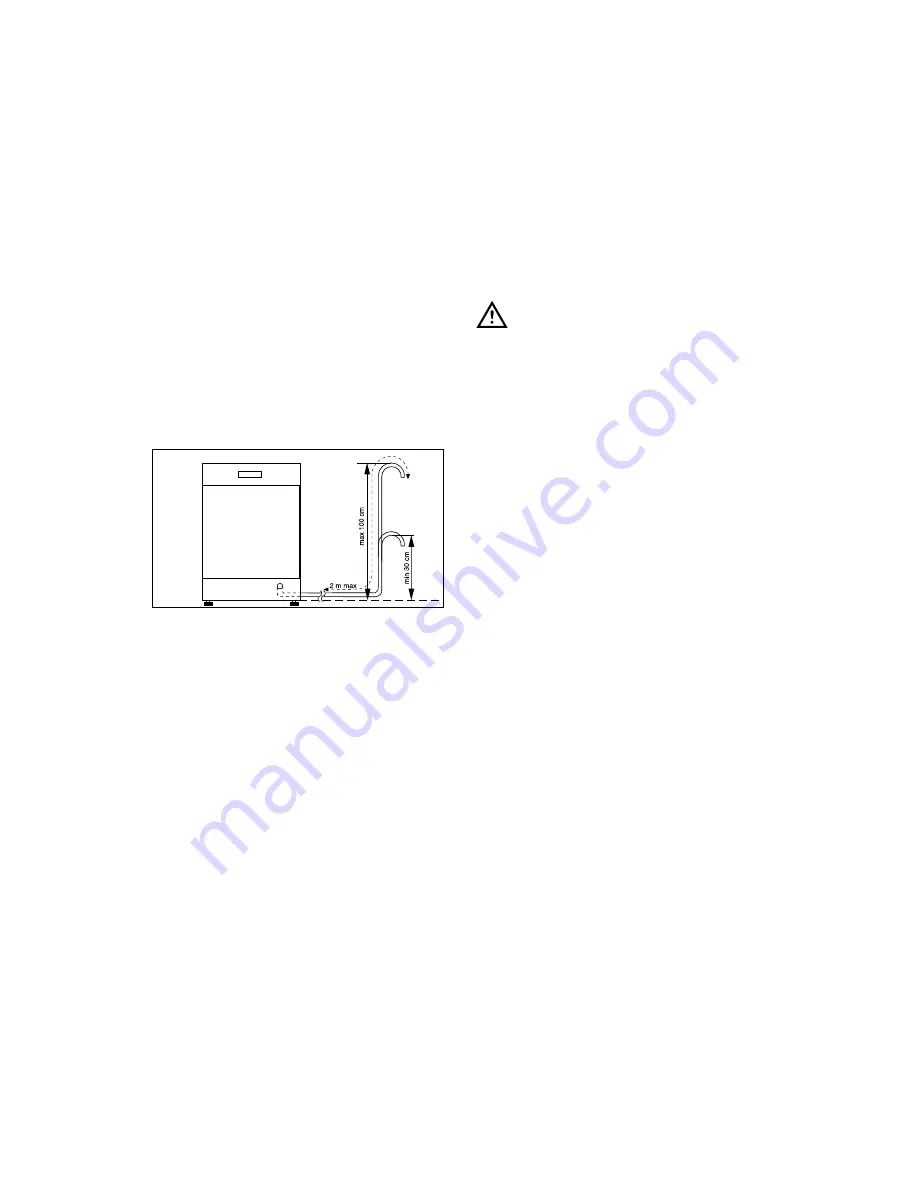
3. To a stand pipe provided with vent-hole, minimum internal 

diameter 4 cm. 

The waste connection must be at a height of between 30 cm
(minimum) and 100 cm (maximum) from the bottom of the
dishwasher. 

The drain hose can face either to the right or left of the
dishwasher 

Ensure the hose is not bent or squashed as this could prevent
or slow down the discharge of water. 

The sink plug must not be in place when the machine is
draining as this could cause the water to syphon back into the
machine. 

If you use a drain hose extension it must be no longer than 2
metres and its internal diameter must be no smaller than the
diameter of the hose provided. 

Likewise the internal diameter of the couplings used for
connections to the waste outlet must be no smaller than the
diameter of the hose provided. 

Attention!
Our appliances are supplied with a security device to protect
against the return of dirty water back into the machine. 
If the spigot of your sink has a "no return valve" incorporated
this can prevent the correct draining of your dishwasher. 
We advise you therefore to remove it.

Electrical connection

Information concerning the electrical connection is given on the
rating plate on the edge of the dishwasher’s door.

Before plugging the appliance into the wall socket, make sure
that:

1. The mains voltage and current rating at the site of 

installation match the nominal voltage and current rating 
given on the rating plate. 

2. The meter, fuses, mains power supply and wall socket can 

all take the maximum load required. Make sure that the 
socket and plug are compatible without having to use any 
type of adaptor. If necessary, have the domestic wiring 
system socket replaced.

To isolate the dishwasher from mains, remove the mains plug.

Important!
The plug must still be accessible after the appliance
has been installed.

In case that the electrical cable has to be replaced,
please contact your local Service Force Centre.

The appliance should not be connected to the
electrical supply by means of an extension cable.

Safety standards require the appliance to be
earthed.
The manufacture accepts no liability for failure to
observe the above safety precautions.

5

CS18

Summary of Contents for ZDF200

Page 1: ...DISHWASHER ZDF 200 Instruction book GB ...

Page 2: ...tenance and cleaning 16 Cleaning the filters 16 Prolonged periods of non operation 16 Frost precautions 16 Moving the machine 16 What to do when 17 Service and spare parts 18 Hints for test centres 19 Contents 2 Dimensions Width 60 cm Height with worktop 85 cm Height without worktop 82 cm Max depth 63 5 cm Max depth with open door 118 5 cm Electrical connection Information on the electrical connec...

Page 3: ...in dishwashers Long bladed knives stored in an upright position are a potential hazard Long and or sharp items of cutlery such as carving knives must be positioned horizontally in the upper basket Ensure that the door of the dishwasher is always closed when it is not being loaded or unloaded In this way you will avoid anybody tripping over the open door and hurting themselves When finishing loadin...

Page 4: ... If the door does not close correctly loosen or tighten the adjustable feet until the machine is perfectly level Water supply connections This dishwasher may be fed with either hot max 60 or cold water Nevertheless we advise you a cold water supply A hot water supply is not always efficient with very soiled crockery as it shortens the washing programmes a lot For making the connection itself the c...

Page 5: ...r appliances are supplied with a security device to protect against the return of dirty water back into the machine If the spigot of your sink has a no return valve incorporated this can prevent the correct draining of your dishwasher We advise you therefore to remove it Electrical connection Information concerning the electrical connection is given on the rating plate on the edge of the dishwashe...

Page 6: ...pliance 6 1 Upper basket stop 2 Water hardness dial 3 Salt container 4 Detergent dispenser 5 Control panel 6 Rating plate 7 Rinse aid dispenser 8 Filters 9 Lower spray arm 10 Upper spray arm 11 Upper basket 12 Worktop IN144 ...

Page 7: ...t cancel indicator light placed above the button illuminates With this button it is possible to cancel a washing programme in progress Indicator lights have the following meanings As soon as you select a washing programme the phase indicator lights for that programme will start flashing As the programme starts the phase indicator lights turn off except for the indicator light of the phase in progr...

Page 8: ...esponds with the first washing programme The On Off and start cancel indicator lights start to flash indicating that you have activated the water softener setting function At the same time the end of programme indicator light starts flashing The current level is indicated by the number of flashes of the end of programme indicator light and a pause of about 5 seconds see chart Example 5 flashes pau...

Page 9: ...dissolve then this can take longer The function of the machine is not affected Do not worry if water over flows from the unit when filling with salt this is quite normal Rinse aid Rinse aid is automatically added during the last rinse ensuring thorough rinsing and spot and streak free drying The dispenser which is positioned inside the door holds about 110 ml of rinse aid which is sufficient for 1...

Page 10: ...or and slide out the baskets to load the dishes The lower basket The lower basket is designed to take saucepans lids plates salad bowls cutlery etc Serving dishes and large lids should be arranged around the edge of the basket ensuring that the spray arms can turn freely In daily use 10 For washing in the dishwasher the following cutlery dishes are of limited suitability Only wash stoneware in the...

Page 11: ...4 cm in diameter salad bowls cups and glasses Arrange items on and underneath the cup racks so that water can reach all surfaces Glasses with long stems can be placed upside down in the cup racks Light items plastic bowls etc must be loaded in the upper basket and arranged so they do not move In case that plates are loaded in the upper basket load them starting from the rear positions of the baske...

Page 12: ...h detergent 1 If the lid is closed press release button 1 The lid springs open 2 Fill the detergent dispenser 2 with detergent The marking indicates the dosing levels 20 approximately 20 g of detergent 30 approximately 30 g of detergent 3 All programmes with prewash need an additional detergent dose 5 10 g that must be placed in the prewash detergent chamber 3 This detergent will take effect durin...

Page 13: ...gent rinse aid and salt functions 1 Before using these products you should first check that the water hardness in your supply is compatible with the use of these products as per the detergent manufacturers on the product packaging 2 These products should be strictly used according to the detergent manufacturers instructions 3 If you encounter problems when using 3 in 1 products for the first time ...

Page 14: ...f the power supply Washing programmes 14 Position of the programme selector dial A Degree of soil and type of load Heavy soil Crockery cutlery pots and pans Normal soil Crockery and cutlery Programme Intensive 70 C Normal 65 C Cycle description 3 Consumption values Hot prewash Main wash up to 70 C 2 warm rinses 1 hot rinse Drying Cold prewash Main wash up to 65 C 2 warm rinses 1 hot rinse Drying P...

Page 15: ...he countdown of the delay start will begin only after having pressed the start cancel button Until that moment it is possible to modify the selection made 5 To interrupt or cancel a washing programme in progress Interrupt or cancel a washing programme in progress ONLY if it s absolutely necessary Attention Hot steam may escape when the door is opened Open the door carefully To interrupt a washing ...

Page 16: ...Place the coarse filter A in the microfilter B and press together 9 Put the filter combination in place and lock by turning the handle clockwise to the stop During this process ensure that the flat filter does not protrude above the base of the washing compartment Attention Under no circumstances may the dishwasher be used without filters Incorrect repositioning and fitting of the filters will pro...

Page 17: ... the Start cancel indicator light 2 flashes of the end of programme indicator light The dishwasher will not drain Fault code malfunction Possible cause Solutions The water tap is blocked or furred with limescale The water tap is turned off The filter where present in the threaded hose fitting at the water inlet valve is blocked The water inlet hose has not been correctly laid or it is bent or squa...

Page 18: ...pots or a bluish coating on glasses and dishes Decrease rinse aid dosing Water drops have dried onto glasses and dishes Increase rinse aid dosing The detergent may be the cause Contact the detergent manufacturer s consumer care line If after all these checks the problem persists contact your local Service Force Centre quoting the model Mod product number PNC and serial number S N This information ...

Page 19: ... be carried out when the salt dispenser and rinse aid container have been filled with salt and rinse aid respectively and using the test programme see Washing programmes chart Hints for test centres 19 Load 12 standard place settings Rinse aid setting position 4 Type III Detergent dosage 5 g 25 g Type B Arrangement upper basket Arrangement lower basket Arrangement cutlery basket ...

Page 20: ... is the world s largest producer of powered appliances for kitchen cleaning and outdoor use More than 55 million Electrolux Group products such as refrigerators cookers vacuum cleaners chain saws and lawn mowers are sold each year to a value of approx 14 billion USD in more than 150 countries around the world 02 05 ...

Reviews: