background image

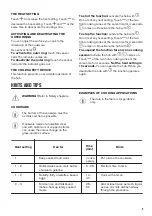
Problem

Possible cause

Remedy

 and a number come on.

There is an error in the hob.

Disconnect the hob from the

electrical supply for some time.

Disconnect the fuse from the

electrical system of the house.
Connect it again. If   comes

on again, speak to an Author-

ised Service Centre.

E6 comes on.

The second phase of the pow-

er supply is missing.

Check if the hob is correctly

connected to the electrical

supply. Remove the fuse, wait

one minute, and insert the fuse

again.

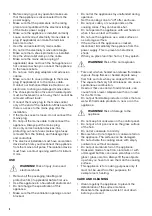
IF YOU CANNOT FIND A SOLUTION...
If you cannot find a solution to the problem yourself,

contact your dealer or an Authorised Service

Centre. Give the data from the rating plate. Give

also three digit letter code for the glass ceramic (it

is in the corner of the glass surface) and an error

message that comes on. Make sure, you operated

the hob correctly. If not the servicing by a service

technician or dealer will not be free of charge, also

during the warranty period. The instructions about

the Service Centre and conditions of guarantee are

in the guarantee booklet.

TECHNICAL DATA

RATING PLATE

Model ZEV6331BBA

PNC 949 492 204 01

Typ 60 HAD 20 AO

220 - 240 V 50 - 60 Hz


Made in Romania

Ser.Nr. .................

5.7 kW

ZANUSSI


COOKING ZONES SPECIFICATION

Cooking zone

Nominal Power (Max heat setting)

[W]

Cooking zone diameter [mm]

Left front

1800

180

Left rear

1200

145

Right front

1700 / 2700

210 / 270

For optimal cooking results use cookware not larger

than the diameter of the cooking zone.

12

Summary of Contents for ZEV6331BBA

Page 1: ...Y User Manual ZEV6331BBA EN User Manual Hob Questo manuale d istruzione è fornito da trovaprezzi it Scopri tutte le offerte per Zanussi ZEV6331BBA o cerca il tuo prodotto tra le migliori offerte di Cucine e Piani cottura ...

Page 2: ...ispose of it appropriately Keep children and pets away from the appliance when it operates or when it cools down Accessible parts are hot If the appliance has a child safety device this should be activated Children shall not carry out cleaning and user maintenance of the appliance without supervision Children aged 3 years and under must be kept away from this appliance when it is in operation at a...

Page 3: ...AFETY INSTRUCTIONS INSTALLATION WARNING Only a qualified person must install this appliance WARNING Risk of injury or damage to the appliance Remove all the packaging Do not install or use a damaged appliance Follow the installation instruction supplied with the appliance Keep the minimum distance from the other appliances and units Always take care when moving the appliance as it is heavy Always ...

Page 4: ...cable before first use Use this appliance in a household environment Do not change the specification of this appliance Make sure that the ventilation openings are not blocked Do not let the appliance stay unattended during operation Set the cooking zone to off after each use Do not put cutlery or saucepan lids on the cooking zones They can become hot Do not operate the appliance with wet hands or ...

Page 5: ...pose of it SERVICE To repair the appliance contact an Authorised Service Centre Use original spare parts only INSTALLATION WARNING Refer to Safety chapters BEFORE THE INSTALLATION Before you install the hob write down the information bellow from the rating plate The rating plate is on the bottom of the hob Serial number BUILT IN HOBS Only use the built in hobs after you assemble the hob into corre...

Page 6: ...on box an additional accessory the protective floor directly below the hob is not necessary The protection box accessory may not be available in some countries Please contact your local supplier You can not use the protection box if you install the hob above an oven 6 ...

Page 7: ... CONTROL PANEL LAYOUT 1 2 3 4 Use the sensor fields to operate the appliance The displays indicators and sounds tell which functions operate Sensor field Function Comment 1 ON OFF To activate and deactivate the hob 2 Heat setting display To show the heat setting 3 To activate and deactivate the outer ring 7 ...

Page 8: ... or deactivate the hob AUTOMATIC SWITCH OFF The function deactivates the hob automatically if all cooking zones are deactivated you do not set the heat setting after you activate the hob you spill something or put something on the control panel for more than 10 seconds a pan a cloth etc An acoustic signal sounds and the hob deactivates Remove the object or clean the control panel you do not deacti...

Page 9: ... on Deactivate the hob with To suspend the function for only one cooking session activate the hob with comes on Touch of the two front cooking zones at the same time for 4 seconds Set the heat setting in 10 seconds You can operate the hob When you deactivate the hob with the function operates again HINTS AND TIPS WARNING Refer to Safety chapters COOKWARE The bottom of the cookware must be as thick...

Page 10: ...s use cookware with clean bottom Scratches or dark stains on the surface have no effect on how the hob operates Use a special cleaner applicable for the surface of the hob Use a special scraper for the glass CLEANING THE HOB Remove immediately melted plastic plastic foil sugar and food with sugar If not the dirt can cause damage to the hob Take care to avoid burns Put the special scraper on the gl...

Page 11: ...signal sounds when the hob is deactivated You put something on one or more sensor fields Remove the object from the sensor fields The hob deactivates You put something on the sen sor field Remove the object from the sensor field Residual heat indicator does not come on The zone is not hot because it operated only for a short time If the zone operated sufficiently long to be hot speak to an Au thor...

Page 12: ...a from the rating plate Give also three digit letter code for the glass ceramic it is in the corner of the glass surface and an error message that comes on Make sure you operated the hob correctly If not the servicing by a service technician or dealer will not be free of charge also during the warranty period The instructions about the Service Centre and conditions of guarantee are in the guarante...

Page 13: ... you follow below hints When you heat up water use only the amount you need If it is possible always put the lids on the cookware Before you activate the cooking zone put the cookware on it The cookware bottom should have the same diameter as the cooking zone Put the smaller cookware on the smaller cooking zones Put the cookware directly in the centre of the cooking zone Use the residual heat to k...

Page 14: ...14 ...

Page 15: ...15 ...

Page 16: ...WWW ZANUSSI COM SHOP 867328609 C 512018 ...

Reviews: