background image

12

MAINTENANCE AND CLEANING

Prior to undertaking any maintenance operation, be 
sure to unplug the appliance from the wall socket as 
a safety precaution.

Clean the interior periodically with lukewarm 
water and some bicarbonate of soda; the cabinet 
exterior with a Silicone wax spray; the condenser 
and the motor compressor with a brush or a vacuum 
cleaner.

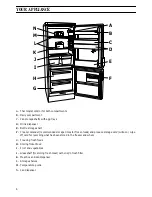
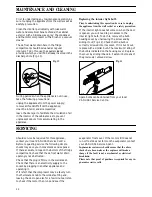
The defrost water drain hole in the fridge 
compartment should be cleaned at regular 
intervals. To do this, use the special cleaner 
provided, which you will find already inserted in the 
discharge hole (Fig. 13).

Fig. 13

During periods when the appliance is not in use, 
take the following precautions:
unplug the appliance from the power supply;
remove all foodstuffs from the appliance;
clean the interior and all accessories;
leave the door ajar to facilitate the circulation of air 
in the interior of the cabinet so as to prevent 
unpleasant odours from accumulating in the 
appliance.

D037

Replacing the interior light bulb

Prior to undertaking this operation, be sure to unplug 
the appliance from the wall socket as a safety precaution.

If the interior light does not come on when the door 
is opened, you will need to gain access to the 
interior light bulb. To do this, remove the bulb 
housing cover by unscrewing the screw and by 
sliding it out (Fig. 14). Check that the bulb is 
correctly screwed into its socket. If it is burnt out, 
replace with a similar bulb. The maximum rating of 
the bulb is indicated on the housing cover. Replace 
the cover by sliding it back in. Fasten it by means of 
the previously removed screw.

Fig. 14

Spare bulbs can be obtained from your local 
ZANUSSI Service Centre.

D206

SERVICING

Should service be required for this appliance, 
contact your local ZANUSSI Service Centre.
Before requesting service the following simple 
checks may save you inconvenience and expense:
If there are water drops on the bottom of the fridge 
compartment, check that the defrost water drain 
opening is not obstructed.
Check that the plug is firmly in the wall socket.
Check that there is an electricity supply to the 
socket by plugging in another appliance and 
operating it.
If it is felt that the compressor may be faulty turn 
the thermostat knob to the coldest setting and, 
leaving the door open also for a few minutes, listen 
to check if the motor then runs and see if the 

evaporator frosts over. If the motor still does not 
run or frost does not form on the evaporator contact 
your ZANUSSI Service Agent.

In-guarantee customers should ensure that the above 
checks have been made as the engineer will make a 
charge if the fault is not a mechanical or electrical 
breakdown.

Please note that proof of purchase is required for any in-
guarantee service calls.

Summary of Contents for ZFCA 62/26

Page 1: ...REFRIGERATOR FREEZER ZFCA 62 26 INSTRUCTION BOOKLET 2222 091 85 1 ...

Page 2: ...e and features of the CRISP N FRESH filter page 8 Cleaning the filter page 8 Drink dispenser page 9 Positioning the door shelves page 9 Cool check temperature guide page 10 Starting the appliance page 10 Everyday use of the cool check temperature guide page 10 Defrosting page 11 Maintenance and cleaning page 12 Replacing the interior light bulb page 12 Servicing page 12 TECHNICAL SPECIFICATIONS DI...

Page 3: ...ions ª Before defrosting cleaning or maintenance work is carried out be sure to switch off the appliance and unplug it ª Frozen food must NOT be re frozen once it has thawed out ª Do not place carbonated or fizzy drinks in the freezer as it creates pressure on the container which may cause it to explode resulting in damage to the appliance ª The cooling plate or refrigerated freezer shelves in thi...

Page 4: ...erhanging furniture Fig 1 B Fig 1 There should also be a gap of 25 mm either side of the appliance Do not obstruct the space underneath The back of the cabinet may be placed close to the wall but must not touch it DO NOT install in places with restricted ventilation A B D204 100 mm min Adjust the level of the appliance by screwing out the adjustable foot or feet at the bottom of the cabinet using ...

Page 5: ...ing E E C Directives 73 23 EEC of 19 2 73 Low Voltage Directive and subsequent modifications 89 336 EEC of 3 5 89 Electromagnetic Compatibility Directive and subsequent modifications Please ensure that when the appliance is installed it is easily accessible for the engineer in the event of a breakdown D207 GREEN YELLOW 13 AMP FUSE BROWN CORD CLAMP BLUE 13 AMP Before using Remove all securing tapes...

Page 6: ... storage times for frozen foods and produce storage card write on wipe off card for recording what has been stored in the freezer and when G Freezing fresh foods H Storing frozen food I Fruit and vegetables J Glass shelf for storing fresh meat with crisp n fresh filter K Meat box and can dispenser L Storage shelves M Temperature guide N Can dispenser 3 6 9 12 A B C D E F G H I J K L M N ...

Page 7: ...ore be sure that these frozen foodstuffs are transferred from the foodstore to the consumer in the shortest possible time a temperature increase of the frozen food could shorten its storage period It is also advisable not to exceed the storage period indicated by the producer of the food Finally do not open the door frequently or leave it open longer than is absolutely necessary If there is a powe...

Page 8: ...op of the salad crisper Meat can only be stored safely in this way for one or two days at the most Fruit vegetables these should be thoroughly cleaned and placed in the bottom salad crispers Butter cheese these should be placed in special airtight containers or wrapped in aluminium foil or polythene bags to exclude as much air as possible Milk bottles these should have a cap and should be stored i...

Page 9: ...r wines to dissolve or alternatively remove for cleaning by unscrewing in an anticlockwise direction Empty the container and rinse thoroughly with clean water If using the dispenser to store fresh fruit juice particular attention should be paid to the manufacturers storage instructions It is also advisable to clean the dispenser thoroughly between every filling using a solution of sterilising flui...

Page 10: ...fe storage level during warmer weather For more information on starting you appliance see Operation Everyday use of the cool check temperature guide During everyday use a fridge door is opened many times and as a result temperature fluctuation may occur A Zanussi fridge is designed to cope with any changes in temperature but under certain conditions the temperature guide in the appliance may show ...

Page 11: ...raper in the appropriate seating as shown in Figure 12 and place underneath a basin to collect the defrost water When defrosting is completed dry the interior thoroughly Replace the plug in the socket and after letting the appliance run for at least half an hour replace the previously removed food into the compartment Fig 12 Important A temperature rise of the frozen food packs during defrosting m...

Page 12: ...unscrewing the screw and by sliding it out Fig 14 Check that the bulb is correctly screwed into its socket If it is burnt out replace with a similar bulb The maximum rating of the bulb is indicated on the housing cover Replace the cover by sliding it back in Fasten it by means of the previously removed screw Fig 14 Spare bulbs can be obtained from your local ZANUSSI Service Centre D206 SERVICING S...

Reviews: