5
Important
The wires in the mains lead are coloured in
accordance with the following code:
Green and Yellow
- Earth
Blue
- Neutral
Brown
- Live
If you fit your own plug, the colours of the wires in
the mains lead of your appliance may not
correspond with the markings identifying the
terminals in your plug, proceed as follows:
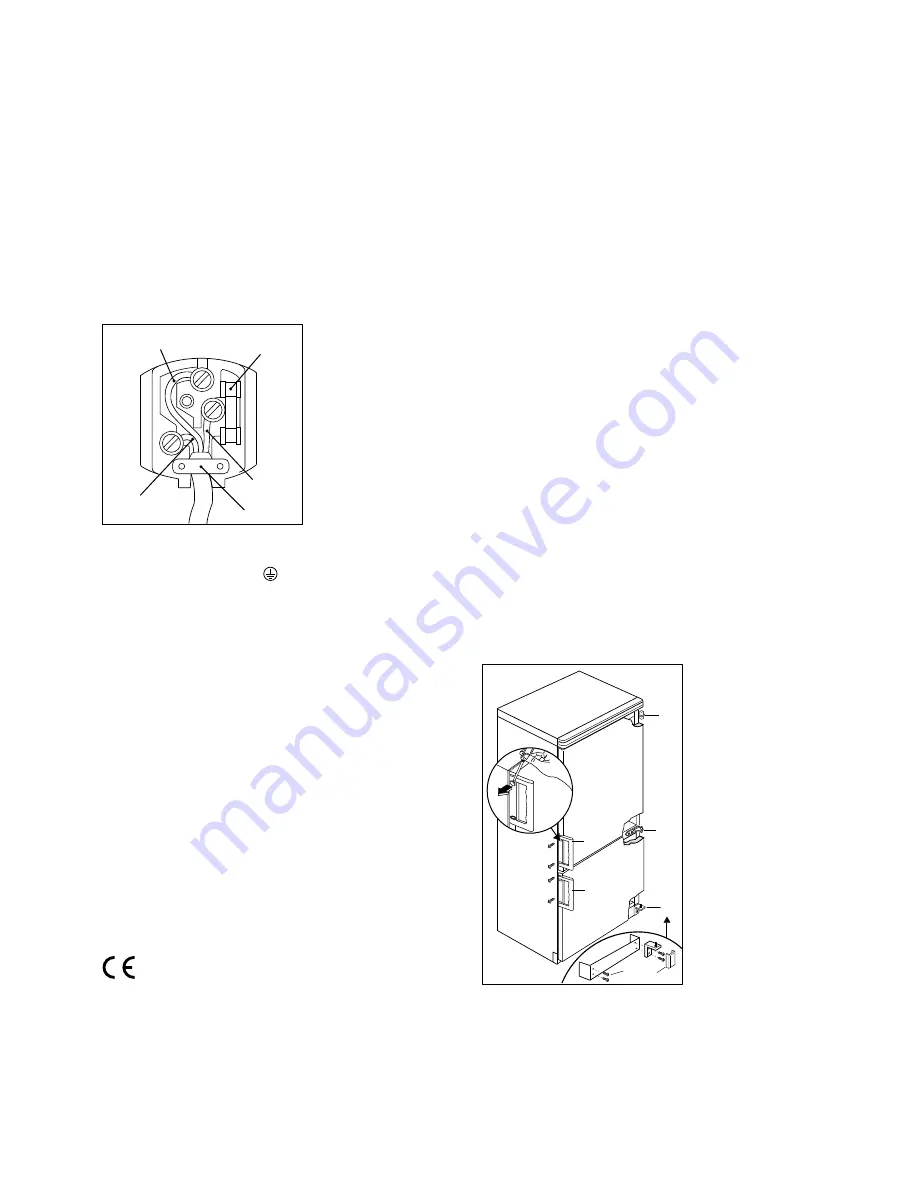
Fig. 4
Connect the Green and Yellow (earth) wire to the
terminal in the plug which is marked with the letter
«E» or the earth symbol
, or coloured green and
yellow.
Connect the blue (neutral) wire to the terminal in
the plug which is marked with the letter «N» or
coloured black.
Connect the brown (live) wire to the terminal in the
plug which is marked with the letter «L» or
coloured red.
The plug moulded onto the lead incorporates a fuse.
For replacement, use a 13amp BSI362 fuse. Only
ASTA or BSI approved fuses should be used.
The plug must not be used if the fuse cover/carrier
is lost. The cover/carrier is indicated by the
coloured insert at the base of the plug.
A replacement cover/carrier must be obtained from
your local Zanussi Service Force Centre whose
address is listed in the Customer Care Booklet
which accompanies your instruction manual.
This appliance complies with the E.E.C. Directive No. 87/308
of 2.6.87 relative to radio interference suppression.
This appliance complies with the following
E.E.C. Directives:
-
73/23 EEC
of 19.2.73 (Low Voltage Directive) and
subsequent modifications;
-
89/336 EEC
of 3.5.89 (Electromagnetic
Compatibility Directive) and subsequent
modifications.
Please ensure that when the appliance is installed it is easily
accessible for the engineer in the event of a breakdown.
D207
GREEN & YELLOW
13 AMP. FUSE
BROWN
CORD CLAMP
BLUE
13 AMP
Before using
Remove all securing tapes. Wash inside the
appliance with lukewarm water and bicarbonate of
soda (5 ml to 0.5 litre of water). Do not use soap or
detergent as the smell might linger. Dry thoroughly.
Door reversal directions
(Fig. 5)
Before carrying out the operations described below,
pull out the mains plug from the wall socket.
To carry out this reversal go through the following
steps:
Gently lay the fridge/freezer on its back with the
top held away from the floor by 5-8 cm (2-3 inches)
of packing;
Remove the plastic cover (6) (which has a clip-in
fitting) masking the bottom hinge;
Remove bottom hinge (1);
Slide out the lower door from middle hinge (2) and
remove the latter;
Slide out the upper door from pin (3);
Refit pin (3) on the opposite side;
Refit the upper door and the middle hinge on the
opposite side;
Refit the lower door and bottom hinge (1) on the
opposite side;
Blank off all unused holes with plugs (7).
Refit the plastic cover (6) on the bottom hinge.
Remove handles (4-5) and refit them on the opposite
side.
Fig. 5
Warning:
After having reversed the opening direction of the doors,
check that all the screws are properly tightened.
D074
3
2
1
6
7
4
5


