background image

19

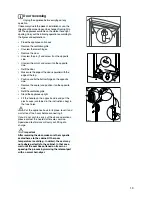
Door reversing

Unplug the appliance before carrying out any

operation.
If necessary due to the place of installation or use, the
direction of door opening can be changed from right to
left. The appliances available on the market have right
opening. Carry out the following operations according to
the figures and explanations.

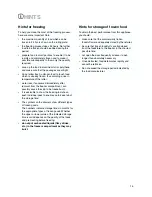
Place the appliance on its back

Remove the ventilation grille.

Unscrew the lower hinges.

Remove the door.

Unscrew the pin (f) and screw it on the opposite
side.

Unscrew the pin (d) and screw it on the opposite
side.

Refit the door.

Make sure the edge of the door is parallel with the
edge of the top.

Position and fix the bottom hinge on the opposite
side.

Remove the cap (e) and position it on the opposite
side.

Refit the ventilation grille.

Stand the appliance upright.

Fit the handle on the opposite side and put the
plastic caps (contained in the instructions bag) in
the free holes.

Put the appliance back in its place, level it and

wait at least two hours before connecting it.

If you do not wish to carry out the above operations,
please contact the nearest after-sales service.
Specialised technicians will carry out fitting at a
charge.

Important

After reversing the door, make sure the magnetic
seal adheres to the cabinet. If the room
temperature is cold (e.g. in winter), the seal may
not adhere perfectly to the cabinet. In that case,
wait until the seal has softened on its own or
speed up the process by warming the relevant part
with a normal hair-dryer.

PR220

Summary of Contents for ZFU 29 SX

Page 1: ...CONGELADOR FREEZER ZFU 29 S ZFU 29 SX LIBRODEINSTRUCCIONES INSTRUCTIONBOOKLET 2223 420 81 ...

Page 2: ...s such as ice cream makers inside of refrigerating appliances Service Repair Any electrical work required to install this appliance should be carried out by a qualified electrician or competent person This product should be serviced by an authorized Service Centre and only genuine spare parts should be used Under no circumstances should you attempt to repair the appliance yourself Repairs carried ...

Page 3: ...uld be against a wall Environment Protection This appliance does not contain gasses which could damage the ozone layer in either its refrigerant circuit or insulation materials The appliance shall not be discarded together with the urban refuse and rubbish Avoid damaging the cooling unit especially at the rear near the heat exchanger Information on your local disposal sites may be obtained from mu...

Page 4: ...pilot light remains lit up USE Control panel Temperature regulation The temperature is automatically regulated and can be increased to achieve a higher temperature warmer by rotating the thermostat knob toward lower settings or reduced colder rotating the knob towards higher settings However the exact setting should be chosen keeping in mind that the temperature inside the refrigerator depends on ...

Page 5: ...er in this case cooking will take longer Ice cube production This appliance is equipped with one or more trays for the production of ice cubes Fill these trays with water then put them in the freezer compartment Do not use metallic instruments to remove the trays from the freezer Freezing fresh food The 4 star compartment is suitable for long term storage of commercially frozen food and for freezi...

Page 6: ...e to show the freezing in date on each individual pack to enable you to keep tab of the storage time The symbols on the drawers show different types of frozen goods The numbers indicate storage times in months for the appropriate types of frozen goods Whether the upper or lower value of the indicated storage time is valid depends on the quality of the foods and pre treating before freezing do not ...

Page 7: ...icarbonate of soda Rinse and dry thoroughly Do not pull move or damage any pipes and or cables inside the cabinet Clean the condenser black grill and the compressor at the back of the appliance with a brush or a vacuum cleaner This operation will improve the performance of the appliance and save electricity consumption Many proprietary kitchen surface cleaners contain chemicals that can attack dam...

Page 8: ...s power switch is on there is an electricity supply find out by plugging in another appliance the thermostat knob is in the correct position If there are water drops on the bottom of the cabinet check that the defrost water drain opening is not obstructed see Defrosting section If your appliance is still not working properly after making the above checks contact the nearest service centre To obtai...

Page 9: ...e must be earthed The power supply cable plug is provided with a contact for this purpose If the domestic power supply socket is not earthed connect the appliance to a separate earth in compliance with current regulations consulting a specialist technician The Manufacturer declines all responsibility if the above safety precautions are not observed This appliance complies with the following E E C ...

Page 10: ...he bottom hinge on the opposite side Remove the cap e and position it on the opposite side Refit the ventilation grille Stand the appliance upright Fit the handle on the opposite side and put the plastic caps contained in the instructions bag in the free holes Put the appliance back in its place level it and wait at least two hours before connecting it If you do not wish to carry out the above ope...

Page 11: ...www electrolux com www zanussi com es ...

Reviews: