background image

8

The appliance is designed to be connected to 230 V
monophase electricity supply.

The connection must be carried out in compliance with
the laws and regulations in force.

Before the appliance is connected:

1) check that the main fuse and the domestic installation

can support the load (see the rating label);

2) check that the power supply is properly earthed in

compliance with the current rules;

3) check the socket or the double pole switch used for

the electrical connection can be easily reached with
the appliance built in the forniture unit.

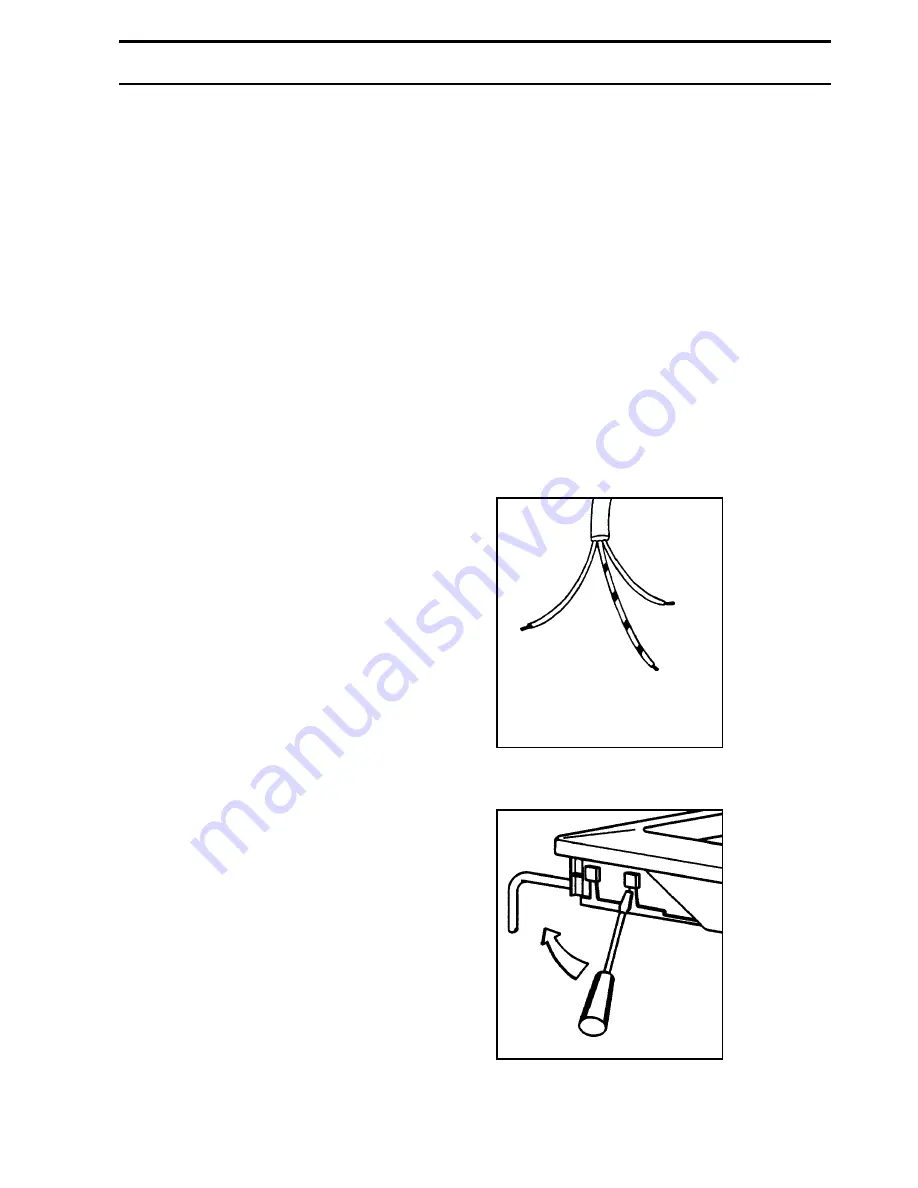
The appliance is supplied with a connection cable. This
has to be provided with a proper plug, able to support the
load marked on the identification plate. To connect the
plug to the cable, follow the recommendation given in
Fig. 8. The plug has to be fitted in a proper socket.
If connecting the appliance directly to the electric system,
it is necessary that you install a double pole switch
between the appliance and the electricity supply, with a
minimum gap of  3 mm. between the switch contacts and
of a type suitable for the required load in compliance
with the current rules.
The earth cable (yellow/green) must not be interrupted
by the interrupter.
The connection cable has to be placed in order that, in
each part, it cannot reach a temperature 90 

°

C higher

than the room temperature.
The brown coloured phase cable (fitted in the terminal
block contact marked with "L") must always be connected
to the network phase.

REPLACEMENT OF THE VOLTAGE CABLE

The connection of the voltage cable to the appliance's
terminal block is of type "Y". This means that its
replacement requires the specific equipment of a
technician.
In this case, only cable type H05V

2

V

2

-F T90 must be

used. The cable section must be suitable to the voltage
and the working temperature.
The yellow/green earth wire must be approximately 2
cm. longer than the phase wires (Fig.8).

To open the terminal block and reach the terminals,
proceed as follows:

insert the point of a screwdriver into the visible
protrunding part of the terminal block;

exert a light pressure and lift (Fig. 9)

7. Electrical Connection

Fig. 8

Fig. 9

FO 0073

FO 0257

Neutral

Earth (yellow/green)

Summary of Contents for ZGF 786 ICX

Page 1: ...1 GAS HOBS ZGF 786 ICX ZGF 786 ICW OPERATING AND INSTALLATION MANUAL ...

Page 2: ...ifications During Operation About Installation Cleaning and Manteinance It is mandatory that all operations required for the installationarecarriedoutbyaqualifiedorcompetent person in accordance with existing rules and regulations Disconnect the appliance from the electrical supply before carrying out any cleaning or manteinance work Ensure a good ventilation around the appliance A poor air supply...

Page 3: ...b to the symbol Always turn the flame down or put it out before taking the pans off the burner USING THE HOB CORRECTLY To ensure maximum burner efficiency it is strongly recommended that you use only pots and pans with a flat bottom fitting the size of the burner used so that flame will not spread beyond the bottom of the vessel see the table beside It is also advisable as soon as a liquid starts ...

Page 4: ...PPORTS The hobs are provided with enamelled pan supports thin and light or cast iron pan supports thicker and heavier see fig 2 To keep the pan supports in the right position they are hooked to a couple of special hinges in the back of the hob Thanks to these hooks you can lift the pan supports for easier cleaning To take the pan supports completely off the hob proceed as shown in fig 3 The pan su...

Page 5: ...and easy cleaning of the hob Cast iron pan supports In hobs provided with cast iron pan supports the left pan supports has to be positioned on the hinge of the right pan support as shown in the fig 6 This jointensures thestabilityofthepansupports when using the central burner WARNING In hobs provided with cast iron pan supports never proceed as described in fig 4 and 5 as this would cause the hing...

Page 6: ...s safety features it is necessary that the taps are periodically lubricated ORIGINAL SPARE PARTS This machine before leaving the factory has been tested and studied by many experts and specialists in order to give you the best results Any repair work which needs to be carried out should be done with the utmost care and attention For this reason we reccomend that for any problem you contact the dea...

Page 7: ...tainless steel If using flexible metallic pipes be careful they do not come in contact with mobile parts or they are not squeezed Use the same attention when the hob is combinated with an oven IMPORTANT To ensure a correct operation a saving of energy and the long life of the appliance the voltage pressure of the appliance must correspond to the recommended values Theadjustableconnectionisfixedtot...

Page 8: ...ith a minimumgapof 3mm betweentheswitchcontactsand of a type suitable for the required load in compliance with the current rules The earth cable yellow green must not be interrupted by the interrupter The connection cable has to be placed in order that in each part it cannot reach a temperature 90 C higher than the room temperature The brown coloured phase cable fitted in the terminal blockcontact...

Page 9: ...Ultra rapid 56 double crown BY pass diameters Fig 11 By pass screw REPLACEMENT OF INJECTORS Remove the pan supports Remove the burner s caps and crowns With a socket spanner 7 unscrew and remove the injectors Fig 10 and replace them with the ones required for the type of gas in use see table on the next page Reassemble the parts following the same procedu re backwards Replace the rating label plac...

Page 10: ...REDUCED NOMINAL NOMINAL OF GAS BURNER MARKS POWER POWER POWER PRESSURE 1 100 mm INPUT kW mbar KW m 3 h g h Ultra rapid large 119 3 4 1 2 0 323 Rapid large 112 2 9 0 65 0 276 Semi rapid medium 92 1 9 0 45 0 180 25 Auxiliary small 70 1 1 0 33 0 104 Ultra rapid large 93 3 5 1 2 254 Rapido grande 86 2 8 0 65 203 Semirapido medio 71 2 0 0 45 145 30 Ausiliario piccolo 50 1 0 0 33 72 Ultra rapid large 12...

Page 11: ...Fit the lid hinge blocks onto the hob using the original screws ensuring that the relevant shims are fitted between the hinge blocks and the hob fig 13 c Fit the left hand lid hinge marked S into the hinge block fig 14 d Carry out the same operation with the right hand lid hinge marked D ADJUSTING THE LID BALANCE To adjust the lid balance turn clockwise or anti clockwise the central screw of the r...

Page 12: ...lings supplied with the hob on the edges of the cut out place them exactly on the front and rear edge and at 50 mm from the side edges as shown in Fig 17 taking care that the sealings meet without overlapping place the hob in the cut out taking care of its centring fix the hob with the relevant screws Fig 18 The traction of the screws is able to trace the sealing any excess of which can then be ea...

Page 13: ...vided with brackets to allow a continuous supply of air To avoid overhating the building in should be carried out as shown in Figs 21 e 22 The hob s electric connection and the oven s one must be carried out separately both for safety reasons and to allow the oven to be easily taken off the unit Hanging forniture units or hoods must be placed at 650 mm minimum from the hob Fig 24 In case a hood wi...

Reviews: