background image

813 Current Editions and the ETCI Rules for

Electrical Installations.

Provision for ventilation

Detailed recommendations are contained in the

following British Standards Codes Of Practice:

B.S. 6172/B.S. 5440, Par. 2 and B.S. 6891

Current Editions.
The hob should not be installed in a bed sitting

room with a volume of less than 20 m³. If it is

installed in a room of volume less than 5 m³ an air

vent of effective area of 100 cm² is required. If it is

installed in a room of volume between 5 m³ and 10

m³ an air vent of effective area of 50 cm² is

required, while if the volume exceeds 11 m³ no air

vent is required.
However, if the room has a door which opens

directly to the outside no air vent is required even if

the volume is between 5 m³ and 11 m³.
If there are other fuel burning appliances in the

same room, B.S. 5440 Part 2 Current Edition,

should be consulted to determine the requisite air

vent requirements.
For appliances installed in the Republic of Ireland

please refer to the NSAI- Domestic Gas Installation

I.S. 813 Current Editions Table Four.

Location

The hob may be located in a kitchen, a kitchen/

diner or bed sitting room (with a volume greater

than 20 m³), but not in a bathroom or shower room.
The minimum distance combustible material can be

fitted above the hob in line with the edges of the

hob is 400 mm. If it is fitted below 400 mm a space

of 50 mm must be allowed from the edges of the

hob.
For appliances installed in the Republic of Ireland

please refer to NSAI- Domestic Gas Installation I.S

813 Current Edition Section 7- Permitted

Locations of Appliance.

GAS CONNECTION

WARNING! Any gas installation must

be carried out by a GAS SAFE

REGISTER installer.

Please refer to the technical

instructions on how to adjust the hob

to the gas specifications on Malta.

This appliance is certified for Malta.

Make sure that, once the hob is installed, it is easily

accessible for the engineer in the event of a

breakdown.

The manufacturer will not accept liability, should the

above instructions or any of the other safety

instructions incorporated in this instruction booklet

be ignored.
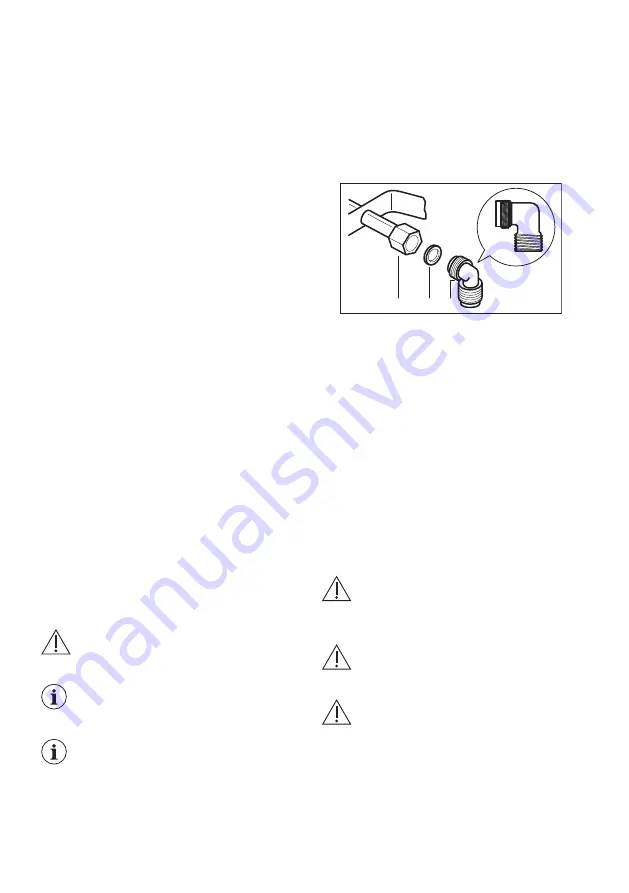
On the end of the shaft, which includes the R 1/2"

threaded elbow, adjustment is fixed so that the

washer is fitted between the components as shown

in the diagram. Screw the parts together without

using excessive force.

A

B

C

A. End of shaft with nut

B. Washer supplied with the appliance

C. Elbow supplied with the appliance
Connection to the gas supply should be with either

rigid or semi-rigid pipe, i.e. steel or copper.
The connection should be suitable for connecting

to R 1/2 (1/2 BSP male thread).
When the final connection has been made, it is

essential that a thorough leak test is carried out on

the hob and installation.
Make sure that the main connection pipe does not

exert any strain on the hob.
If you use flexible metal pipes make sure that they

agree to ISO 10380 and ISO 10807 standards. Be

careful they do not come in touch with mobile parts

or they are not squeezed. Also be careful when the

hob is put together with an oven.

CAUTION! It is important to install the

elbow correctly, with the shoulder on

the end of the thread, fitted to the hob

connecting pipe.

CAUTION! Failure to ensure the

correct assembly will cause leakage of

gas.

CAUTION! Make sure that the gas

supply pressure of the appliance

obeys the recommended values.

Rigid connection:

Carry out connection by using metal rigid pipes

(copper with mechanical end).

6

Summary of Contents for ZGH75524XB

Page 1: ...GETTING STARTED EASY User Manual ZGH75524XB ZGH75524XX ZGH76524XX EN User Manual Hob GB IE MT NG ...

Page 2: ...sons with very extensive and complex disabilities shall be kept away unless continuously supervised Children of less than 3 years of age should be kept away unless continuously supervised Do not let children play with the appliance Keep all packaging away from children and dispose of it appropriately Keep children and pets away from the appliance when it operates or when it cools down Accessible p...

Page 3: ...route the mains cable make sure that the cable doesn t come into direct contact for example using insulating sleeving with parts that can reach temperatures of more than 50 C above room temperature WARNING Use only hob guards designed by the manufacturer of the cooking appliance or indicated by the manufacturer of the appliance in the instructions for use as suitable or hob guards incorporated in ...

Page 4: ... plug after the installation If the mains socket is loose do not connect the mains plug Do not pull the mains cable to disconnect the appliance Always pull the mains plug Use only correct isolation devices line protecting cut outs fuses screw type fuses removed from the holder earth leakage trips and contactors The electrical installation must have an isolation device which lets you disconnect the...

Page 5: ...r touch the hob This can cause matt patches Discoloration of the enamel or stainless steel has no effect on the performance of the appliance CARE AND CLEANING WARNING Do not remove the buttons knobs or gaskets from the control panel Water may get inside the appliance and cause damage Clean the appliance regularly to prevent the deterioration of the surface material Deactivate the appliance and let...

Page 6: ...tion must be carried out by a GAS SAFE REGISTER installer Please refer to the technical instructions on how to adjust the hob to the gas specifications on Malta This appliance is certified for Malta Make sure that once the hob is installed it is easily accessible for the engineer in the event of a breakdown The manufacturer will not accept liability should the above instructions or any of the othe...

Page 7: ...pproximately 1 4 of a turn 1 2 of a turn for Multi Crown burner 6 Reassemble the gasket and the knob WARNING Make sure the flame does not go out when you quickly turn the knob from the maximum position to the minimum position ELECTRICAL CONNECTION Do not pull the mains cable to disconnect the appliance Always pull the mains plug if applicable The appliance must not be connected with an extension c...

Page 8: ... A cut off plug inserted into a 13 amp socket is a serious shock hazard Ensure that the cut off plug is disposed of safely REPLACEMENT OF THE CONNECTION CABLE The replacement of electric cable must be carried out exclusively by the service force centre or by personnel with similar competencies in accordance with the current regulations To replace the connection cable use only H03V2V2 F T90 or equi...

Page 9: ...in 150 mm 30 mm 480 mm 2 0 min 600 mm 4 50 mm 400 mm If a furniture unit is installed at a distance of 400 mm above the hob there must be a minimum safety distance of 50 mm to the left or right from the edge of the hob 5 6 7 8 A A supplied bracket 9 ...

Page 10: ... Kitchen unit with door or drawer min 6 mm min 30 mm 60 mm min 5 mm max 150 mm A B A Removable panel B Space for connections Kitchen unit with oven The electrical connection of the hob and the oven must be installed separately for safety reasons and to let easy remove oven from the unit PRODUCT DESCRIPTION COOKING SURFACE LAYOUT 3 4 5 2 1 1 Semi rapid burner 2 Multi Crown burner 3 Rapid burner 4 A...

Page 11: ...es any responsibility in case of the flame misuse 1 Push the control knob down and turn it counterclockwise to the maximum gas supply position 2 Keep the control knob pushed for equal or less than 10 seconds This lets the thermocouple warm up If not the gas supply is interrupted 3 Adjust the flame after it is regular If after some tries the burner does not light check if the crown and its cap are ...

Page 12: ...me down or switch it off before you remove the pans from the burner HINTS AND TIPS WARNING Refer to Safety chapters COOKWARE CAUTION Do not use cast iron pans clay or earthenware pots grill or toaster plates The stainless steel can become tarnished if it is too much heated WARNING Do not put the same pan on two burners WARNING Do not put unstable or damaged pots on the burner to prevent spills and...

Page 13: ...an have rough edges so be careful when you wash the pan supports by hand and dry them If necessary remove stubborn stains with a paste cleaner 3 After you clean the pan supports make sure that they are in correct positions 4 For the burner to operate correctly make sure that the arms of the pan supports are aligned with the centre of the burner CLEANING THE HOB Remove immediately melted plastic pl...

Page 14: ...ame extinguishes immedi ately after ignition Thermocouple is not heated up sufficiently After lightning the flame keep the knob pushed for equal or less than 10 seconds The flame ring is uneven Burner crown is blocked with food residues Make sure that the injector is not blocked and the burner crown is clean IF YOU CANNOT FIND A SOLUTION If you cannot find a solution to the problem yourself contac...

Page 15: ...O 03 IT MADE IN ITALY TYPE IP20 0049 A B C A Stick it on Guarantee Card and send this part if applicable B Stick it on Guarantee Card and keep this part if applicable C Stick it on instruction booklet TECHNICAL DATA HOB DIMENSIONS Width 744 mm Depth 510 mm BYPASS DIAMETERS BURNER Ø BYPASS 1 100 mm Multi Crown 57 Rapid 42 Semi rapid 32 Auxiliary 28 15 ...

Page 16: ...JECTOR MARK Multi Crown 4 0 1 4 146 Rapid 3 0 0 75 119 Semi rapid 2 0 0 45 96 Auxiliary 1 0 0 33 70 WARNING This appliance does not function with the existing gas settings if installed in Malta Therefore before connecting the appliance it is essential to change the nozzles according to the type of gas used according to the table below GAS BURNERS FOR LPG G30 G31 28 30 37 mbar BURNER NORMAL POWER k...

Page 17: ...s burner EE gas burner Left rear Semi rapid 61 2 Right rear Rapid 54 4 Centre middle Multi Crown 54 7 Left front Semi rapid 57 6 Right front Auxiliary not applicable Energy efficiency for the gas hob EE gas hob 57 0 EN 30 2 1 Domestic cooking appliances burning gas Part 2 1 Rational use of energy General ENERGY SAVING Before use make sure that the burners and pan supports are assembled correctly U...

Page 18: ...tainers to recycle it Help protect the environment and human health by recycling waste of electrical and electronic appliances Do not dispose of appliances marked with the symbol with the household waste Return the product to your local recycling facility or contact your municipal office 18 ...

Page 19: ...19 ...

Page 20: ...WWW ZANUSSI COM SHOP 867345143 E 052019 ...

Reviews: