background image

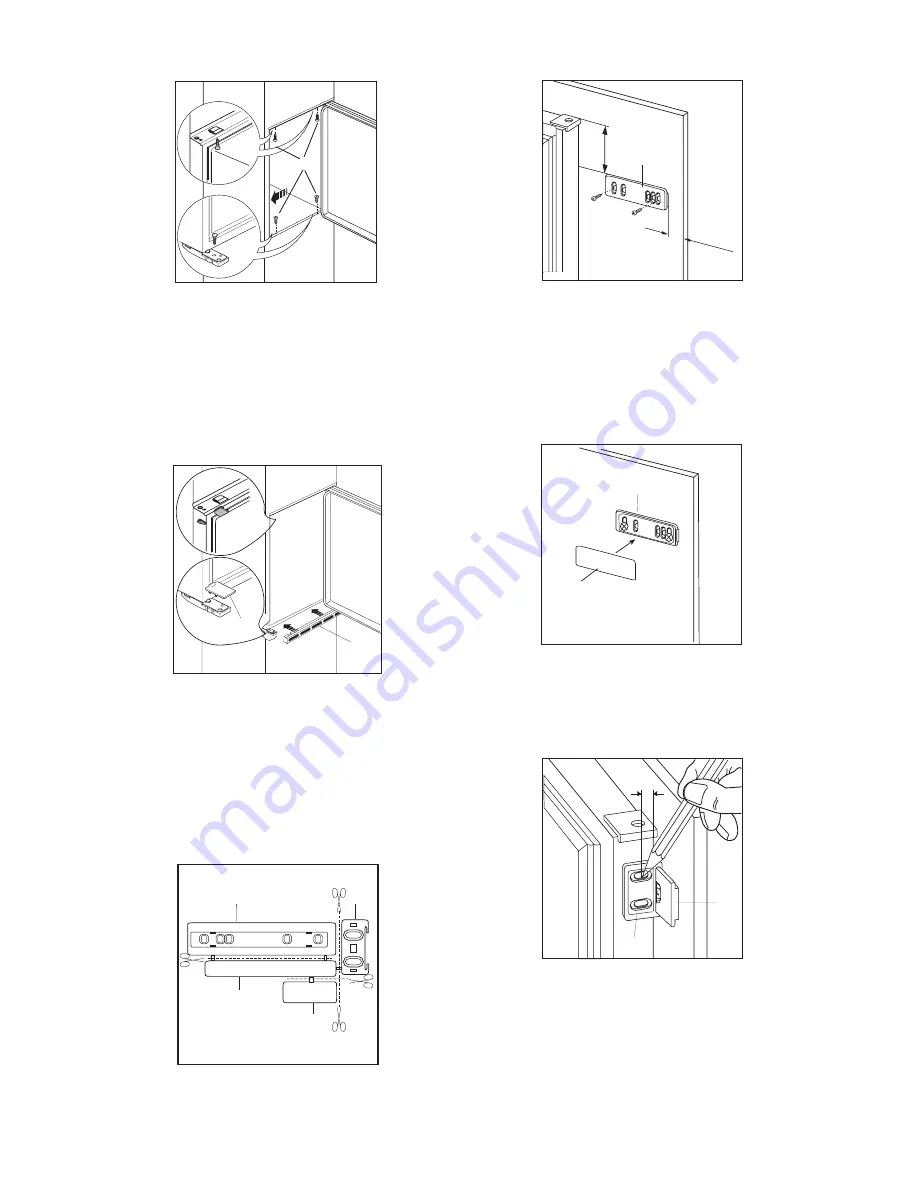
6. Place guide (A) on the inside part of the furniture

door, up and down as shown in the figure and
mark the position of external holes. After having
drilled holes, fix the guide with the screws
supplied.

8. Open the appliance door and the furniture door at

90¡. Insert the small square (B) into guide (A). Put
together the appliance door and the furniture door
and mark the holes as indicated in the figure. 

Remove the squares and drill holes with ¯ 2 mm
at 8 mm from the outer edge of the door. Place the
small square on the guide again and fix it with the
screws supplied.

20mm

A

50mm

PR166

P R 3 3 / 2

C

A

8mm

PR167

A

B

4. Snap vent grille (B) and hinge cover (E) into

position.
Apply covers (C-D) on joint cover lugs and into
hinge holes.

5. Separate parts A, B, C, D as shown in the figure.

PR266

A

B

C

D

3. Open the door and push the appliance against the

side of the kitchen unit opposite to that of ap-
pliance hinges. Fasten the appliance with 4
screws (I) provided in the kit included with the
appliance.

I

B

E

C

D

7. Fix cover (C) on guide (A) until it clips into place.

41

Summary of Contents for ZI 2403

Page 1: ...BEDIENUNGSANLEITUNG MODE D EMPLOI GEBRUIKSAANWIJZING INSTRUCTION BOOKLET 2222759 20 K HLSCHRANK REFRIGERATEUR KOELKAST REFRIGERATOR ZI 1603 ZI 2403 D F N t...

Page 2: ...ety Please read it before installing or using the appliance Please retain the instruction book for future reference If owner ship is transferred please leave the user manual for the new owner Domestic...

Page 3: ...aration of guarantee terms 43 Use and Control Before Use Wait two hours before connecting the appliance to allow the oil to flow back in the compressor Before using the appliance for the first time wa...

Page 4: ...uently as warm air will enter the cabinet and cause the compressor to switch on unnecessarily often If the ambient temperature is high the thermostat knob is on the coldest setting higher numbers and...

Page 5: ...easant smells Changing the light bulb Should the interior light fail to work first switch off the appliance and disconnect from the electricity supply then replace the bulb as follows 1 unscrew the li...

Page 6: ...around them Make sure that the door is completely closed and that the insulating strip is complete and clean The temperature where the cabinet is placed is above normal room temperature Turn the tempe...

Page 7: ...d loss See installation instructions Important if the supply cord is damaged it must be replaced by a special cord or assembly availa ble from the manufacturer or its service agent Positioning Unpack...

Page 8: ...following dimensions Depth 50 mm Width 540 mm PR0 540 50 3 2 1 Electrical connection Before plugging in ensure that the voltage and frequency shown on the serial number plate correspond to your domes...

Page 9: ...rill holes with 2 mm at 8 mm from the outer edge of the door Place the small square on the guide again and fix it with the screws supplied 20mm A 50mm PR166 PR33 2 C A 8mm PR167 A B 4 Snap vent grille...

Page 10: ...of the furniture door be necessary use the clearance of slots At the end of operations it is necessary to check if the door of the furniture closes properly PR168 PR167 1 D B 10 Fix cover D on guide B...

Page 11: ...ts that result from repairs or measures carried out by people who are not qualified or expert or defects that result from the addition of non original accessories or spare parts are not covered by the...

Page 12: ...923631724 923527635...

Reviews: