background image

18

Safety Instructions for the Installer

A fixture must be provided in the electrical instal-
lation which allows the appliance  to be discon-
nected from the mains at all poles with a contact
opening width of at least 3 millimetres.
Suitable isolation devices include, e.g. cut-outs,
fuses (screw type fuses are to be removed from
the holder), earth leakage trips and contactors.

In respect of fire protection, this appliance corre-
sponds to type Y (IEC 335-2-6). Only this type of
appliance may be installed with a high cupboard
or wall on one side.

It is not permitted to fit drawers underneath the
cooking surface.

Shock protection must be provided by the instal-
lation.

The kitchen unit in which the appliance is fitted
must satisfy the requirements of DIN 68930 in
respect of stability.

For protection against moisture, all cut surfaces
are to be sealed with a suitable sealant.

On tiled work surfaces, the joints in the area
where the hob sits must be completely filled with
grout.

On natural, artificial stone, or ceramic tops, the
snap action springs must be bonded in place
using sythetic resin or separate application adhe-
sive.

Ensure that the seal is correctly seated in the
frame and that it is seated against the work sur-
face without leaving any gaps. Additional silicon
sealant must not be applied, this will make remo-
val more difficult in the event of the need for ser-
vice.

To remove the hob, it must be pressed out from
below.

Summary of Contents for ZKT 630 D

Page 1: ...Induktions Glaskeramik Kochfeld laca vitrocerámica de cocción por inducción Table de cuisson vitrocéramique à induction ZKT 630 D INSTRUCTION BOOK GEBRAUCHSANWEISUNG INSTRUCCIONES NOTICE D UTILISATION 319 599 200 B 1201 03 g d e f ...

Page 2: ...f the appliance is highlighted It is imperative that this information is observed 1 Numbered instructions guide you step by step through operation of the appliance 2 3 3 After this symbol you will find supplementary information on operating and practical use of the appliance 2 Tips and instructions for the economical and environmentally sound use of the appliance are marked with this symbol The in...

Page 3: ... 10 Heat Level Selection and 10 Cooking without the Automatic Heating Up Function 11 Cooking with the Automatic Heating Up Function 11 Switching the Double ring cooking zone On and Off 12 Power Function 12 Timer 12 Locking Unlocking the Control Panel 13 Usage Tables Tips 14 Tips on Cooking with or without the Automatic Feature 14 Tables 14 Application Examples for the Automatic Heating Up Feature ...

Page 4: ...is appliance is intended for domestic cooking only It is not designed for commercial or indu strial purposes Do not use the hob to heat the room Take care when plugging electrical appliances into mains sockets near the hob Connecting leads must not come into contact with the hot surface Overheated fats and oils catch fire quickly You should supervise cooking when preparing foods in fat or oil e g ...

Page 5: ...ediately with a scraper while it is still hot If the mixture cools damage to the surface may be incurred when it is removed Keep all items and materials that can melt away from the glass ceramic surface e g plastics alu minium foil or oven foils If something of this nature should melt onto the glass ceramic sur face it must also be removed immediately using the scraper Avoid boiling pans dry The b...

Page 6: ...zone there is no energy transfer heating up and thereby absolute security against accidental switching on 3 For technical reasons it is necessary that a cooling blower operates when the induction cooking zone is on Cooking surface features View of the appliance H e a t S e t t i n g s e l e c t i o n a n d O n O f f s e n s o r f i e l d C o o k i n g z o n e s e l e c t i o n w i t h d i g i t a ...

Page 7: ...hen the Power function is activa ted The Power function supplies extra high hea ting capacity It can be activated for cooking zone 1 at the front left ø 210 mm Cooking Zone Safety Switch 1 If one of the cooking zones is not switched off after a certain time or if the cooking stage is not changed the corresponding cooking zone switches itself off automatically j appears in the display of the releva...

Page 8: ... 9 Caution The pan base of suitable kitchenware heats up within a few seconds You can also check this with a magnet If it remains fixed to the base the pan is suitable for induction cooking zones Pan Size Up to a certain limit the induction cooking zone adapts itself to the size of the pan base diameter However the pan base diameter must be of a mini mum size depending on the size of the cooking z...

Page 9: ...ged and then scratch the cooking surface when slid Sau cepans and frying pans with sharp edges and burrs will also scratch 2 Energy saving tips Always place pans on the cooking zone before switching on Ensure that the pots and pans are in the centre of the cooking zone and cover the heated marked surface Dirty cooking zones and pan bases damage the glass ceramic cooking surface and increase elec t...

Page 10: ...ely 1 second 3 After a single cooking zone or the entire coo king field has been switched off remaining residual heat is shown in the digital displays of the corresponding cooking zones with h for hot 3 If all cooking zones are switched off the appliance switches off automatically after a period of time Cooking Zone Selection To select the required cooking zone touch the corresponding sensor field...

Page 11: ...con tinued cooking stage The duration of the automatic heating up function depends on the selected continued cooking stage 1 Select the required cooking zone with the coo king zone sensor fields The decimal point in the associated display field illuminates 2 With the or sensor fields set the cooking stage 9 Put down briefly and press the sensor field again A lights up in the cooking stage display ...

Page 12: ...t setting Timer A cooking time can be set with the integrated timer for all 4 cooking zones When the end of the cooking time is reached the cooking zone switches itself off automatically 1 Use the sensor field Cooking Zone to select the required cooking zone and set the required coo king stage 2 Touch the TIMER W sensor field to activate the timer function for this cooking zone 00 appears in the d...

Page 13: ...eaving the coo king zone active 1 Select the desired cooking zone using the coo king zone buttons 2 Touch the Timer button again 3 Touch the and buttons simultaneously only the timer switches off The cooking zone is left on Locking Unlocking the Control Panel The control panel with the exception of the On Off sensor field can be locked at any required time during cooking in order to prevent adjust...

Page 14: ...ui dance The switch setting required for cooking depends on the quality of the pots and on the type and quantity of the foodstuffs Switch setting Suitable for 9 or P Heating Up Heating up large quantities of water cooking pasta 7 9 Heavy Browning Deep frying pommes frites browning meat e g goulash Frying e g potato fritters Frying pieces of loin steaks 6 7 Gentle Frying Frying meat schnitzel cordo...

Page 15: ... not be left on the surface Clean the entire cooking surface thoroughly once a week For cleaning use Stahl Fix WK Top or Cillit Then rinse the entire cooking surface with plain water and rub it dry with a clean cloth Please ensure that no residues cleaner remain on the surface The cooking surface would otherwise be damaged Application examples Cooking pro cesses Switch set ting Duration Notes tips...

Page 16: ...emovers on the hob frame they will make the surface matt Grains of sand that have fallen on the cooking sur face can cause scratches when the pans are slid around Ensure therefore that no grains of sand remain on the cooking surface Abraded decor In time the decor is abra ded by the use of aggres sive cleaners and scouring pan bases and dark stains develop 3 You can obtain suitable cleaning and ca...

Page 17: ... mm Depth 500 mm Height outside 54 mm Height inside 51 mm Cut Out Dimensions Width 560 mm Depth 490 mm Corner radius R3 Power Consumption Radiant heat single ring cooking zone ø 145 mm 1200 W Radiant heat double ring cooking zone ø 180 mm ø 120 mm 1700 W 800 W Induction cooking zone ø 145 mm 1400 W Induction cooking zone ø 210 mm 2200 W Induction cooking zone ø 210 mm P 3000 W Heating element volt...

Page 18: ...k protection must be provided by the instal lation The kitchen unit in which the appliance is fitted must satisfy the requirements of DIN 68930 in respect of stability For protection against moisture all cut surfaces are to be sealed with a suitable sealant On tiled work surfaces the joints in the area where the hob sits must be completely filled with grout On natural artificial stone or ceramic t...

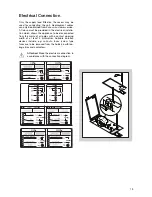
Page 19: ...rovided in the electrical installa tion which allows the appliance to be disconnected from the mains at all poles with a contact opening width of at least 3 millimetres Suitable isolation devices include e g cut outs fuses screw type fuses are to be removed from the holder earth lea kage trips and contactors 1 Attention Make the electrical connection in accordance with the connection diagram ...

Page 20: ... or plastic Costs incurred for calls to put right an appliance which is improperly installed or calls to appliance outside the United Kingdom Appliances found to be in use within a commer cial or similar environment plus those which are the subject to rental agreements Products of Zanussi manufacture which are not marketed by Zanussi European Guarantee If you should move to another country within ...

Page 21: ...ical breakdown even if the appliance is under warranty Please note that proof of purchase is required for in guarantee service calls Help us to help you Please determine your type of enquiry before writing or telephoning When you contact us we need to know Your Name Address and post code Telephone number Clear and concise detail of the fault Name and model of the appliance E number CUSTOMER CARE F...

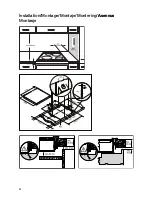
Page 22: ...94 Installation Montage Montaje Montering Asennus Asennus Montasje ...

Reviews: