background image

be washed with lukewarm water and some

neutral soap to remove the typical smell of a

brand-new product, then dried thoroughly.

CAUTION!

Do not use detergents, abrasive

powders, chlorine or oil-based cleaners

as they will damage the finish.

CAUTION!

The accessories and parts of the

appliance are not suitable for washing in

a dishwasher.

7.2 Periodic cleaning

The equipment has to be cleaned regularly:

1. Clean the inside and accessories with

lukewarm water and some neutral soap.

2. Regularly check the door seals and wipe

them clean to ensure they are clean and

free from debris.

3. Rinse and dry thoroughly.

7.3 Defrosting of the refrigerator

Frost is automatically eliminated from the

evaporator of the refrigerator compartment

during normal use. The defrost water drains

out through a trough into a special container

at the back of the appliance, over the motor

compressor, where it evaporates.
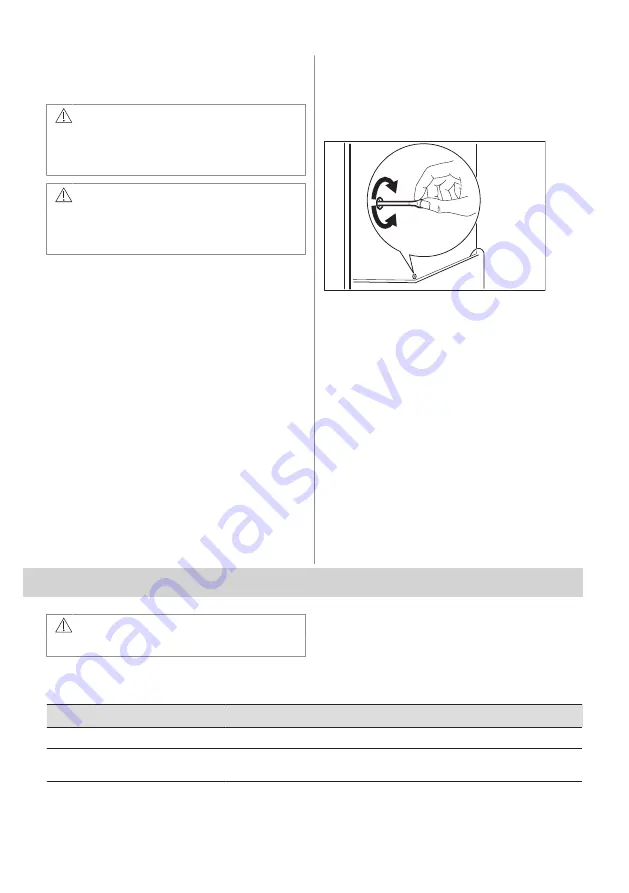
It is important to periodically clean the defrost

water drain hole in the middle of the

refrigerator compartment channel to prevent

the water overflowing and dripping onto the

food inside.
For this purpose use the tube cleaner

provided with the appliance.

7.4 Defrosting of the freezer

The freezer compartment is frost free. This

means that there is no build up of frost when

it is in operation, neither on the internal walls,

nor on the foods.

7.5 Period of non-operation

When the appliance is not in use for long

period, take the following precautions:

1. Disconnect the appliance from electricity

supply.

2. Remove all food.

3. Clean the appliance and all accessories.

4. Leave the doors open to prevent

unpleasant smells.

8. TROUBLESHOOTING

WARNING!

Refer to Safety chapters.

8.1 What to do if...

Problem

Possible cause

Solution

The appliance does not operate.

The appliance is switched off.

Switch on the appliance.


The mains plug is not connected to

the mains socket correctly.

Connect the mains plug to the

mains socket correctly.

ENGLISH 17

Summary of Contents for ZNTN18ES5

Page 1: ...zanussi com register ZNTN18ES5 EN User Manual Fridge Freezer zanussi com register...

Page 2: ...not responsible for any injuries or damage that are the result of incorrect installation or usage Always keep the instructions in a safe and accessible location for future reference 1 1 Children and...

Page 3: ...estic usage levels To avoid contamination of food respect the following instructions do not open the door for long periods clean regularly surfaces that can come in contact with food and accessible dr...

Page 4: ...d the appliance At first installation or after reversing the door wait at least 4 hours before connecting the appliance to the power supply This is to allow the oil to flow back in the compressor Befo...

Page 5: ...nce Do not put flammable products or items that are wet with flammable products in near or on the appliance Do not touch the compressor or the condenser They are hot Do not remove or touch items from...

Page 6: ...he model has been discontinued 2 7 Disposal WARNING Risk of injury or suffocation Disconnect the appliance from the mains supply Cut off the mains cable and discard it Remove the door to prevent child...

Page 7: ...W2 mm 546 D2 mm 551 A mm 1780 Space required in use B mm 36 the height width and depth of the appliance including the handle plus the space necessary for free circulation of the cooling air Overall s...

Page 8: ...d electrician or competent person WARNING This appliance must be earthed The manufacturer declines any liability should these safety measures not be observed The wires in the mains lead are coloured i...

Page 9: ...ing with a durable material 4 CONTROL PANEL 5 1 6 7 8 4 3 2 1 Display 2 Freezer Temperature warmer button 3 Freezer Temperature colder button 4 OK 5 Mode 6 Fridge Temperature warmer button 7 Fridge Te...

Page 10: ...1 Press Mode until the corresponding icon appears The Fridge OFF indicator flashes 2 Press OK to confirm The fridge OFF indicator turns off and the fridge compartment is switched on To select a diffe...

Page 11: ...ith a device that allows rapid cooling of food and keeps more uniform temperature in the compartment This device activates automatically when needed or manually To switch on the function 1 Press the M...

Page 12: ...deactivate the alarm 1 Press any button The sound switches off 2 The freezer temperature indicator shows the highest temperature reached for a few seconds then the display shows the set temperature a...

Page 13: ...le to switch on the device manually when needed refer to DYNAMICAIR function The fan operates only when the door is closed 5 5 Freezing fresh food The freezer compartment is suitable for freezing fres...

Page 14: ...pliance is the one that ensures the most efficient use of energy Fridge Most efficient use of energy is ensured in the configuration with the drawers in the bottom part of the appliance and shelves ev...

Page 15: ...inside the appliance may lead to shorter shelf life The whole freezer compartment is suitable for storage of frozen food products Leave enough space around the food to allow air to circulate freely Fo...

Page 16: ...he old one 6 7 Hints for food refrigeration Fresh food compartment is the one marked on the rating plate with Meat all types wrap in a suitable packaging and place it on the glass shelf above the vege...

Page 17: ...ompressor where it evaporates It is important to periodically clean the defrost water drain hole in the middle of the refrigerator compartment channel to prevent the water overflowing and dripping ont...

Page 18: ...eeze function is switched on Refer to FastFreeze function sec tion The FastCool function is switched on Refer to FastCool function section The compressor does not start im mediately after pressing the...

Page 19: ...nction or Fast Cool function is switched on Switch off FastFreeze function or FastCool function manually or wait until the function deactivates auto matically to set the temperature Re fer to FastFree...

Page 20: ...not lead to the desired result call the nearest Authorized Service Centre 8 2 Replacing the lamp The appliance is equipped with a longlife LED interior light Only service is allowed to replace the li...

Page 21: ...uments provided with this appliance 11 INFORMATION FOR TEST INSTITUTES Installation and preparation of the appliance for any EcoDesign verification shall be compliant with BS EN 62552 UK or EN 62552 E...

Page 22: ......

Page 23: ......

Page 24: ...222381822 A 282023...

Reviews: