background image

9

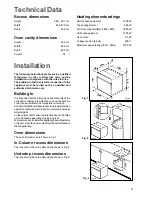
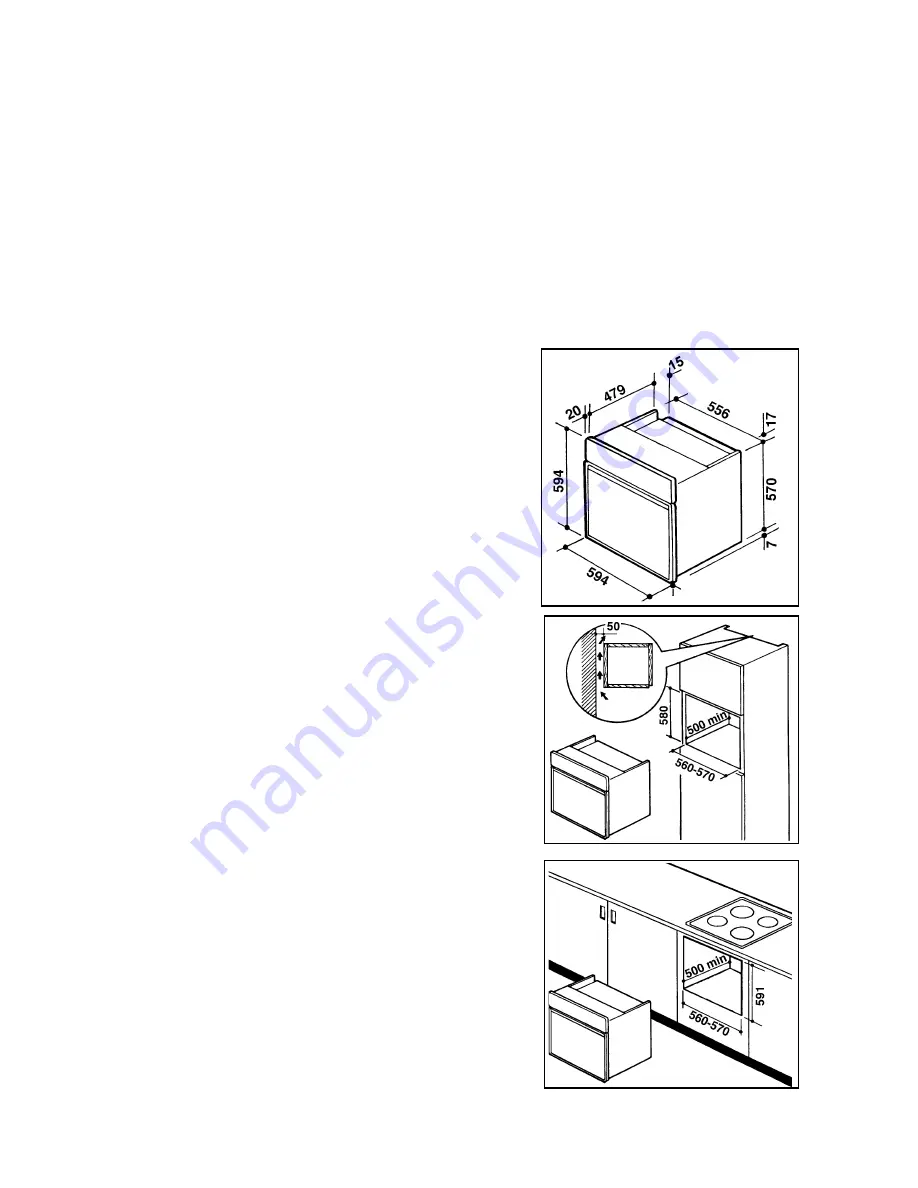
Recess dimensions

Height

58,0 / 59,1 cm

Width

56,0-57,0 cm

Depth

50,0 cm

Oven cavity dimensions

Height

32,5 cm

Width

44,0 cm

Depth

40,0 cm

Volume

 58     l

Technical Data

The following instructions are meant to a qualified

technician,  in  order  to  allow  him  carry  out  the

installation in compliance with the rules in force.

The building-in and the electrical connection fo the

appliance must be carried out by a qualified and

authorized technician only.

Building In

It is important that the dimensions and materials of the

surround or cabinet into which the oven will be built are

correct and will withstand a temperature increase.

A correct installation will have to ensure a proper protection

against contact with electric parts or merely functionally

isolated parts.

All the units meant to ensure protection have to be fitted

not to be taken away without using any tool.

We recommed not to install the appliance near refrigerators

or freezer, since the heat could affect the performance of

these appliances.

Oven dimensions

The oven dimensions are shown in fig. 7.

In-Column recess dimensions

The recess must have the dimensions shown in Fig. 8.

Undertop recess dimensions

The recess must have the dimensions shown in Fig. 9.

Installation

Heating elements ratings

Bottom heating element

1000 W

Top heating element

800 W

Full Oven (Top+Bottom) (1000 + 800)

1800 W

Grill heating element

1750 W

Oven lamp

25 W

Voltage tension (50 Hz)

230 V

Maximum power rating (230V - 50Hz)

1830 W

FO 0290

FO 0340

FO 0208

Fig. 7

Fig. 8

Fig. 9

Summary of Contents for ZOB 331

Page 1: ...ELECTRIC OVEN ZOB 331 INSTRUCTION BOOKLET ...

Page 2: ...itched on Alwaysplacethedrippingpaninpositiontocollectfat whenusingthegrillorwhencookingmeat Pouralittle water into the dripping pan to avoid smoke and unpleasant smells Alwaysuseovenglovestoremovepansfromtheoven Forhygieneandsafetyreasons thisapplianceshould be kept clean at all times A build up of fats or other foodstuff could result in a fire Disconnect the appliance from the electrical supply ...

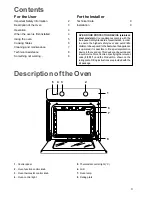
Page 3: ... 35791 and the Product No shown on the ratingplate Fittinginstructionsareprovidedwiththe kit package Contents For the User For the Installer Description of the Oven 2 1 3 8 7 6 4 5 1 Control panel 2 Oven function control knob 3 Oven thermostat control knob 4 Oven control light 5 Thermostat control light C 6 Grill 7 Oven lamp 8 Rating plate Important Safety Information 2 Description of the Oven 3 O...

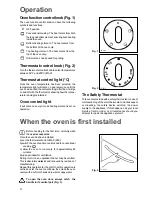
Page 4: ...ration Fig 2 Fig 1 5 0 MAX 1 0 0 1 5 0 2 0 0 FO 2673 0 FO 2739 The Safety Thermostat Thisovenisprovidedwithasafetythermostat Incaseof malfunctioning of the main thermostat and consequent over heating the safety device will stop the power supply to the appliance If this happens call your local Service Centre Under no circumstances should you attempt to repair the appliance yourself Before cooking f...

Page 5: ...lfall on the oven base If this happens carefully clean the oven to avoid unpleasant smells or smoke Hints and Tips on Cooking Fish and Meat You can place meat in oven proof dishes or directly on the oven shelf In this case remember to place the dripping pan in the first position from the bottom with some water in it The dripping pan will avoid the falling of melted fat on the oven base White meat ...

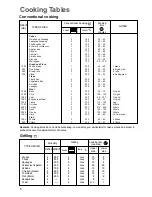
Page 6: ...e bread 1 200 45 60 1 piece 500 Rye bread 2 200 30 45 In bread pan 500 Bread rolls 2 200 20 35 8 rolls 250 Pizza 1 220 20 35 In baking pan Flans Pasta flan 2 200 40 50 Vegetable flan 2 200 45 60 Quiches 2 200 35 45 Lasagne 2 200 45 60 Meat 1000 Beef 2 200 50 70 On grid 1200 Pork 2 200 100 130 On grid 1000 Veal 2 200 90 120 On grid 1500 English roast beef 2 220 50 70 On grid 1200 Lamb 2 200 110 130...

Page 7: ... the oven door we recommend you to removeitfromtheoven Proceed as follows a open the oven door completely b find the hinges linking the door to the oven fig 6 c unlock and turn the small levers located on the two hinges fig 6 d handle the door by its left and right hand sides then slowly turn it towards the oven until it is half closed e gently pull the oven door off its site fig 6 f place it on a...

Page 8: ...perature light does not come on n The oven light does not come on n It takes too much time to finish the dishes or they are cooked too fast n Steam and condensation settle on the food and the oven cavity If the appliance is not working correctly please carry out the following checks before contacting your local Service Centre If after the checks listed in the previous chapter the appliance still d...

Page 9: ...nstallationwillhavetoensureaproperprotection against contact with electric parts or merely functionally isolated parts All the units meant to ensure protection have to be fitted not to be taken away without using any tool Werecommednottoinstalltheappliancenearrefrigerators orfreezer sincetheheatcouldaffecttheperformanceof these appliances Oven dimensions The oven dimensions are shown in fig 7 In C...

Page 10: ...tted in compliance with the electric supply rate Only the following cable types must beused H07RN F H05RN F H05RR F H05VV F H05 V2V2 F T90 H05 BB F section 3 x 1 mm2 A suitable plug able to carry the load specified on the rating plate must be fitted to the cable The plug has to be fitted in a proper socket Ifconnectingtheappliancedirectlytotheelectricsystem a double pole switch must be installed b...

Page 11: ......

Page 12: ...rld s largest producer of powered appliances for kitchen cleaning and outdoor use More than 55 million Electrolux Group products such as refrigerators cookers washing machines vacuum cleaners chain saws and lawn mowers are sold each year to a value of approx USD 14 billion in more than 150 countries around the world ...

Reviews: