background image

Before carrying out any maintenance, disconnect the appliance

from the power supply.

Ensure that the appliance is switched off before replacing the

lamp to avoid the possibility of electric shock.

Do not use a steam cleaner to clean the appliance.

Do not use harsh abrasive cleaners or sharp metal scrapers to

clean the glass door since they can scratch the surface, which

may result in shattering of the glass.

If the mains power supply cable is damaged, it must be

replaced by the manufacturer, its Authorised Service Centre or

similarly qualified persons to avoid an electrical hazard.

SAFETY INSTRUCTIONS

INSTALLATION

WARNING! Only a qualified person

must install this appliance.

• Remove all the packaging.

• Do not install or use a damaged appliance.

• Follow the installation instructions supplied with

the appliance.

• Always take care when moving the appliance as

it is heavy. Always use safety gloves and

enclosed footwear.

• Do not pull the appliance by the handle.

• Keep the minimum distance from other

appliances and units.

• Install the appliance in a safe and suitable place

that meets installation requirements.

• The appliance is equipped with an electric

cooling system. It must be operated with the

electric power supply.

ELECTRICAL CONNECTION

WARNING! Risk of fire and electric

shock.

• All electrical connections should be made by a

qualified electrician.

• The appliance must be earthed.

• Make sure that the parameters on the rating

plate are compatible with the electrical ratings

of the mains power supply.

• Always use a correctly installed shockproof

socket.

• Do not use multi-plug adapters and extension

cables.

• Make sure not to cause damage to the mains

plug and to the mains cable. Should the mains

cable need to be replaced, this must be carried

out by our Authorised Service Centre.

• Do not let mains cables touch or come near the

appliance door, especially when the door is hot.

• The shock protection of live and insulated parts

must be fastened in such a way that it cannot be

removed without tools.

• Connect the mains plug to the mains socket

only at the end of the installation. Make sure that

there is access to the mains plug after the

installation.

• If the mains socket is loose, do not connect the

mains plug.

• Do not pull the mains cable to disconnect the

appliance. Always pull the mains plug.

• Use only correct isolation devices: line

protecting cut-outs, fuses (screw type fuses

removed from the holder), earth leakage trips

and contactors.

• The electrical installation must have an isolation

device which lets you disconnect the appliance

from the mains at all poles. The isolation device

must have a contact opening width of minimum

3 mm.

• This appliance complies with the E.E.C.

Directives.

USE

WARNING! Risk of injury, burns and

electric shock or explosion.

• This appliance is for household use only.

• Do not change the specification of this

appliance.

3

Summary of Contents for ZOB10401XU

Page 1: ...GETTING STARTED EASY User Manual ZOB10401XU EN User Manual Oven ...

Page 2: ...8 years of age and persons with very extensive and complex disabilities shall be kept away unless continuously supervised Children of less than 3 years of age should be kept away unless continuously supervised Do not let children play with the appliance Keep all packaging away from children and dispose of it appropriately Keep children and pets away from the appliance when it operates or when it c...

Page 3: ...ade by a qualified electrician The appliance must be earthed Make sure that the parameters on the rating plate are compatible with the electrical ratings of the mains power supply Always use a correctly installed shockproof socket Do not use multi plug adapters and extension cables Make sure not to cause damage to the mains plug and to the mains cable Should the mains cable need to be replaced thi...

Page 4: ...ake sure the door is never closed when the appliance is in operation Heat and moisture can build up behind a closed furniture panel and cause subsequent damage to the appliance the housing unit or the floor Do not close the furniture panel until the appliance has cooled down completely after use CARE AND CLEANING WARNING Risk of injury fire or damage to the appliance Before maintenance deactivate ...

Page 5: ...ut the accessories back to their initial position PREHEATING Preheat the empty oven before first use 1 Set the function Set the maximum temperature 2 Let the oven operate for 1 hour 3 Set the function Set the maximum temperature 4 Let the oven operate for 15 minutes 5 Turn off the oven and let it cool down Accessories can become hotter than usual The oven can emit an odour and smoke Make sure that...

Page 6: ...he function is not interrupted and to ensure that the oven operates with the highest energy efficiency pos sible When you use this function the temperature in the cavi ty may differ from the set temperature The heating power may be reduced For general energy saving recommendations refer to Energy Efficiency chapter Energy Saving This function was used to comply with the energy efficiency class acc...

Page 7: ...ings for temperature cooking time and shelf position If you cannot find the settings for a special recipe look for the similar one Baking cakes Do not open the oven door before 3 4 of the set cooking time is up If you use two baking trays at the same time keep one empty level between them Cooking meat and fish Leave the meat for approximately 15 minutes before carving so that the juice does not se...

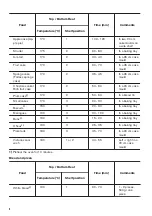
Page 8: ...uit cake 170 2 50 60 In a 20 cm cake mould Plum cake1 170 2 50 60 In a bread tin Small cakes 170 3 20 30 In a baking tray Biscuits1 150 3 20 30 In a baking tray Meringues 100 3 90 120 In a baking tray Buns1 190 3 15 20 In a baking tray Choux1 190 3 25 35 In a baking tray Plate tarts 180 3 45 70 In a 20 cm cake mould Victoria sand wich 180 1 or 2 40 55 Left right in a 20 cm cake mould 1 Preheat the...

Page 9: ...nts Temperature C Shelf position Pasta flan 180 2 40 50 In a mould Vegetable flan 200 2 45 60 In a mould Quiches 190 1 40 50 In a mould Lasagne 200 2 25 40 In a mould Cannelloni 200 2 25 40 In a mould Yorkshire pud ding1 220 2 20 30 6 pudding mould 1 Preheat the oven for 10 minutes Meat Food Top Bottom Heat Time min Comments Temperature C Shelf position Beef 200 2 50 70 On a wire shelf and a deep ...

Page 10: ...es on a deep an Lamb 190 2 110 130 Leg Chicken 200 2 70 85 Whole on a deep pan Turkey 180 1 210 240 Whole on a deep pan Duck 175 2 120 150 Whole on a deep pan Goose 175 1 150 200 Whole on a deep pan Rabbit 190 2 60 80 Cut in pieces Hare 190 2 150 200 Cut in pieces Pheasant 190 2 90 120 Whole on a deep pan Fish Food Top Bottom Heat Time min Comments Temperature C Shelf position Trout Sea bream 190 ...

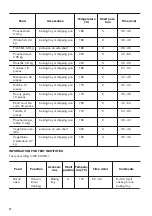
Page 11: ...IONAL BAKING For best results follow suggestions listed in the table below Food Accessories Temperature C Shelf posi tion Time min Sweet rolls 12 pieces baking tray or dripping pan 180 2 35 40 Rolls 9 pieces baking tray or dripping pan 180 2 35 40 Pizza frozen 0 35 kg wire shelf 220 2 35 40 Swiss roll baking tray or dripping pan 170 2 30 40 Brownie baking tray or dripping pan 180 2 30 40 Soufflè 6...

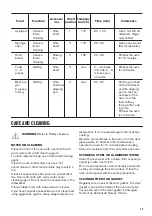
Page 12: ...12 pieces baking tray or dripping pan 170 2 30 40 Savory pastry 16 pieces baking tray or dripping pan 170 2 35 45 Short crust bis cuits 20 pieces baking tray or dripping pan 150 2 40 50 Tartlets 8 pieces baking tray or dripping pan 170 2 20 30 Poached vege tables 0 4 kg baking tray or dripping pan 180 3 35 40 Vegetarian ome lette pizza pan on wire shelf 200 3 30 45 Vegetables mediterrean 0 7 kg ba...

Page 13: ... cleaning agent Clean the oven interior after each use Fat accumulation or other food remains may result in a fire Clean all accessories after each use and let them dry Use a soft cloth with warm water and a cleaning agent Do not clean the accessories in the dishwasher Clean stubborn dirt with a special oven cleaner If you have nonstick accessories do not clean them using aggressive agents sharp e...

Page 14: ... try to remove the internal glass panel before you remove the oven door CAUTION Do not use the oven without the internal glass panel 1 Open the door fully and hold both hinges 2 Lift and turn the levers fully on both hinges 3 Close the oven door halfway to the first opening position Then lift and pull forward and remove the door from its seat 4 Put the door on a soft cloth on a stable surface 5 Re...

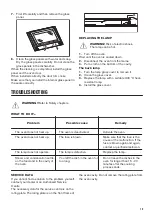
Page 15: ...Install the glass cover TROUBLESHOOTING WARNING Refer to Safety chapters WHAT TO DO IF Problem Possible cause Remedy The oven does not heat up The oven is deactivated Activate the oven The oven does not heat up The fuse is blown Make sure that the fuse is the cause of the malfunction If the fuse is blown again and again contact a qualified electrician The lamp does not operate The lamp is defectiv...

Page 16: ...ble if you do not follow the safety precautions from the Safety chapters This appliance is supplied with a main plug and a main cable CABLE Cable types applicable for installation or replacement H07 RN F H05 RN F H05 RRF H05 VV F H05 V2V2 F T90 H05 BB F For the section of the cable refer to the total power on the rating plate You can also refer to the table Total power W Section of the cable mm ma...

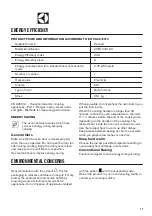
Page 17: ... energy saving When possible do not preheat the oven before you put the food inside When the cooking duration is longer than 30 minutes reduce the oven temperature to minimum 3 10 minutes before the end of the cooking time depending on the duration of the cooking The residual heat inside the oven will continue to cook Use the residual heat to warm up other dishes Keep breaks between baking as shor...

Page 18: ...18 ...

Page 19: ...19 ...

Page 20: ...WWW ZANUSSI COM SHOP 867348367 A 272018 ...

Reviews: