background image

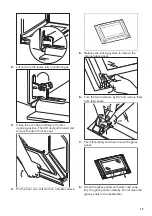
2. Lift and turn the levers fully on both hinges.

3. Close the oven door halfway to the first

opening position. Then lift and pull forward and

remove the door from its seat.

4. Put the door on a soft cloth on a stable surface.

5.

Release the locking system to remove the

internal glass panel.

6. Turn the two fasteners by 90° and remove them

from their seats.

90°

7. First lift carefully and then remove the glass

panel.

1

2

8. Clean the glass panels with water and soap.

Dry the glass panels carefully. Do not clean the

glass panels in the dishwasher.

15

Summary of Contents for ZOB140X

Page 1: ...GETTING STARTED EASY User Manual ZOB140X EN User Manual Oven ...

Page 2: ...8 years of age and persons with very extensive and complex disabilities shall be kept away unless continuously supervised Children of less than 3 years of age should be kept away unless continuously supervised Do not let children play with the appliance Keep all packaging away from children and dispose of it appropriately Keep children and pets away from the appliance when it operates or when it c...

Page 3: ...ith the electric power supply ELECTRICAL CONNECTION WARNING Risk of fire and electric shock All electrical connections should be made by a qualified electrician The appliance must be earthed Make sure that the parameters on the rating plate are compatible with the electrical ratings of the mains power supply Always use a correctly installed shockproof socket Do not use multi plug adapters and exte...

Page 4: ...ot be used for other purposes for example room heating Always cook with the oven door closed If the appliance is installed behind a furniture panel e g a door make sure the door is never closed when the appliance is in operation Heat and moisture can build up behind a closed furniture panel and cause subsequent damage to the appliance the housing unit or the floor Do not close the furniture panel ...

Page 5: ...nly with the Grill roasting pan BEFORE FIRST USE WARNING Refer to Safety chapters INITIAL CLEANING Remove all accessories from the oven Refer to Care and cleaning chapter Clean the oven and the accessories before first use Put the accessories back to their initial position PREHEATING Preheat the empty oven before first use 1 Set the function Set the maximum temperature 2 Let the oven operate for 1...

Page 6: ...d tips chapter Conventional Baking The oven door should be closed during cooking so that the function is not interrupted and to ensure that the oven operates with the highest energy efficiency pos sible When you use this function the temperature in the cavi ty may differ from the set temperature The heating power may be reduced For general energy saving recommendations refer to Energy Efficiency c...

Page 7: ...f point down 2 Put the deep pan into the oven on the necessary shelf position ADDITIONAL FUNCTIONS COOLING FAN When the oven operates the cooling fan turns on automatically to keep the surfaces of the oven cool If you turn off the oven the cooling fan stops SAFETY THERMOSTAT Incorrect operation of the oven or defective components can cause dangerous overheating To prevent this the oven has a safet...

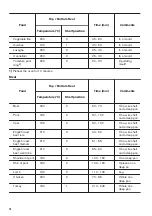
Page 8: ...condensation add water each time after it dries up Cooking times Cooking times depend on the type of food its consistency and volume Initially monitor the performance when you cook Find the best settings heat setting cooking time etc for your cookware recipes and quantities when you use this appliance BAKING AND ROASTING TABLE Cakes Food Top Bottom Heat Time min Comments Temperature C Shelf positi...

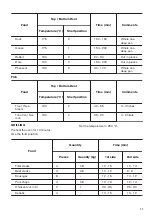
Page 9: ...ft right in a 20 cm cake mould 1 Preheat the oven for 10 minutes Bread and pizza Food Top Bottom Heat Time min Comments Temperature C Shelf position White bread1 190 1 60 70 1 2 pieces 500 gr one piece Rye bread 190 1 30 45 In a bread tin Bread rolls1 190 2 25 40 6 8 rolls in a baking tray Pizza1 190 1 20 30 On a deep pan Scones1 200 3 10 20 In a baking tray 1 Preheat the oven for 10 minutes Flans...

Page 10: ...n Beef 200 2 50 70 On a wire shelf and a deep pan Pork 180 2 90 120 On a wire shelf and a deep pan Veal 190 2 90 120 On a wire shelf and a deep pan English roast beef rare 210 2 44 50 On a wire shelf and a deep pan English roast beef medium 210 2 51 55 On a wire shelf and a deep pan English roast beef well done 210 2 55 60 On a wire shelf and a deep pan Shoulder of pork 180 2 120 150 On a deep pan...

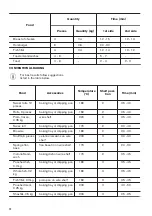
Page 11: ... Top Bottom Heat Time min Comments Temperature C Shelf position Trout Sea bream 190 2 40 55 3 4 fishes Tuna fish Sal mon 190 2 35 60 4 6 fillets GRILLING Preheat the oven for 10 minutes Use the third position Set the temperature to 250 C Food Quantity Time min Pieces Quantity kg 1st side 2nd side Fillet steaks 4 0 8 12 15 12 14 Beef steaks 4 0 6 10 12 6 8 Sausages 8 12 15 10 12 Pork chops 4 0 6 12...

Page 12: ...ing pan 180 2 35 40 Pizza frozen 0 35 kg wire shelf 220 2 35 40 Swiss roll baking tray or dripping pan 170 2 30 40 Brownie baking tray or dripping pan 180 2 30 40 Soufflè 6 pieces ceramic ramekins on wire shelf 200 3 30 40 Sponge flan base flan base tin on wire shelf 170 2 20 30 Victoria Sand wich baking dish on wire shelf 170 2 35 45 Poached fish 0 3 kg baking tray or dripping pan 180 3 35 45 Who...

Page 13: ...dripping pan 180 3 35 40 Vegetarian ome lette pizza pan on wire shelf 200 3 30 45 Vegetables mediterrean 0 7 kg baking tray or dripping pan 180 4 35 40 INFORMATION FOR TEST INSTITUTES Tests according to IEC 60350 1 Food Function Accesso ries Shelf position Tempera ture C Time min Comments Small cake Conven tional Cooking Baking tray 3 170 20 30 Put 20 small cakes per one baking tray Apple pie Conv...

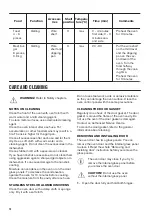
Page 14: ... aggressive agents sharp edged objects or a dishwasher It can cause damage to the nonstick coating Moisture can condense in the oven or on the door glass panels To decrease the condensation operate the oven for 10 minutes before cooking Clean the moisture from the cavity after each use STAINLESS STEEL OR ALUMINIUM OVENS Clean the oven door with a damp cloth or sponge only Dry it with a soft cloth ...

Page 15: ...t 4 Put the door on a soft cloth on a stable surface 5 Release the locking system to remove the internal glass panel 6 Turn the two fasteners by 90 and remove them from their seats 90 7 First lift carefully and then remove the glass panel 1 2 8 Clean the glass panels with water and soap Dry the glass panels carefully Do not clean the glass panels in the dishwasher 15 ...

Page 16: ...he oven does not heat up The oven is deactivated Activate the oven The oven does not heat up The fuse is blown Make sure that the fuse is the cause of the malfunction If the fuse is blown again and again contact a qualified electrician The lamp does not operate The lamp is defective Replace the lamp Steam and condensation settle on the food and in the cavity of the oven You left the dish in the ov...

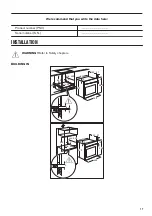
Page 17: ...e the data here Product number PNC Serial number S N INSTALLATION WARNING Refer to Safety chapters BUILDING IN 589 594 114 19 21 540 570 558 min 550 20 6 600 min 560 3 6 min 550 20 580 min 560 589 594 114 19 21 540 570 558 9 17 ...

Page 18: ...x 1 5 mm Cable flex type H07 RN F H05 RN F H05 RRF H05 VV F H05 V2V2 F T90 H05 BB F Applicable types of cables for UK only Connection via Min size cable flex Cable flex type Fuse Oven Control Circuit 2 5 mm PVC PVC twin and earth 15 A min 20 A max ENERGY EFFICIENCY PRODUCT FICHE AND INFORMATION ACCORDING TO EU 65 66 2014 Supplier s name Zanussi Model identification ZOB140X Energy Efficiency Index ...

Page 19: ...0 minutes before the end of the cooking time depending on the duration of the cooking The residual heat inside the oven will continue to cook Use the residual heat to warm up other dishes Keep breaks between baking as short as possible when you prepare few dishes at one time Keep food warm Choose the lowest possible temperature setting to use residual heat and keep a meal warm Conventional Baking ...

Page 20: ...WWW ZANUSSI COM SHOP 867347894 A 232018 ...

Reviews: