background image

Before carrying out any maintenance, disconnect the appliance

from the power supply.

WARNING: Ensure that the appliance is switched off before

replacing the lamp to avoid the possibility of electric shock.

Do not use the appliance before installing it in the built-in

structure.

Do not use a steam cleaner to clean the appliance.

Do not use harsh abrasive cleaners or sharp metal scrapers to

clean the glass door since they can scratch the surface, which

may result in shattering of the glass.

If the mains power supply cable is damaged, it must be

replaced by the manufacturer, its Authorised Service Centre or

similarly qualified persons to avoid an electrical hazard.

SAFETY INSTRUCTIONS

INSTALLATION

WARNING! Only a qualified person

must install this appliance.

• Remove all the packaging.

• Do not install or use a damaged appliance.

• Follow the installation instructions supplied with

the appliance.

• Always take care when moving the appliance as

it is heavy. Always use safety gloves and

enclosed footwear.

• Do not pull the appliance by the handle.

• Keep the minimum distance from other

appliances and units.

• Install the appliance in a safe and suitable place

that meets installation requirements.

• The appliance is equipped with an electric

cooling system. It must be operated with the

electric power supply.

ELECTRICAL CONNECTION

WARNING! Risk of fire and electric

shock.

• All electrical connections should be made by a

qualified electrician.

• The appliance must be earthed.

• Make sure that the parameters on the rating

plate are compatible with the electrical ratings

of the mains power supply.

• Always use a correctly installed shockproof

socket.

• Do not use multi-plug adapters and extension

cables.

• Make sure not to cause damage to the mains

plug and to the mains cable. Should the mains

cable need to be replaced, this must be carried

out by our Authorised Service Centre.

• Do not let mains cables touch or come near the

appliance door or the niche below the

appliance, especially when it operates or the

door is hot.

• The shock protection of live and insulated parts

must be fastened in such a way that it cannot be

removed without tools.

• Connect the mains plug to the mains socket

only at the end of the installation. Make sure that

there is access to the mains plug after the

installation.

• If the mains socket is loose, do not connect the

mains plug.

• Do not pull the mains cable to disconnect the

appliance. Always pull the mains plug.

• Use only correct isolation devices: line

protecting cut-outs, fuses (screw type fuses

removed from the holder), earth leakage trips

and contactors.

• The electrical installation must have an isolation

device which lets you disconnect the appliance

from the mains at all poles. The isolation device

must have a contact opening width of minimum

3 mm.

• This appliance complies with the E.E.C.

Directives.

3

Summary of Contents for ZOB20311XU

Page 1: ...GETTING STARTED EASY User Manual ZOB20311XU EN User Manual Oven ...

Page 2: ...ith very extensive and complex disabilities shall be kept away from the appliance unless continuously supervised Children of less than 3 years of age should be kept away from the appliance unless continuously supervised Do not let children play with the appliance Keep all packaging away from children and dispose of it appropriately Keep children and pets away from the appliance when it operates or...

Page 3: ...ICAL CONNECTION WARNING Risk of fire and electric shock All electrical connections should be made by a qualified electrician The appliance must be earthed Make sure that the parameters on the rating plate are compatible with the electrical ratings of the mains power supply Always use a correctly installed shockproof socket Do not use multi plug adapters and extension cables Make sure not to cause ...

Page 4: ...t be used for other purposes for example room heating Always cook with the oven door closed If the appliance is installed behind a furniture panel e g a door make sure the door is never closed when the appliance is in operation Heat and moisture can build up behind a closed furniture panel and cause subsequent damage to the appliance the housing unit or the floor Do not close the furniture panel u...

Page 5: ...akes and biscuits BEFORE FIRST USE WARNING Refer to Safety chapters INITIAL CLEANING Remove all accessories from the oven Refer to Care and cleaning chapter Clean the oven and the accessories before the first use Put the accessories back to their initial position PREHEATING Preheat the empty oven before first use 1 Set the function Set the maximum temperature 2 Let the oven operate for 1 hour 3 Se...

Page 6: ... highest energy efficiency pos sible When you use this func tion the temperature in the cavity may differ from the set temperature The heating pow er may be reduced For general energy saving recommenda tions refer to Energy Efficien cy chapter Energy Sav ing This function was used to comply with the energy effi ciency class according to EN 60350 1 SETTING A HEATING FUNCTION 1 Turn the knob for the...

Page 7: ...tings for temperature cooking time and shelf position If you cannot find the settings for a special recipe look for the similar one The oven has a special system which circulates the air and constantly recycles the steam With this system you can cook in a steamy environment and keep the food soft inside and crusty outside It decreases the cooking time and energy consumption Baking cakes Do not ope...

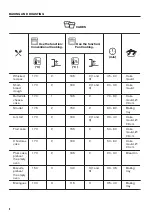
Page 8: ...ilk cheese cake 170 1 165 2 70 80 Cake mould Ø 26 cm Strudel 175 2 150 2 60 80 Baking tray Jam tart 170 2 160 2 1 and 3 30 40 Cake mould Ø 26 cm Fruit cake 170 2 155 2 50 60 Cake mould Ø 26 cm Christmas cake 170 2 160 2 50 60 Cake mould Ø 20 cm Plum cake preheat the empty oven 170 2 165 2 20 30 Bread tin Biscuits preheat the empty oven 150 3 140 3 1 and 3 30 35 Baking tray Meringues 100 3 115 3 35...

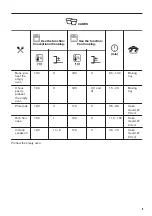
Page 9: ...pty oven 190 3 180 3 80 100 Baking tray Choux pastry preheat the empty oven 190 3 180 3 1 and 3 15 20 Baking tray Plate tarts 180 3 170 2 25 35 Cake mould Ø 20 cm Rich fruit cake 160 1 150 2 110 120 Cake mould Ø 24 cm Victoria sandwich 180 1 or 2 170 2 45 70 Cake mould Ø 20 cm Preheat the empty oven 9 ...

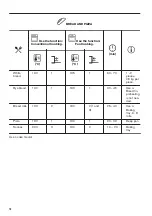
Page 10: ... C C White bread 190 1 195 1 60 70 1 2 pieces 0 5 kg per piece Rye bread 190 1 190 1 30 45 Use a Bread tin preheating is not nee ded Bread rolls 190 2 180 2 1 and 3 25 40 Use a Baking tray 6 8 rolls Pizza 190 1 190 1 20 30 Deep pan Scones 200 3 190 2 10 20 Baking tray Use a cake mould 10 ...

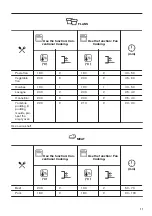
Page 11: ...n 200 2 200 2 45 60 Quiches 190 1 190 1 40 50 Lasagne 200 2 200 2 25 40 Cannelloni 200 2 200 2 25 40 Yorkshire pudding 6 pudding moulds pre heat the empty oven 220 2 210 2 20 30 Use a wire shelf MEAT Use the function Con ventional Cooking Use the function Fan Cooking min C C Beef 200 2 190 2 50 70 Pork 180 2 180 2 90 120 11 ...

Page 12: ... 200 2 44 50 English roast beef medium 210 2 200 2 51 55 English roast beef well done 210 2 200 2 55 60 MEAT Use the function Con ventional Cooking Use the function Fan Cooking min C C Pork shoul der with rind 180 2 170 2 120 150 Pork shin 2 pieces 180 2 160 2 100 120 Leg of lamb 190 2 190 2 110 130 Whole chick en 200 2 200 2 70 85 12 ...

Page 13: ...goose 175 1 160 1 150 200 Rabbit cut in pieces 190 2 175 2 60 80 Hare cut in pieces 190 2 175 2 150 200 Pheasant whole 190 2 175 2 90 120 FISH Use the function Conventional Cooking Use the function Fan Cooking min C C Trout Sea bream 190 2 175 2 1 and 3 40 55 3 4 fish Tuna Salmon 190 2 175 2 1 and 3 35 60 4 6 fillets GRILLING Preheat the empty oven 13 ...

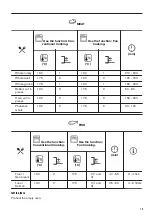
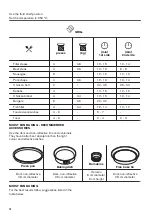
Page 14: ... Fish fillet 4 0 4 12 14 10 12 Toasted sandwiches 4 6 5 7 Toast 4 6 2 4 2 3 MOIST FAN BAKING RECOMMENDED ACCESSORIES Use the dark and non reflective tins and containers They have better heat absorption than the light colour and reflective dishes Pizza pan Baking dish Ramekins Flan base tin Dark non reflective 28 cm diameter Dark non reflective 26 cm diameter Ceramic 8 cm diameter 5 cm height Dark ...

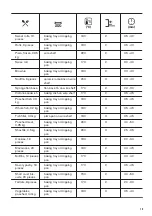
Page 15: ... pan 180 3 35 45 Whole fish 0 2 kg baking tray or dripping pan 180 3 35 45 Fish fillet 0 3 kg pizza pan on wire shelf 180 3 35 45 Poached meat 0 25 kg baking tray or dripping pan 200 3 40 50 Shashlik 0 5 kg baking tray or dripping pan 200 3 25 35 Cookies 16 pieces baking tray or dripping pan 180 2 20 30 Macaroons 20 pieces baking tray or dripping pan 180 2 40 45 Muffins 12 pieces baking tray or dr...

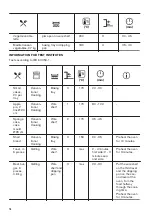
Page 16: ...120 Sponge cake cake mould Ø26 cm Conven tional Cooking Wire shelf 2 170 35 45 Short bread Conven tional Cooking Baking tray 3 150 20 35 Preheat the oven for 10 minutes Toast 4 6 pieces Grilling Wire shelf 3 max 2 4 minutes first side 2 3 minutes sec ond side Preheat the oven for 3 minutes Beef bur ger 6 pieces 0 6 kg Grilling Wire shelf and dripping pan 3 max 20 30 Put the wire shelf on the third...

Page 17: ... edged ob jects or in a dishwasher STAINLESS STEEL OR ALUMINIUM OVENS Clean the oven door with a damp cloth or sponge only Dry it with a soft cloth Do not use steel wool acids or abrasive materials as they can damage the oven surface Clean the oven control panel with the same precautions CLEANING THE DOOR GASKET Regularly do a check of the door gasket The door gasket is around the frame of the ove...

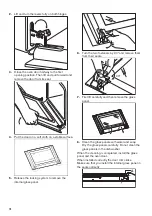
Page 18: ...ternal glass panel 6 Turn the two fasteners by 90 and remove them from their seats 90 7 First lift carefully and then remove the glass panel 1 2 8 Clean the glass panels with water and soap Dry the glass panels carefully Do not clean the glass panels in the dishwasher When the cleaning is completed install the glass panel and the oven door When installed correctly the door trim clicks Make sure th...

Page 19: ...sure that the fuse is the cause of the malfunction If the fuse is blown again and again contact a qualified electrician The lamp does not operate The lamp is defective Replace the lamp Steam and condensation settle on the food and in the cavity of the oven You left the dish in the oven for too long Do not leave the dishes in the oven for longer than 15 20 minutes after the cooking process ends SER...

Page 20: ...ions from the Safety chapters This appliance is supplied only with a main cable CABLE Cable types applicable for installation or replacement H07 RN F H05 RN F H05 RRF H05 VV F H05 V2V2 F T90 H05 BB F For the section of the cable refer to the total power on the rating plate You can also refer to the table Total power W Section of the cable mm maximum 1380 3 x 0 75 maximum 2300 3 x 1 maximum 3680 3 ...

Page 21: ...ake sure it is well fixed in its position Use metal cookware to improve energy saving When possible do not preheat the oven before cooking Keep breaks between baking as short as possible when you prepare a few dishes at one time Cooking with fan When possible use the cooking functions with fan to save energy Residual heat When the cooking duration is longer than 30 minutes reduce the oven temperat...

Page 22: ...Return the product to your local recycling facility or contact your municipal office 22 ...

Page 23: ...23 ...

Page 24: ...WWW ZANUSSI COM SHOP 867355647 A 102019 ...

Reviews: