background image

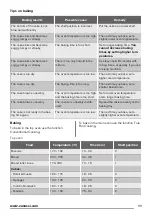
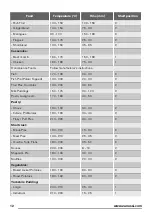
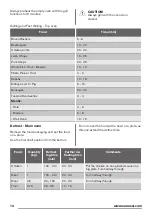
Food

Temperature (°C)

Time (min)

Shelf position

- Rich Fruit

140 - 150

120 - 150

2

- Gingerbread

140 - 150

75 - 90

2

- Meringues

90 - 100

150 - 180

2

- Flapjack

160 - 170

25 - 30

2

- Shortbread

130 - 150

45 - 65

2

Casseroles:


- Beef / Lamb

160 - 170

150 - 180

1

- Chicken

160 - 180

75 - 90

1

Convenience Foods

Follow manufacturer's instructions.

Fish

170 - 190

20 - 30

2

Fish Pie (Potato Topped)

190 - 200

20 - 30

2

Fruit Pies, Crumbles

190 - 200

30 - 50

2

Milk Puddings

150 - 170

90 - 120

2

Pasta, Lasagne etc.

170 - 180

40 - 50

2

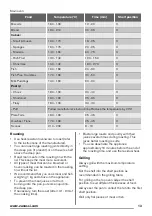
Pastry:


- Choux

180 - 190

30 - 40

2

- Eclairs, Profiteroles

180 - 190

30 - 40

2

- Flaky / Puff Pies

210 - 220

30 - 40

2

Shortcrust:


- Mince Pies

190 - 210

15 - 20

2

- Meat Pies

190 - 210

25 - 35

2

- Quiche, Tarts, Flans

180 - 200

25 - 50

2

Scones

220 - 230

8 - 12

2

Shepard's Pie

180 - 190

30 - 40

2

Souffles

190 - 200

20 - 30

2

Vegetables:


- Baked Jacket Potatoes

180 - 190

60 - 90

2

- Roast Potatoes

180 - 190

60 - 90

2

Yorkshire Pudding:


- Large

200 - 210

25 - 40

1

- Individual

210 - 220

15 - 25

1

12

www.zanussi.com

Summary of Contents for ZOF35517

Page 1: ...EN ZOF35517 User Manual Oven ...

Page 2: ...en aged from 8 years and above and persons with reduced physical sensory or mental capabilities or lack of experience and knowledge if they have been given supervision or instruction concerning the use of the appliance in a safe way and understand the hazards involved Do not let children play with the appliance Keep all packaging away from children and dispose of it appropriately Keep children and...

Page 3: ...r end away from the side walls Install the shelf supports in the opposite sequence The means for disconnection must be incorporated in the fixed wiring in accordance with the wiring rules Safety instructions Installation WARNING Only a qualified person must install this appliance Remove all the packaging Do not install or use a damaged appliance Follow the installation instruction supplied with th...

Page 4: ...e after each use Be careful when you open the appliance door while the appliance is in operation Hot air can release Do not operate the appliance with wet hands or when it has contact with water Do not apply pressure on the open door Do not use the appliance as a work surface or as a storage surface Open the appliance door carefully The use of ingredients with alcohol can cause a mixture of alcoho...

Page 5: ...ocation Disconnect the appliance from the mains supply Cut off the mains electrical cable close to the appliance and dispose of it Remove the door catch to prevent children or pets from becoming trapped in the appliance Service To repair the appliance contact an Authorised Service Centre Use original spare parts only Product description General overview 1 3 5 6 7 4 2 2 4 8 10 9 9 11 11 1 2 3 4 12 ...

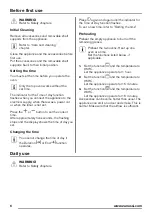
Page 6: ...d the display shows the time of day you set Changing the time You cannot change the time of day if the Duration or End function operates Press again and again until the indicator for the Time of Day function flashes To set a new time refer to Setting the time Preheating Preheat the empty appliance to burn off the remaining grease Preheat the two ovens Heat up one oven at a time Set the functions l...

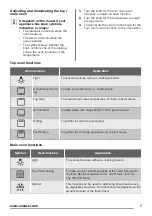
Page 7: ... To activate the lamp without a cooking function Conventional Cook ing To bake and roast food on 1 shelf position Top Heat To brown bread cakes and pastries To finish cooked dishes Bottom Heat To bake cakes with crispy bottom and to preserve food Grilling To grill flat food and to toast bread Fast Grilling To grill flat food in large quantities and to toast bread Main oven functions Symbol Oven fu...

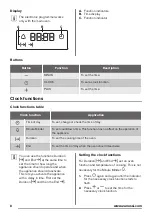
Page 8: ...o set the cooking time of the oven End To set the time of day when the oven should deactivate You can use the functions Duration and End at the same time to set the time for how long the appliance should operate and when the appliance should deactivate This lets you activate the appliance with a delay in time First set the Duration and then the End Setting the clock functions For Duration and End ...

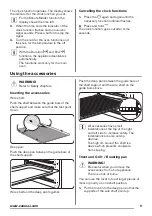
Page 9: ...to Safety chapters Inserting the accessories Wire shelf Push the shelf between the guide bars of the shelf support and make sure that the feet point down Deep pan Push the deep pan between the guide bars of the shelf support Wire shelf and the deep pan together Push the deep pan between the guide bars of the shelf support and the wire shelf on the guide bars above All accessories have small indent...

Page 10: ...en used to cook fruitcakes sweets and savoury flans or quiche Main oven The main oven is the bigger of the two ovens It is particularly suitable for cooking larger quantities of food Baking Your oven may bake or roast differently to the appliance you had before Adapt your usual settings temperature cooking times and shelf positions to the values in the tables The manufacturer recommends that you u...

Page 11: ...u bake set a higher oven temperature The cake is too dry The baking time is too long The next time you bake set a shorter baking time The cake browns unevenly The oven temperature is too high and the baking time is too short Set a lower oven temperature and a longer baking time The cake browns unevenly The mixture is unevenly distrib uted Spread the mixture evenly on the baking tray The cake is no...

Page 12: ...20 30 2 Fruit Pies Crumbles 190 200 30 50 2 Milk Puddings 150 170 90 120 2 Pasta Lasagne etc 170 180 40 50 2 Pastry Choux 180 190 30 40 2 Eclairs Profiteroles 180 190 30 40 2 Flaky Puff Pies 210 220 30 40 2 Shortcrust Mince Pies 190 210 15 20 2 Meat Pies 190 210 25 35 2 Quiche Tarts Flans 180 200 25 50 2 Scones 220 230 8 12 2 Shepard s Pie 180 190 30 40 2 Souffles 190 200 20 30 2 Vegetables Baked ...

Page 13: ...ting tin with the lid This keeps the meat more succulent All types of meat that can be browned or have crackling can be roasted in the roasting tin without the lid We recommend that you cook meat and fish weighing 1 kg and above in the appliance To prevent the meat juices or fat from burning onto the pan put some liquid into the deep pan If necessary turn the roast after 1 2 2 3 of the cooking tim...

Page 14: ...oasted Sandwiches 3 4 Steaks Rare 4 6 Medium 6 8 Well Done 12 15 Defrost Main oven Remove the food packaging and put the food on a plate Use the first shelf position from the bottom Do not cover the food with a bowl or a plate as this can extend the defrost time Food Quantity kg Defrost ing time min Further de frosting time min Comments Chicken 1 100 140 20 30 Put the chicken on an upturned saucer...

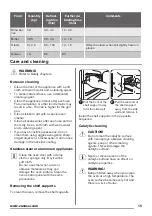
Page 15: ...edged objects or a dishwasher It can cause damage to the nonstick coating Stainless steel or aluminium appliances Clean the oven door with a damp cloth or sponge only Dry it with a soft cloth Do not use steel wool acids or abrasive materials as they can damage the oven surface Clean the oven control panel with the same precautions Removing the shelf supports To clean the oven remove the shelf supp...

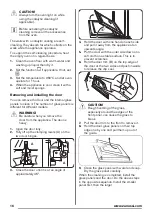
Page 16: ...e door from the appliance The door is heavy 1 Open the door fully 2 Fully lift up the clamping levers A on the two door hinges A A 3 Close the door until it is at an angle of approximately 45 45 4 Hold the door with one hand on each side and pull it away from the appliance at an upwards angle 5 Put the door with the outer side down on a soft cloth on a stable surface This is to prevent scratches 6...

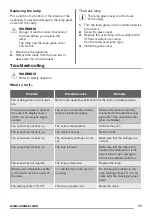
Page 17: ...ce You cannot activate or operate the oven The display shows 400 and an acoustic signal sounds The oven is incorrectly connec ted to an electrical supply Check if the oven is correctly connected to the electrical sup ply refer to the connection dia gram if available The oven does not heat up The oven is deactivated Activate the oven The oven does not heat up The clock is not set Set the clock The ...

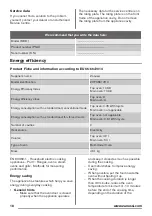
Page 18: ... oven not applicable Energy consumption with a standard load fan forced mode Top oven not applicable Main oven 0 81 kWh cycle Number of cavities 2 Heat source Electricity Volume Top oven 42 l Main oven 50 l Type of oven Built Under Oven Mass 46 1 kg EN 60350 1 Household electric cooking appliances Part 1 Ranges ovens steam ovens and grills Methods for measuring performance Energy saving The applia...

Page 19: ... warm choose the lowest possible temperature setting ENVIRONMENTAL CONCERNS Recycle the materials with the symbol Put the packaging in applicable containers to recycle it Help protect the environment and human health and to recycle waste of electrical and electronic appliances Do not dispose appliances marked with the symbol with the household waste Return the product to your local recycling facil...

Page 20: ...www zanussi com shop 867300190 B 162016 ...

Reviews: