background image

12

If this appliance featuring magnetic door
seals is to replace an older appliance having
a spring lock (latch) on the door or lid, be
sure to make that spring lock unusable
before you discard the old appliance. This
will prevent it from becoming a death-trap
for a child.

Positioning

The appliance should be installed well away
from sources of heat such as radiators, boilers,
direct sunlight etc. Best performance is
obtained with ambient temperature between
+18°C and +43°C (class T); +18°C and +38°C
(class ST); +16°C and +32°C (class N); +10°C
and +32°C (class SN). The class of your
appliance is shown on its rating plate.

For building into kitchen units follow the special

“ Building-in” instructions given.

Important

It is essential that the appliance be connected
to an efficient earth tap. For this purpose the
supply cable plug incorporates a special earth
contact. If the sockets of your domestic wiring
system are not earthed, have the appliance
connected to a separate earth wire by a
qualified electrician in accordance with existing
safety regulations.

The Manufacturer declines all responsibility
if the above safety precautions are not
observed.

This appliance complies with EEC directive
number 87/308 of 2/6/87 relative to radio
interference suppression.

This appliance complies with the
following   E.E.C. Directives:

- 73/23 EEC of 19.2.73 (Low Voltage
Directive) and subsequent mod)fications; 

- 89/336 EEC of 3.5.89 (Electromagnetic
Compatibility Directive) and subsequent
modifications.

Cleaning the interior

Before using the appliance for the first time,
wash the interior and all internal accessories
with lukewarm water and some neutral soap so
as to remove the typical smell of a brand-new
product, then dry thoroughly. Do not use

detergents or abrasive powders, as these will
damage the finish.

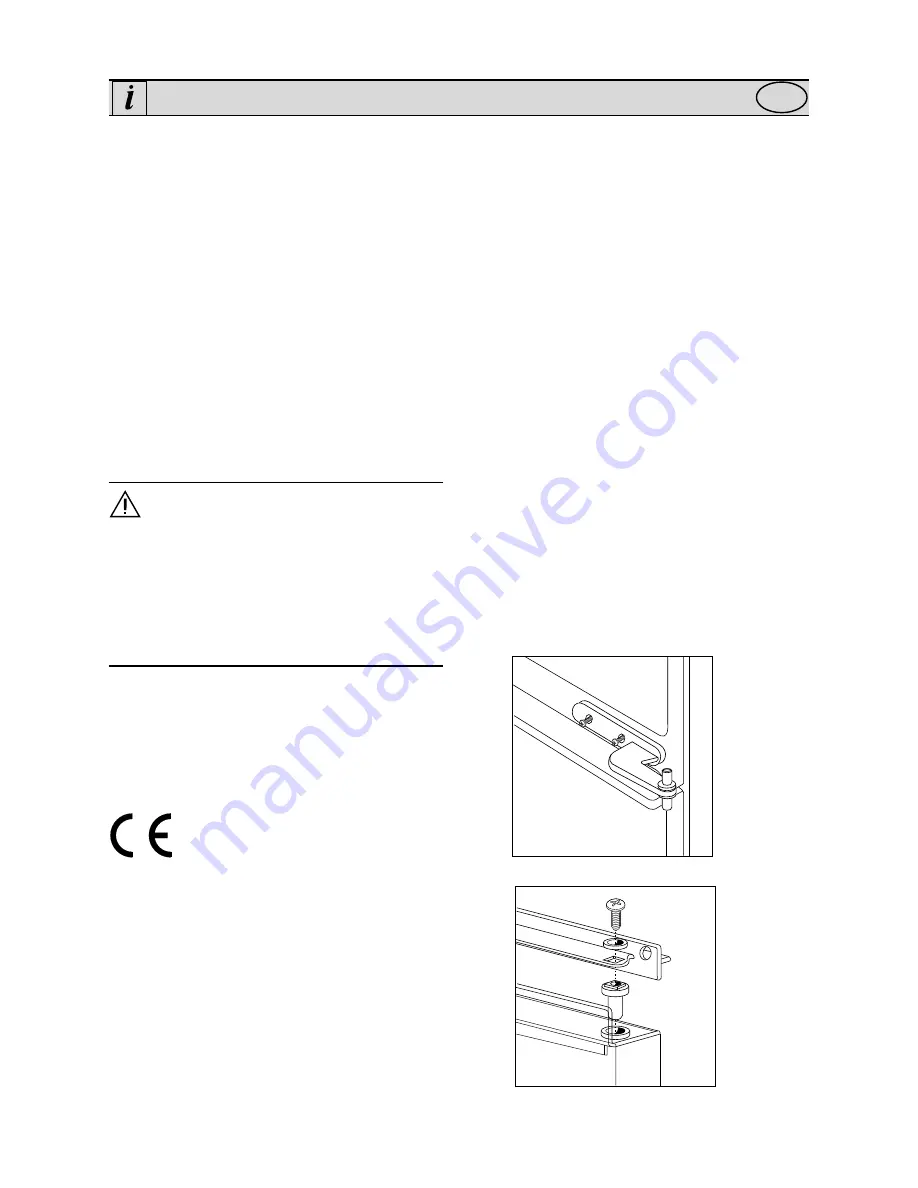
Door reversibility

This appliance is equipped to allow the opening
direction of the doors to be changed. To do this:

Position the appliance horizontally.

Unscrew the middle hinge (A) and remove it,
slightly lifting the doors.

Remove the top door, unscrew the top screw (1)
and remove it with its washèr (2).

Remove the stud (3) and fit it on the opposite
side using screw (1) and its washer (2).

Reposition the door.

Remove the bottom door. Remove the three
screws (5) which secure the hinge to the
cabine”. Slowly sfide the hinge out of the slot in
the bottom ventilation grille. Turn the hinge
upside down; position it and screw it on the
opposite side.

Refit the bottom door.

Remove the screws which blank off the holes,
then position the middle hinge on the opposite
side, slightly lifting the doors, making sure that
the doors are properly aligned.

INSTALLATION

GB

D148

A

D150

1

2

3

4

Fig. 1

Fig. 2

Summary of Contents for ZPC 726 D

Page 1: ...REFRIGERADOR CONGELADOR FRIDGE FREEZER ZPC 726 D LIBRODEINSTRUCCIONES INSTRUCTION BOOKLET 2222 120 43 ...

Page 2: ...he storage of edible foodstuffs only Frozen food must not be re frozen once it has been thawed out Manufacturers storage recommendations should be strictly adhered to Refer to relevant instructions The inner lining of the appliance consists of channels through which the refrigerant passes If these should be punctured this would damage the appliance beyond repair and cause food loss DO NOT USE SHAR...

Page 3: ...cessary details on the Card Certificate and send it to the Zanussi Centre covering the area in which the appliance is to be installed See list of Zanussi network centres We congratulate you an your choice Read this instruction manual carefully and follow the recommendations it provides to benefit from years of excellent service The appliance which you have just purchased has been very accurately c...

Page 4: ...rference suppression This appliance complies with the following E E C Directives 73 23 EEC of 19 2 73 Low Voltage Directive and subsequent mod fications 89 336 EEC of 3 5 89 Electromagnetic Compatibility Directive and subsequent modifications Cleaning the interior Before using the appliance for the first time wash the interior and all internal accessories with lukewarm water and some neutral soap ...

Page 5: ...o ensure air circulation leave a ventilation gap at the back of the appliance having the following dimensions depth 50 mm width 540 mm Fig 5 A similar gap must also be left in the top of the kitchen furniture Remove the two spacer bushes A then fit the appliance into the recess in the tali kitchen unit Using the four screws supplied with the appliance secure the four corners of the appliance cabin...

Page 6: ...rt The maximum quantity of food which can be frozen in 24 hrs is shown on the rating plate Only freeze top quality fresh and thoroughly cleaned foodstuffs Prepare the fresh food in small portions to enable it to be rapidly and completely frozen and to make it possible subsequently to thaw only the quantity required at the time Wrap up the food in aluminium foil or polythene and make sure that the ...

Page 7: ...s shelf above the vegetable drawer s For safety store in this way only one or two days at the most Cooked foods cold dishes etc these should be covered and may be placed on any shelf Fruit and vegetables these should be thoroughly cleaned and placed in the special drawer s provided Butter and cheese these should be placed in special airtight containers or wrapped in aluminium foil or polythene bag...

Page 8: ...ost exceeds 4 mm During this operation it is not necessary to switch off the power supply or to remove the foodstuffs Never use sharp metal tools to scrape off frost from the evaporator as you could damage it However when the ice becomes very thick on the inner liner complete defrosting should be carried out as follows pull out the plug from the wall socket or turn the thermostat knob to the O set...

Page 9: ...iod of time in which the freezer is not to be used Interior light The light inside the refrigerator compartment is easy to get at through the opening in the light holder If the light does not go on when the door is open check that it is screwed into place properly If it still does not light up change the bulb The rating is shown on the light bulb cover MAINTENANCE GB DEFECTIVE OPERATION GB Before ...

Reviews: