background image

16

ELECTRICAL CONNECTION

WARNING:

THIS APPLIANCE MUST BE EARTHED.
The manufacturer declines any liability
should this safety measure not be
observed.

If the plug that is fitted to your appliance is not
suitable for your socket outlet, it must be cut off and
the appropriate plug fitted.

Remove the fuse from the cut off plug.
The cut off plug should then be disposed of to
prevent the hazard of shocks in case it should be
plugged into a 13amp socket in another part of your
home.

Important

The wires in the mains lead are coloured in
accordance with the following code:

Green and Yellow

- Earth

Blue

- Neutral

Brown

- Live

If you fit your own plug, the colours of the wires in the
mains lead of your appliance, may not correspond
with the markings identifying the terminals in your
plug, proceed as follows:

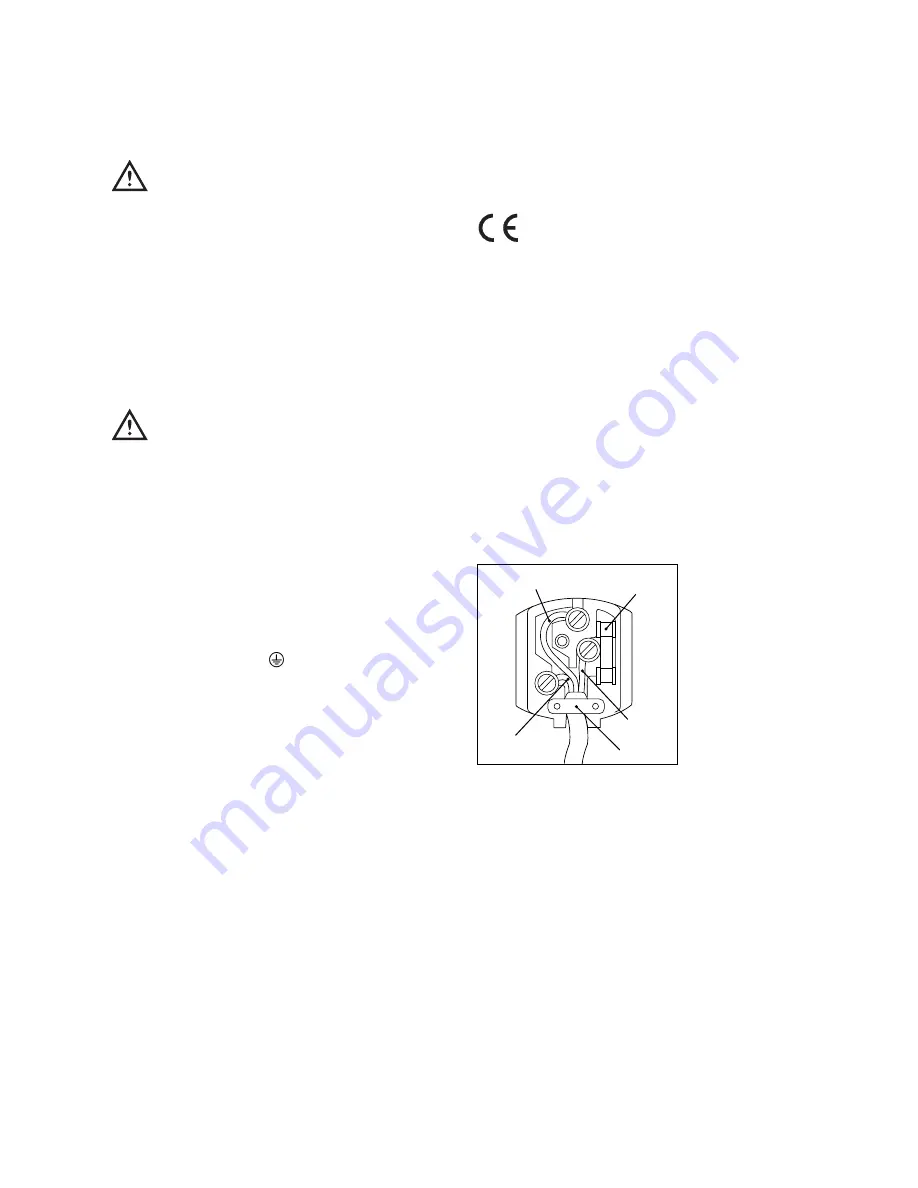
Connect the Green and the Yellow (earth) wire to the
terminal in the plug which is marked with the letter
«E» or the earth symbol 

, or coloured green and

yellow.

Connect the blue (neutral) wire to the terminal in the
plug which is marked with the letter «N» or coloured
black.

Connect the brown (live) wire to the terminal in the
plug which is marked with the letter «L» or coloured
red.

The plug moulded onto the lead incorporates a fuse.
For replacement, use a 13amp BS1362 fuse. Only
ASTA or BSI approved fuses should be used.

The plug must not be used if the fuse cover/carrier is
lost. The cover/carrier is indicated by the coloured
insert at the base of the plug.
A replacement cover/carrier must be obtained from
your local Service Force Centre.

This appliance complies with the E.E.C. Directive
No. 87/308 of 2.6.87 relative to radio interference
suppression.

This appliance complies with the following 
E.E.C. Directive:

- 73/23 EEC of 19.2.73 (Low Voltage Directive)

and subsequent amendments.

- 89/336 EEC of 3.5.89 (Electromagnetic 
- Compatibility Directive) and subsequent amend-

ments.

Please ensure that when the appliance is
installed it is easily accessible for the engineer in
the event of breakdown.

D207

GREEN & YELLOW

13 AMP. FUSE

BROWN

CORD CLAMP

BLUE

13 AMP

Summary of Contents for ZR 25

Page 1: ...REFRIGERATOR ZR 25 1 W 2222612 11 INSTRUCTION BOOKLET...

Page 2: ...ing sounds 6 Health and Safety Guidelines 7 Defrosting 7 Maintenance and Cleaning 8 Internal cleaning 8 External cleaning 8 Changing the light bulb 8 When the appliance is not in use 8 Something Not W...

Page 3: ...se Attention The worktop of this appliance is heat resistant at max 70 C Containers with flammable gases or liquids can leak at low temperatures Do not store any containers with flammable materials su...

Page 4: ...nside the refrigerator and the star compartment is regulated by a thermostat with 6 temperature positions and one OFF O position Position 1 minimum coldness Position 6 maximum coldness Turn the thermo...

Page 5: ...o not cover the shelves with any protective material such as paper cardboard or plastic which may obstruct the air circulation through them To help you use your refrigerator correctly here are some mo...

Page 6: ...while still frozen but you must ensure that it is thoroughly cooked through Vegetables should be directly immersed in boiling water ready cooked dishes can be placed directly in the oven in their alu...

Page 7: ...h the changes in shopping habits to a once a week shop mean that safe handling and storage of food is even more important than ever HEALTH AND SAFETY GUIDELINES The following tips should help you to e...

Page 8: ...and the compressor at the back of the appliance with a brush or vacuum cleaner see figure You MUST ensure that the appliance is switched OFF An accumulation of dust will affect the performance of the...

Page 9: ...ors are closed Large quantities of food have recently been placed in the cabinet and or door is frequently opened Check that air ventilation is not obstructed Ensure the door is not left open Check th...

Page 10: ...ring service or if you wish to purchase spare parts please contact your local Zanussi Service Force Centre by telephoning 08705 929929 Your telephone call will be automatically routed to the Service F...

Page 11: ...d OWN SALES Perth PH1 3AF SHETLAND 3 4 Carlton Place Lerwick Shetland OWN SALES ZE1 0PW SHETLAND Bolts Shetland 26 North Road Lerwick OWN SALES Shetland ZE1 0PE WHALSAY Leask Electrical Harisdale Symb...

Page 12: ...rthants NN10 8PL ILKESTON Unit 2 Furnace Road Ilkeston DE7 5EP LEICESTER Unit 7 Oaks Industrial Estate Coventry Road Narborough Leicestershire LE9 5GF LINCOLN Unit 8 Clifton Street Stone Field Park Li...

Page 13: ...ts incurred for calls to put right an appliance which is improperly installed or calls to appliances outside the United Kingdom Appliances found to be in use within a commercial environment plus those...

Page 14: ...F or rise above 32 C 90 F e g conservatories For correct operation this appliance must be located in a dry atmosphere away from heat sources e g cookers radiators boilers and direct sunlight You shou...

Page 15: ...5 Unscrew the foot at the base 6 of the appliance and refit it on the opposite side 6 Refit the door and the bottom hinge 5 to the left hand side When positioning the bottom hinge blade on the revers...

Page 16: ...mbol or coloured green and yellow Connect the blue neutral wire to the terminal in the plug which is marked with the letter N or coloured black Connect the brown live wire to the terminal in the plug...

Page 17: ...Electrolux Household Appliances Limited 2001...

Reviews: