background image


14

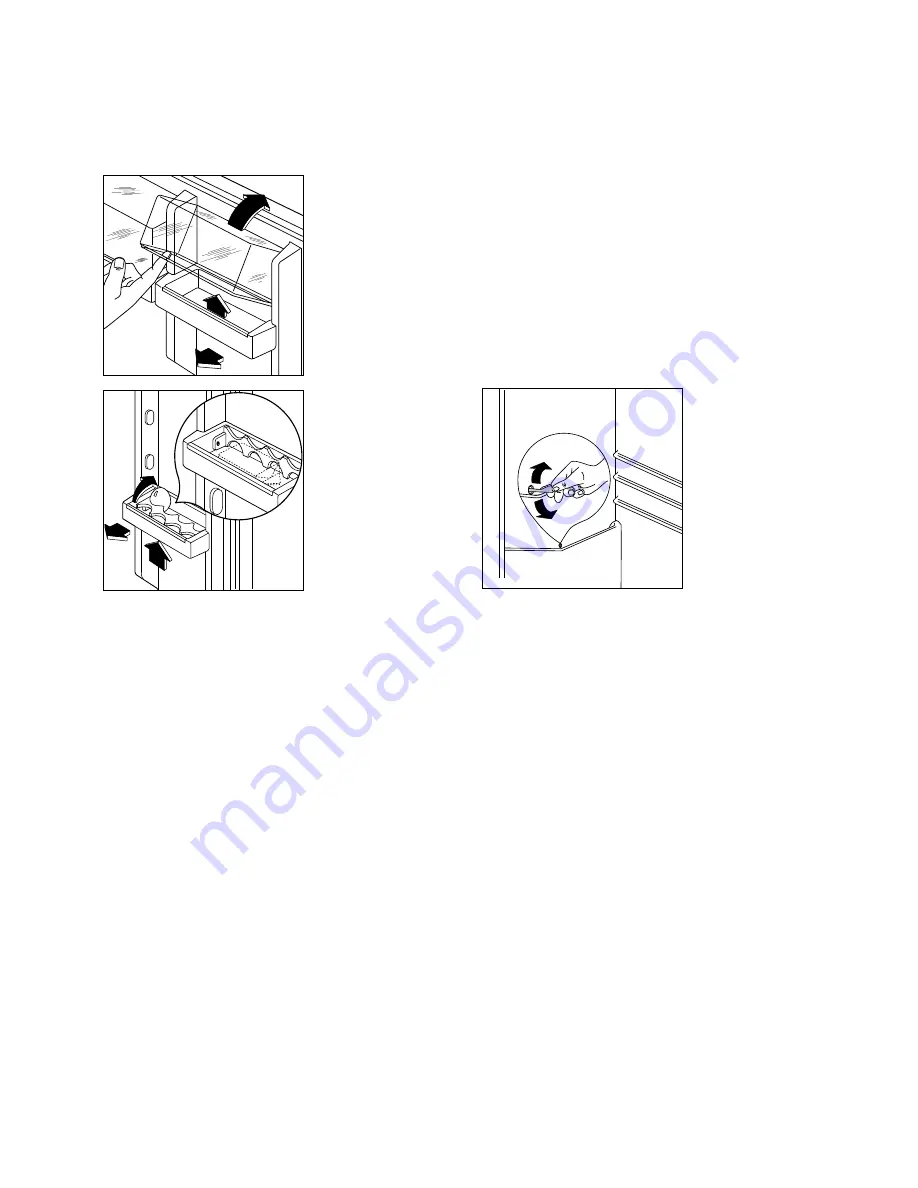
For more thorough cleaning, the top door shelf can 
be removed by pulling it in the direction of the 
arrows, then refitting it in position (Fig. 12).


Fig. 12

Fig. 13

D006

D005

Defrosting

Frost is automatically eliminated from the 
evaporator of the refrigerator compartment every 
time the motor compressor stops, during normal 
use.
The defrost water drains out through a trough into 
a special container at the back of the appliance, over 
the motor compressor, where it evaporates.

It is important to periodically clean the defrost water 
drain hole in the middle of the refrigerator compartment 
trough to prevent the water overflowing and dripping 
onto the food inside.
Use the special cleaner provided, which you will find 
already inserted into the drain hole.

Fig. 14

D037

Summary of Contents for ZR 255 CTF

Page 1: ...FRIGORIFERO REFRIGERATOR KÜHLSCHRANK ZR 255 CTF LIBRETTO ISTRUZIONI INSTRUCTION BOOKLET GEBRAUCHSANWEISUNG 2222 118 54 This document was created with FrameMaker 4 0 4 ...

Page 2: ...tally built in appliances page 11 Use page 13 Operation page 13 Temperature regulation page 13 Fresh food refrigeration page 13 Movable shelves page 13 Positioning the door shelves page 13 Defrosting page 14 Maintenance page 15 Periodic cleaning page 15 Periods of non operation page 15 Interior light page 15 Customer Service and spare parts page 15 ...

Page 3: ... installation instructions ª Parts which heat up should not be exposed Wherever possible the back of the appliance should be against a wall ª Before any cleaning or maintenance work is carried out be sure to switch off and unplug the appliance ª If the appliance is transported horizontally it is possible that the oil contained in the compressor flows in the refrigerant circuit It is advisable to w...

Page 4: ...cturer declines all responsibility if the above safety precautions are not observed This appliance complies with EEC directive number 87 308 of 2 6 87 relative to radio interference suppression This appliance complies with the following E E C Directives 73 23 EEC of 19 2 73 Low Voltage Directive and subsequent modifications 89 336 EEC of 3 5 89 Electromagnetic Compatibility Directive and subsequen...

Page 5: ...ig 7 and mark the position of the external holes After preparing the holes screw the runners to the kitchen unit door using 3 5x16 mm screws Fig 8 Open both the appliance door and that of the kitchen unit to approx 90 Place the little plates over the runners Hold the doors of the appliance and the unit together and mark the holes Fig 9 Remove the little plates and make the holes with a diam of 2 m...

Page 6: ...rformance do not store warm food or evaporating liquids in the refrigerator do cover or wrap the food particularly if it has a strong flavour Position food so that air can circulate freely round it Useful hints Meat all types wrap in polythene bags and place on the glass shelf above the vegetable drawer For safety store in this way only one or two days at the most Cooked foods cold dishes etc thes...

Page 7: ...the motor compressor stops during normal use The defrost water drains out through a trough into a special container at the back of the appliance over the motor compressor where it evaporates It is important to periodically clean the defrost water drain hole in the middle of the refrigerator compartment trough to prevent the water overflowing and dripping onto the food inside Use the special cleane...

Page 8: ...f it still does not light up change the bulb The rating is shown on the light bulb cover Fig 15 D 400 CUSTOMER SERVICE AND SPARE PARTS If the appliance is not functioning properly check that the plug is firmly in the wall socket and the mains power switch is on there is an electricity supply find out by plugging in another appliance the thermostat knob is in the correct position If there are water...

Reviews: