background image

Replacing the control unit

The appliance is equipped with a longlife LED
interior light.
Only service is allowed to replace the control
unit. Contact your Service Center.

Closing the door

1.

Clean the door gaskets.

2.

If necessary, replace the defective door
gaskets. Contact the After Sales Service.

Installation

Caution!

 Read the "Safety Information"

carefully for your safety and correct

operation of the appliance before installing the
appliance.

Positioning

Install this appliance at a location where the am-
bient temperature corresponds to the climate
class indicated on the rating plate of the appli-
ance:

Climate

class

Ambient temperature

SN

+10°C to + 32°C

N

+16°C to + 32°C

ST

+16°C to + 38°C

T

+16°C to + 43°C

Location

Warning!

 It must be possible to

disconnect the appliance from the mains

power supply; the plug must therefore be easily
accessible after installation.

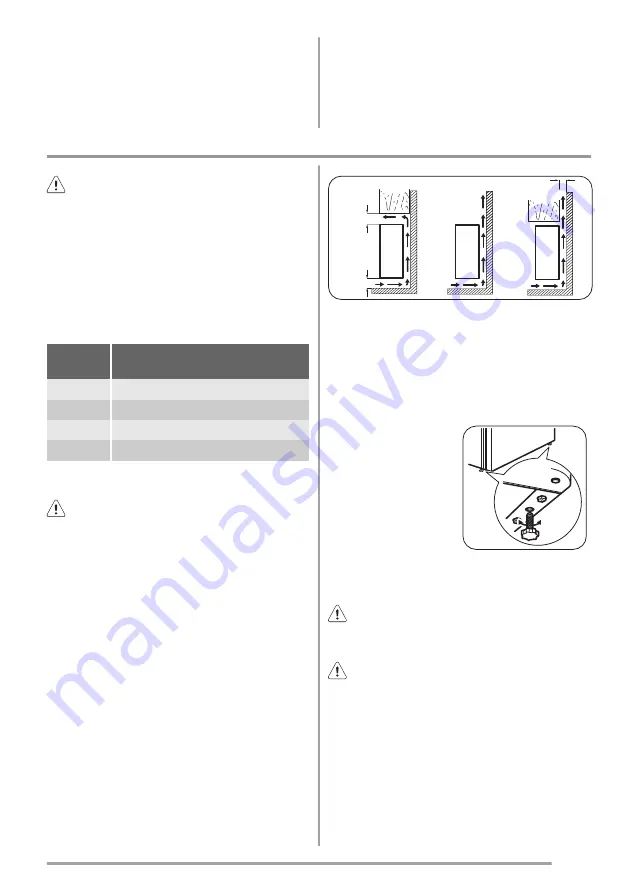
The appliance should be installed well away
from sources of heat such as radiators, boilers,
direct sunlight etc. Ensure that air can circulate
freely around the back of the cabinet. To ensure
best performance, if the appliance is positioned
below an overhanging wall unit, the minimum
distance between the top of the cabinet and the
wall unit must be at least 100 mm . Ideally, how-
ever, the appliance should not be positioned
below overhanging wall units. Accurate levelling
is ensured by one or more adjustable feet at the
base of the cabinet.

A

min

100mm

20mm

min

100mm

B

C

In order to guarantee proper functioning in am-
bient temperatures above 38ºC, it is advised to
have a 30mm separation between the sides of
the appliance and any surrounding furniture.

Levelling

When placing the ap-
pliance ensure that it
stands level. This can
be achieved by two
adjustable feet at the
bottom in front.

Electrical Connection

Caution!

 Any electrical work required to

install this appliance should be carried out

by a qualified electrician or competent person.

Warning!

 This appliance must be earthed.

The manufacturer declines any liability

should these safety measures not be observed.


11

www.zanussi.com

Summary of Contents for ZRB34211WA

Page 1: ...EN User manual Fridge Freezer ZRB34211WA...

Page 2: ...the appliance by a person re sponsible for their safety Children should be supervised to ensure that they do not play with the appliance Keep all packaging well away from children There is risk of su...

Page 3: ...arts in the appliance Do not store flammable gas and liquid in the appliance because they may explode Do not place food products directly against the air outlet on the rear wall If the appliance is Fr...

Page 4: ...t remove the LED light cover Contact the nearest After Sales Service Force to re place the LED light board if it is necessary This product must be serviced by an author ized Service Centre and only ge...

Page 5: ...Product description 6 3 4 1 5 2 8 7 1 Vegetable drawers 2 Cabinet shelves 3 Bottle rack 4 Control panel 5 Door shelves 6 Bottle shelf 7 Freezer drawers 8 Rating plate 5 www zanussi com...

Page 6: ...suitable However the exact setting should be chosen keeping in mind that the temperature inside the appliance depends on room temperature how often the door is opened quantity of food stored applianc...

Page 7: ...e The freezing process lasts 24 hours during this period do not add other food to be frozen After 24 hours when the freezing process is completed deactivate the Quick Chill function see Quick Chill fu...

Page 8: ...rap the food particularly if it has a strong flavour position food so that air can circulate freely around it Hints for refrigeration Useful hints Meat all types wrap in polythene bags and place on th...

Page 9: ...cleaning The equipment has to be cleaned regularly clean the inside and accessories with luke warm water and some neutral soap regularly check the door seals and wipe clean to ensure they are clean an...

Page 10: ...appli ance to the mains socket Contact a qualified electrician The light device does not work The light device is in stand by Close and open the door The unit is defective Refer to Replacing the contr...

Page 11: ...t such as radiators boilers direct sunlight etc Ensure that air can circulate freely around the back of the cabinet To ensure best performance if the appliance is positioned below an overhanging wall...

Page 12: ...same as that indicated on the appliance rating plate 6 Switch on the appliance The appliance is supplied with a 13 amp plug fitted 2 In the event of having to change the fuse in the plug supplied a 1...

Page 13: ...180 o 11 Place the upper door on the middle hinge pivot 12 Fix the door with upper hinge and fix it with screws of it 13 12 13 It is advisable to wait at least four hours before connecting the applia...

Page 14: ...terials with the symbol Put the packaging in applicable containers to recycle it Help protect the environment and human health and to recycle waste of electrical and electronic appliances Do not dispo...

Page 15: ...15 www zanussi com...

Page 16: ...www zanussi com shop 280151854 A 192013...

Reviews: