background image

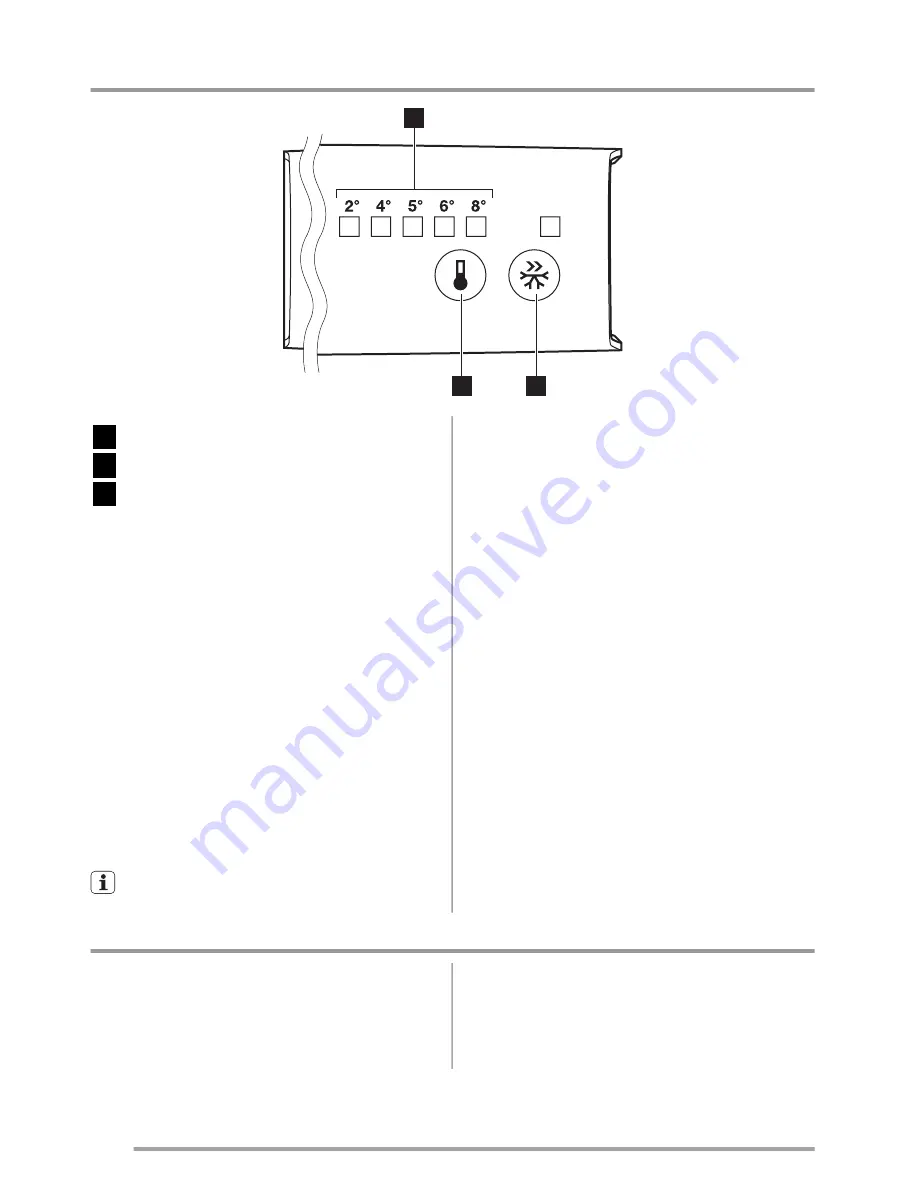
Control panel

1

3

2

1

Temperature indicators LED

2

QuickChill button

3

Temperature regulator

Switching on

Insert the plug into the wall socket.

Temperature regulation

To operate the appliance, proceed as follows:

• touch the temperature regulator button until

the LED corresponding to the required tem-
perature lights up. Selection is progressive,
varying from 2 to 8°C.
At first button touch actual setting LED keeps
blinking.
Any time the button is touch the set tempera-
ture is moved to 1 position . Corresponding
LED will blink for a while.
Touch the setting button until the required
temperature is selected. The set will be fixed

coldest setting: +2°C
warmest setting: +8°C

A medium setting is generally the most suitable.

However, the exact setting should be chosen
keeping in mind that the temperature inside the
appliance depends on:

• room temperature

• how often the door is opened

• quantity of food stored

• appliance location.

QuickChill function

You can activate the QuickChill function by
pressing the QuickChill button.
The LED corresponding to the symbol Quick-
Chill indicator lights up.
You can deactivate the QuickChill function by
pressing the QuickChill button again.
The QuickChill indicator will light off.

Important!


This function stops automatically after 52 hours.

First use

Cleaning the interior

Before using the appliance for the first time,
wash the interior and all internal accessories
with lukewarm water and some neutral soap so

as to remove the typical smell of a brand-new
product, then dry thoroughly.

Important!

 Do not use detergents or abrasive

powders, as these will damage the finish.

6


www.zanussi.com

Summary of Contents for ZRB38212WA

Page 1: ...EN User manual Fridge Freezer ZRB38212WA ZRB38212XA ZRB38214WA ...

Page 2: ...f the appliance by a person re sponsible for their safety Children should be supervised to ensure that they do not play with the appliance Keep all packaging well away from children There is risk of suffocation If you are discarding the appliance pull the plug out of the socket cut the connection ca ble as close to the appliance as you can and remove the door to prevent playing chil dren to suffer...

Page 3: ...parts in the appliance Do not store flammable gas and liquid in the appliance because they may explode Do not place food products directly against the air outlet on the rear wall If the appliance is Frost Free Frozen food must not be re frozen once it has been thawed out Store pre packed frozen food in accordance with the frozen food manufacturer s instruc tions Appliance s manufacturers storage r...

Page 4: ...ot remove the LED light cover Contact the nearest After Sales Service Force to re place the LED light board if it is necessary This product must be serviced by an author ized Service Centre and only genuine spare parts must be used Environment Protection This appliance does not contain gasses which could damage the ozone layer in ei ther its refrigerant circuit or insulation materials The applianc...

Page 5: ...Product description 6 3 4 1 5 2 8 7 1 Vegetable drawers 2 Cabinet shelves 3 Bottle rack 4 Control panel 5 Door shelves 6 Bottle shelf 7 Freezer drawers 8 Rating plate 5 www zanussi com ...

Page 6: ...t suitable However the exact setting should be chosen keeping in mind that the temperature inside the appliance depends on room temperature how often the door is opened quantity of food stored appliance location QuickChill function You can activate the QuickChill function by pressing the QuickChill button The LED corresponding to the symbol Quick Chill indicator lights up You can deactivate the Qu...

Page 7: ...f the fridge The freezing process lasts 24 hours during this period do not add other food to be frozen After 24 hours when the freezing process is completed deactivate the Quick Chill function see Quick Chill function Thawing Deep frozen or frozen food prior to being used can be thawed in the refrigerator compartment or at room temperature depending on the time available for this operation Small p...

Page 8: ...over or wrap the food particularly if it has a strong flavour position food so that air can circulate freely around it Hints for refrigeration Useful hints Meat all types wrap in polythene bags and place on the glass shelf above the vegetable drawer For safety store in this way only one or two days at the most Cooked foods cold dishes etc these should be covered and may be placed on any shelf Frui...

Page 9: ...st therefore only be carried out by authorized technicians Periodic cleaning The equipment has to be cleaned regularly clean the inside and accessories with luke warm water and some neutral soap regularly check the door seals and wipe clean to ensure they are clean and free from debris rinse and dry thoroughly Important Do not pull move or damage any pipes and or cables inside the cabinet Never us...

Page 10: ... does not op erate The plug is not connected to the mains socket correctly Connect the plug to the mains socket correctly The appliance has no power There is no voltage in the mains socket Connect a different electrical appli ance to the mains socket Contact a qualified electrician The light device does not work The light device is in stand by Close and open the door The unit is defective Refer to...

Page 11: ...30 240 V Frequency 50 Hz The technical information are situated in the rat ing plate on the internal left side of the appli ance and in the energy label Installation Caution Read the Safety Information carefully for your safety and correct operation of the appliance before installing the appliance Positioning Install this appliance at a location where the am bient temperature corresponds to the cl...

Page 12: ...t be observed A B C D E Important The wires in the mains lead are coloured in accordance with the following code A Green and Yellow Earth C Brown Live D Blue Neutral As the colours of the wires in the mains lead of this appliance may not correspond with the col oured markings identifying the terminals in your plug proceed as follows 1 Connect the wire coloured green and yel low to the terminal mar...

Page 13: ... screws of the middle hinge 3 2 1 Remove the plugs on the upper side of both doors and move them to the other side Remove the lower door from the lower hinge pivot 4 4 3 Screw off the pivot of the lower hinge 5 and screw the lower hinge pivot 6 into the left drill of the lower hinge 5 6 Screw off the screws of the lower hinge and remove the hinge 8 Screw off the lower cover plugs and screw them in...

Page 14: ... your cost Environmental concerns The symbol on the product or on its packaging indicates that this product may not be treated as household waste Instead it should be taken to the appropriate collection point for the recycling of electrical and electronic equipment By ensuring this product is disposed of correctly you will help prevent potential negative consequences for the environment and human ...

Page 15: ...15 www zanussi com ...

Page 16: ...www zanussi com shop 280151112 A 042013 ...

Reviews: