background image

Defrosting of the refrigerator

Frost is automatically eliminated from the evaporator of

the refrigerator compartment every time the motor com-

pressor stops, during normal use. The defrost water

drains out through a trough into a special container at the

back of the appliance, over the motor compressor, where

it evaporates.

It is important to periodically clean the defrost water drain

hole in the middle of the refrigerator compartment channel

to prevent the water overflowing and dripping onto the

food inside. Use the special cleaner provided, which you

will find already inserted into the drain hole.

Defrosting the freezer

A certain amount of frost will always form on the

freezer shelves and around the top compartment.

Important!  Defrost the freezer when the frost layer reaches

a thickness of about 3-5 mm.
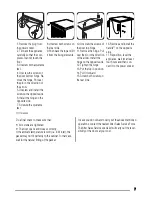
To remove the frost, do these steps:
1. Switch off the appliance.
2. Remove any stored food, wrap it in several layers of

newspaper and put it in a cool place.

3. Leave the door open.
4. When defrosting is completed, dry the interior thor-

oughly and refit the plug.

5. Switch on the appliance.
6. Set the temperature regulator to obtain the maximum

coldness and run the appliance for two or three hours

using this setting.

7. Reload the previously removed food into the com-

partment.

Important!  Never use sharp metal tools to scrape off frost

from the evaporator as you could damage it. Do not use

a mechanical device or any artificial means to speed up

the thawing process other than those recommended by

the manufacturer. A temperature rise of the frozen food

packs, during defrosting, may shorten their safe storage

life.

What to do if…

Normal Operating Sounds

• You may hear a faint gurgling and a bubbling sound

when the refrigerant is pumped through the coils or

tubing. This is correct.

• When the compressor is on, the refrigerant is being

pumped around and you will hear a whirring sound

and a pulsating noise from the compressor. This is

correct.

• The thermic dilatation might cause a sudden cracking

noise. It is natural, not dangerous physical phenom-

enon. This is correct.

• When the compressor switches on or switches off, you

will hear a faint "click" of the temperature regulator.

This is correct.

Technical data


Dimension


Height

850 mm


Width

550 mm


Depth

612 mm

Rising Time


11 h


5

Summary of Contents for ZRG614SW

Page 1: ...EN User manual 2 Refrigerator ZRG614SW ...

Page 2: ...remove the door to prevent playing children to suffer electric shock or to close themselves into it If this appliance featuring magnetic door seals is to replace an older appliance having a spring lock latch on the door or lid be sure to make that spring lock unusable before you discard the old appliance This will prevent it from becoming a death trap for a child General safety Caution Keep ventil...

Page 3: ...roduct then dry thoroughly Do not clean the appliance with metal objects Do not use sharp objects to remove frost from the ap pliance Use a plastic scraper Never use a hair drier or other heating appliances to speed up defrosting Excessive heat may damage the plastic interior and humidity could enter the electric system making it live Regularly examine the drain in the refrigerator for de frosted ...

Page 4: ...gulator toward higher settings to obtain the max imum coldness Important In this condition the refrigeratorcompartment temperature might drop below 0 C If this occurs reset the temperature regulator to a warmer setting Storage of frozen food When first starting up or after a period out of use before putting the products in the compartment let the appliance run at least 2 hours on the higher settin...

Page 5: ...ughly and refit the plug 5 Switch on the appliance 6 Set the temperature regulator to obtain the maximum coldness and run the appliance for two or three hours using this setting 7 Reload the previously removed food into the com partment Important Never use sharp metal tools to scrape off frost from the evaporator as you could damage it Do not use a mechanical device or any artificial means to spee...

Page 6: ...irculate freely around the back of the cabinet To ensure best performance if the appliance is positioned below an overhanging wall unit the minimum distance between the top of the cabinet and the wall unit must be at least 100 mm Ideally however the appliance should not be positioned below overhanging wall units Accurate levelling is ensured by one or more adjustable feet at the base of the cabine...

Page 7: ...the arrow Install the hinge on the opposite side 12 Tighten the hinge 13 Put the top in position 14 Pull it forward 15 Screw both screws on the rear side 16 Remove and install the handle1 on the opposite side 17 Reposition level the appliance wait for at least four hours and then con nect it to the power socket 1 If foreseen Do a final check to make sure that All screws are tightened The door open...

Page 8: ... lead of this ap pliance may not correspond with the coloured markings identifying the terminals in your plug proceed as follows 1 Connect the wire coloured green and yellow to the terminal marked either with the letter E or by the earth symbol or coloured green and yellow 2 Connect the wire coloured blue to the terminal either marked with the letter N or coloured black 3 Connect the wire coloured...

Page 9: ...that this product may not be treated as household waste Instead it should be taken to the appropriate collection point for the recycling of electrical and electronic equipment By ensuring this product is disposed of correctly you will help prevent potential negative consequences for the environment and human health which could otherwise be caused by inappropriate waste handling of this product For...

Page 10: ...10 ...

Page 11: ...11 ...

Page 12: ...To buy accessories consumables and spare parts at our online shop please visit www zanussi co uk www zanussi com 200383438 00 18032010 ...

Reviews: