background image

15

Electrical Connection

WARNING:

THIS APPLIANCE MUST BE EARTHED.
The manufacturer declines any inability 
should this safety measure not be 
observed.

If the plug that is fitted to your appliance is not suit-
able for your socket outlet, it must be cut off and the
appropriate plug fitted.

Remove the fuse from the cut off plug.
The cut off plug should then be disposed of to pre-
vent the hazard of shocks in case it should be
plugged into a 13amp socket in another part of your
home.

Important
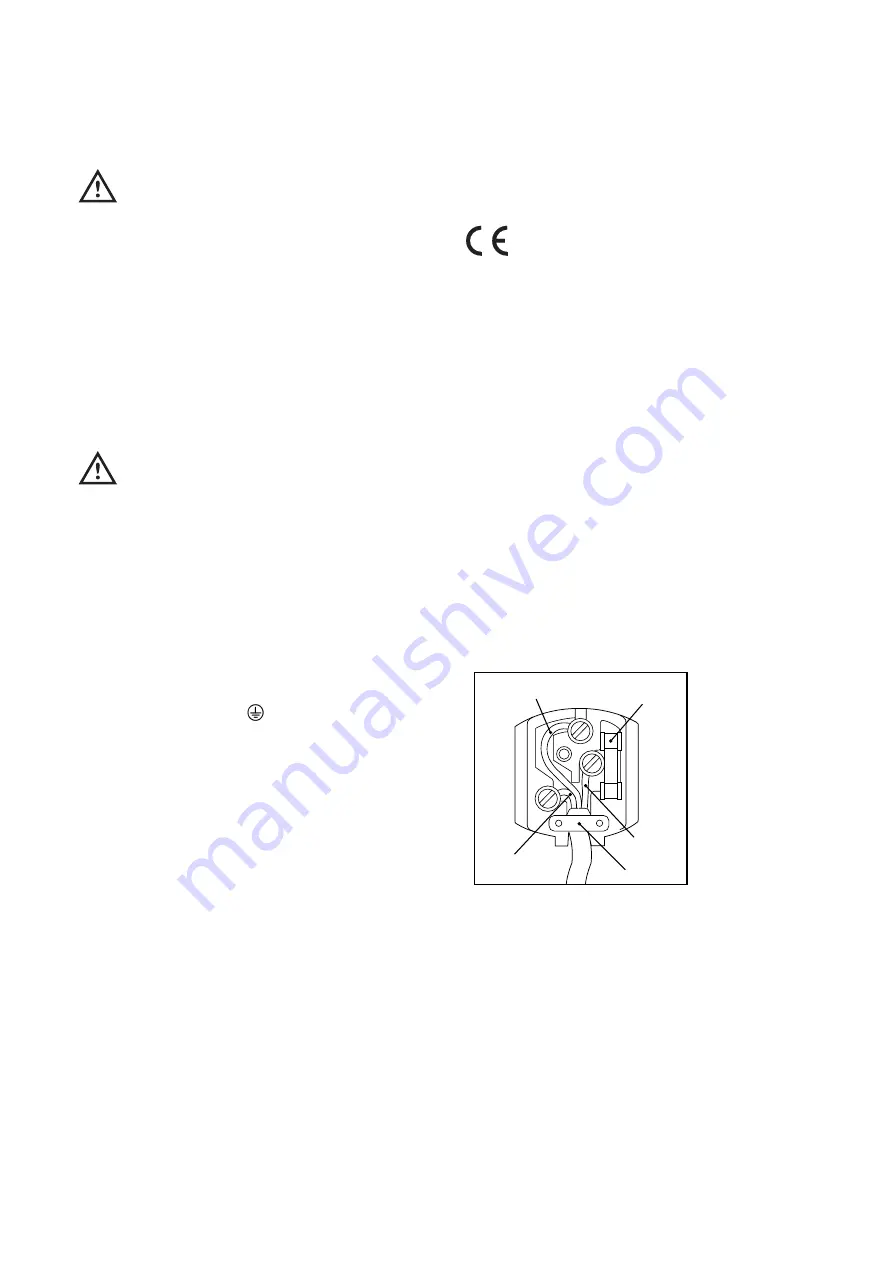
The wires in the mains lead are coloured in 
accordance with the following code:

Green and Yellow

- Earth

Blue

- Neutral

Brown

- Live

If you fit your own plug, the colours of the wires in
the mains lead of your appliance, may not corre-
spond with the markings identifying the terminals in
your plug, proceed as follows:

Connect the Green and the Yellow (earth) wire to the
terminal in the plug which is marked with the letter
«E» or the earth symbol 

, or coloured green and

yellow.

Connect the blue (neutral) wire to the terminal in the
plug which is marked with the letter «N» or coloured
black.

Connect the brown (live) wire to the terminal in the
plug which is marked with the letter «L» or coloured
red.

The plug moulded onto the lead incorporates a fuse.
For replacement, use a 13amp BS1362 fuse. Only
ASTA or BSI approved fuses should be used.

The plug must not be used if the fuse cover/carrier is
lost. The cover/carrier is indicated by the coloured
insert at the base of the plug.
A replacement cover/carrier must be obtained from
your local Zanussi Service Force Centre whose
address is listed in the Customer Care Booklet
which accompanies your instruction manual.

This appliance complies with the E.E.C.
Directive No. 87/308 of 2.6.87 relative to radio
interference suppression.

This appliance complies with the following 
E.E.C. Directive:

- 73/23 EEC of 19.2.73 (Low Voltage Directive)

and subsequent amendments.

- 89/336 EEC of 3.5.89 (Electromagnetic 
- Compatibility Directive) and subsequent

amendments.

Please ensure that when the appliance is
installed it is easily accessible for the engineer
in the event of breakdown.

D207

GREEN & YELLOW

13 AMP. FUSE

BROWN

CORD CLAMP

BLUE

13 AMP

Summary of Contents for ZT 51/2 R

Page 1: ...REFRIGERATOR ZT 51 2 R 2222611 87 INSTRUCTION BOOKLET...

Page 2: ...Fresh food refrigeration 6 Health and safety guidelines 7 Defrosting 8 Maintenance and Cleaning 9 Internal cleaning 9 External cleaning 9 Changing the light bulb 9 When the appliance is not use 9 Som...

Page 3: ...not allow children to tamper with the controls or play with the product There is a risk of suffocation Keep packaging material away from children During Use This appliance is designed for domestic us...

Page 4: ...compartment B Can storage shelf with egg tray C Bottle storage shelf D Salad drawer E Glass shelf G Storage shelves H Conveyor K Freezer compartment L Thermostat control Description of the Appliance...

Page 5: ...e way in When frozen food is not stored in the star compartment and when the ambient temperature is higher than 25 C return the conveyor to its initial position This reduces the temperature in the ref...

Page 6: ...or bubbling sounds when the refrigerant is pumped through the coils or tubing at the rear and the cooling evaporator When the compressor is on the refrigerant is being pumped round and you will hear...

Page 7: ...od as quickly as possible but do NOT place in the refrigerator until cool Leave food in a cool place in order that it can then be placed in the refrigerator as soon as possible Do NOT mix raw and cook...

Page 8: ...f the thermostat knob To accelerate defrosting place a bowl of hot water inside the compartment with a piece of cardboard underneath the bowl as protection 5 When defrosting is completed dry thoroughl...

Page 9: ...f the appliance with a brush or vacuum cleaner see figure You MUST ensure that the appliance is switched OFF An accumulation of dust will affect the perfor mance of the appliance and cause excessive e...

Page 10: ...is not jammed Check the thermostat in the fridge is turned to the correct setting relative to ambient conditions Check the ambient temperature is within the appliances operating limits of 10 C to 32 C...

Page 11: ...under the heading Something Not Working When you contact the Service Centre you will need to give the following details 1 Your name address and post code 2 Your telephone number 3 Clear and concise d...

Page 12: ...incurred for calls to put right an appliance which is improperly installed or calls to appliances outside the United Kingdom Appliances found to be in use within a commercial environment plus those w...

Page 13: ...or rooms where the ambient temperature reaches above 32 degrees C or drops below 10 degrees e g conservatories You should also ensure that air can circulate freely around the back and the top of the...

Page 14: ...n the left hand side 5 Unscrew the foot at the base 6 of the appliance and refit it on the opposite side 6 Refit the door and the bottom hinge to the left hand side When the bottom hinge is screwed in...

Page 15: ...neutral wire to the terminal in the plug which is marked with the letter N or coloured black Connect the brown live wire to the terminal in the plug which is marked with the letter L or coloured red...

Page 16: ...oard monitors software tv dvd and othes Manual users user manuals user guide manual owners manual instruction manual manual owner manual owner s manual guide manual operation operating manual user s m...

Reviews: