background image

38

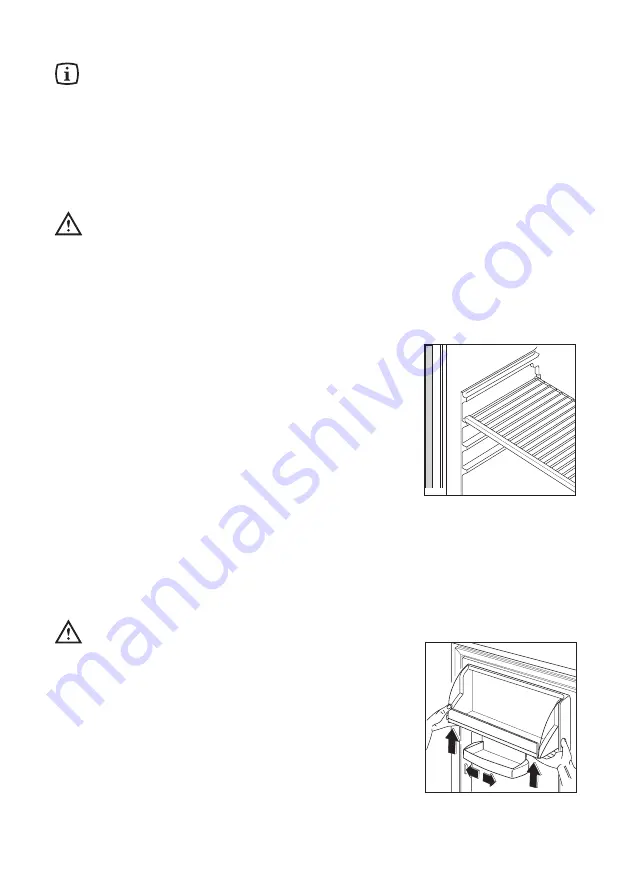
Prateleiras móveis

Os encaixes que se encontram no interior da caixa
permitem colocar as prateleiras a diferentes alturas,
conforme as necessidades.

D040

Arranque

Terminada a operação de limpeza, ligue a ficha à
tomada de corrente, abra a porta e coloque o botão
do termóstato além da posição «O» (paragem).
A máquina está a funcionar.

Regulação da temperatura

A temperatura no interior do refrigerador e do
congelador é regulada automaticamente e pode ser
aumentada (menos frio) rodando o botão para os
números mais baixos, ou diminuída (mais frio)
rodando para os números mais altos.

A posição correcta, de qualquer modo, deve ser
detectada considerando que a temperatura no interior
da caixa depende de vários factores, tais como:

a temperatura ambiente;

a qualidade das provisões guardadas no aparelho;
a frequência de abertura da porta;
a colocação do refrigerador.

A posição intermédia é a mais indicada.
Para parar o aparelho, coloque o botão do termóstato
na posição «O».

Importante

Assim que o termóstato estiver regulado na
posição de frio máximo, com uma
temperatura ambiente elevada e a caixa do
aparelho cheia de provisões, pode
acontecer que o compressor funcione em
marcha contínua. 

Nesse caso dar-se-á

formação de gelo no evaporador do
compartimento refrigerador. Para evitar este
inconveniente coloque o botão numa
posição menos fria de maneira a permitir o
descongelamento automático e, por
conseguinte, um menor consumo de
energia eléctrica.

Refrigeração dos alimentos e das
bebidas

Para obter um melhor rendimento do seu aparelho:

reparta as provisões de maneira  que o ar possa
circular, facilmente, à volta delas

;

não introduza, na caixa, alimentos ainda quentes
ou líquidos em evaporacão

;

cubra os alimentos, sobretudo se são aromáticos

.

Posição das prateleiras da porta

Para permitir a colocação de alimentos de vários
tamanhos, as prateleiras das portas podem ser
ajustadas em altura.

Para este ajuste proceda da seguinte maneira:

Puxe gradualmente a prateleira na direção das setas,
até ela sair, depois volte a colocá-la na posição
desejada.

Limpeza das partes internas 

Estando o aparelho convenientemente instalado,
antes de o utilizar, aconselhamos a sua limpeza
cuidadosa com água tépida e sabão neutro para
retirar o cheiro característico do "novo". Enxague e
seque cuidadosamente.

Não utilize detergentes ou pós abrasivos,
que podem danificar os acabamentos.

UTILIZAÇÃO

Summary of Contents for ZUS 6140

Page 1: ...D t T P BEDIENUNGSANLEITUNG INSTRUCTION BOOKLET INSTRU ES DE USO 2222681 89 K HLSCHRANK REFRIGERATOR O FRIGOR FICO ZUS 6140...

Page 2: ...bstellregale 6 H henverstellung der Innent rablagen 6 Tips 6 Tips f r das K hlen 6 Wartung 7 Abtauen 7 Regelm ige Reinigung 7 Au ergew hnliche Reinigung 8 Stillstandszeiten 8 Innenbeleuchtung 8 Kunden...

Page 3: ...es nicht anfassen oder es als Spielzeug verwend Vor der inneren bzw u eren Reinigung des Ger tes sowie beim Auswechseln der G hlampe bei damit ausgestatteten Ger ten das Ger t spannungslos machen Eis...

Page 4: ...bholtermine oder Sammelpl tze gibt die rtliche Gemeindeverwaltung an Die in diesem Ger t verwendeten und mit dem Symbol kennzeichneten Materialien sind recyclingf hig HINWEISE ZUR VERPACKUNGSENTSORGUN...

Page 5: ...e WICHTIG H chste K lteeinstellung bei hoher Raumtemperatur und erheblicher Lebensmittelmenge kann fortdauernden K hlschrank Betrieb verursachen dabei kann sich eine Reif oder Eisschicht an der hinter...

Page 6: ...erden TIPS Tips f r das K hlen Nachstehend einige praktische Ratschl ge Gekochte Nahrungsmittel kalte Platten usw zugedeckt aufbewahren Sie k nnen auf jeden beliebigen Rost gelegt werden Fleisch und F...

Page 7: ...u reinigen Benutzen Sie hierzu das daf r geeignete Reinigungsger t P Auf diese Weise wird verhindert da das Wasser in die Gem seschublade flie t S I 011 P F Regelm ige Reinigung Benutzen Sie nie Metal...

Page 8: ...men Ger t abtauen Innenraum und Zubeh rteile reinigen die T r offen lassen um im Inneren eine gute Luftzirkulation zu gew hrleisten und somit Geruchsbildung zu vermeiden Innenbeleuchtung Die Innenbele...

Page 9: ...ausreichend verpackte Waren eingelagert Wurde die T r offengelassen Wurde die T r h ufig ge ffnet oder stand sie f r l ngere Zeit offen Ist die Dichtung noch intakt Verhindert etwas im Innenraum da di...

Page 10: ...chrift nicht beachtet wird Vorbereitung des L ftungsgitters Nehmen Sie das Gitter aus der unteren Verpackungsschale T r ffnung rechts entfernen Sie die linke Seite A vom Gitter durch einen Schnitt von...

Page 11: ...T r danach befestigen Sie das Scharnier oben in Position B Achtung Bei einer niedrigen Raumtemperatur z B im Winter kann es vorkommen dass die Dichtung nicht perfekt am Schrank haftet Die Wiederherst...

Page 12: ...t wird PR266 A B C D 6 Die Schiene A auf der Innenseite der M belt r oben und unten auflegen siehe Abb und die Position der u eren Bohrl cher anzeichnen Nachdem die L cher gebohrt wurden die Schiene m...

Page 13: ...enutzen Bei einer lichten Einbauh he Ma A 820 mm und einer Sockelblendenh he Ma a 100 mm kann die Sockelblende unver ndert montiert werden Ebenso bei einer lichten Einbauh he Ma B 870 mm und einer Soc...

Page 14: ...e door shelves 17 Hints 18 Hints for refrigeration 18 Maintenance 18 Defrosting 18 Periodic cleaning 19 Periodic of non operation 19 Interior light 19 Customer Service and Spare Parts 20 Instructions...

Page 15: ...ith the controls or play with the product It is dangerous to alter the specifications or modify this product in any way Before any cleaning or maintenance work is carried out be sure to switch off and...

Page 16: ...marked with the symbol are recyclable DESCRIPTION OF THE APPLIANCE Butter shelf Sliding shelf Bottle shelf Airduct exit Air inlet filter Salad bins Storage shelves Thermostat considerably For safety r...

Page 17: ...djusted depending on the inner temperature of the refrigerator which in turn depends on a number of factors such as the ambient temperature the number of times the door is opened the quantity of food...

Page 18: ...ed in the bottle rack on the door Bananas potatoes onions and garlic if not packed must not be kept in the refrigerator 3 2 1 Unplug the appliance before carrying out any maintenance operation Warning...

Page 19: ...ce as it may get damaged Clean the inside with warm water and bicarbonate of soda Rinse and dry thoroughly The appliance is equipped with an air inlet filter 1 and an air outlet duct 2 on the ventilat...

Page 20: ...usable before you discard the old appliance This will prevent it from becoming a death trap for a child Positioning The appliance should be installed well away from sources of heat such as radiators b...

Page 21: ...the niche with the brackets Door reversal The appliance must be unplugged before starting work To reverse the opening direction of the door proceed as follows 1 remove the top hinge 1 taking care not...

Page 22: ...ts A B C D as shown in the figure S I 004 600 550 600 600 820 870 b a S I 006 30 PR266 A B C D 1 Fasten the side panel to the rear of the appliance with the fixing brackets D326 SUPER INFER UPPER LOWE...

Page 23: ...of the furniture closes properly 9 Push cover D into guide B until it clips into place Fitting the plinth Important For the efficient operation of the appliance it is important that the original venti...

Page 24: ...T 30 M 30 M 30 30 31 32 B 32 34 24 C B 25 O 26 27 27 B e e opa 27 P 27 Xpa e e o 27 C 27 28 28 P 28 29 29 B 29 T 30...

Page 25: ...O E C H H T H O B T 25 H P O H B B H H H X H B E...

Page 26: ...26 B M B E 2 X H O O O T...

Page 27: ...H H P C M C B B O O 27 T A C H D040 P T H O B e E B...

Page 28: ...28 O P H T C F P S I 011 P F...

Page 29: ...29 T 1 2 C 1 H b 2 3 K 1 C 1 2 2 3 S I 012 2 1 a b S I 013 3 2 1 K E B 1 O 2 C E E M D411...

Page 30: ...T 30 E E E O E E C T T B 815 560 538 M E M H 18 C 43 C T 18 C 38 C ST 16 C 32 C N 10 C 32 C SN K 6...

Page 31: ...31 T B K e H E C N 87 308 2 6 87 73 23 CEE 19 02 73 89 336 CEE 03 05 89 C A B P S I 002 A B a b S I 001 a a...

Page 32: ...32 2 E y 1 1 2 2 3 3 F F1 4 1 A 5 1 A 6 2 G B S I 003 F F B A F 3 1 2 G 1 F1 B P b S I 004 600 550 600 600 820 870 b a S I 005 1 D326 SUPER INFER D319 E E SUPER INFER...

Page 33: ...PR33 2 C A 33 T 6 C A S I 006 30 3 X 870 4 O A B C D PR266 A B C D 5 A 20mm A 50mm PR166 7 O 90 B B A C 2 8 B 8mm PR167 A B 8 B PR168...

Page 34: ...34 9 D B PR167 1 D B B E A 820 100 T B 870 b 150 E 100 b 150 580 100 b 150 B 25 S I 007 S I 008 580 a 100 b 150 25 80 A 820 B 870 25...

Page 35: ...eis 38 Posi o das prateleiras da porta 38 Conselhos 39 Conselhos para a refrigera o 39 Manuten o 39 Descongela o 39 Limpeza 40 L mpada de ilumina o 40 Paragem prolongada 40 Assist ncia t cnica e pe as...

Page 36: ...LHOS IMPORTANTES muito importante que este manual de instru es acompanhe o aparelho para garantir uma futura utiliza o correcta Se o aparelho for vendido ou emprestado a terceiros o manual de instru e...

Page 37: ...o ambiente Este aparelho n o cont m no seu circuito refrigerante e nas suas mat rias isolantes gases nocivos camada de ozono Mesmo assim este aparelho deve quando for destru do receber os cuidados con...

Page 38: ...caixa do aparelho cheia de provis es pode acontecer que o compressor funcione em marcha cont nua Nesse caso dar se forma o de gelo no evaporador do compartimento refrigerador Para evitar este inconven...

Page 39: ...e alho se n o forem estiverem embalados n o devem ser guardados no refrigerador 3 2 1 MANUTEN O Antes de qualquer interven o no aparelho aconselhamos que se desligue a tomada de corrente Aten o Este...

Page 40: ...ltro proceder no sentido inverso A estrutura do aparelho permite de efectuar uma limpeza da zona traseira pr xima parede at mesmo utilizando um aspirador de p 1 Remover o rodap 1 2 desmontar a grade d...

Page 41: ...material antisonoro na parede atr s do aparelho O aparelho est demasiadamente encostado a algum m vel Deixe um espa o para a ventila o Veja par grafo instala o A porta est mal vedada eventualmente ap...

Page 42: ...a ficha fique acess vel INSTALA O Liga o el ctrica Verifique antes de ligar o aparelho se a voltagem e a frequ ncia indicadas na placa de marca o correspondem s da sua rede Toler ncia admitida na volt...

Page 43: ...gabinete Se a temperatura ambiente estiver fria por exemplo no inverno pode ser que a junta n o adira perfeitamente ao gabinete Neste caso esperar que a mesma recupere a sua forma natural ou pode se a...

Page 44: ...os fixe a guia com os parafusos fornecidos PR33 2 C A 6 Engate a cobertura C na guia A at encaixar 8mm PR167 A B 7 Abra a porta do aparelho e a do m vel a 90 aprox Insira a esquadria B na guia A Mante...

Page 45: ...eito que sem modifica es Pode se dizer a mesma coisa no caso de luz m xima em altura com medida B 870 mm e de altura do rodap de medida b 150 mm Se a altura do rodap for superior a a 100 mm b 150 mm o...

Page 46: ......

Page 47: ......

Page 48: ......

Reviews: