background image

Because of consumer demand, preservatives have been removed from many pre-prepared foods. This
together with the changes in shopping habits to a once-a-week shop, mean that safe handling and
storage of food is even more important than ever.
The following tips should help you to ensure that the food in your home is in as perfect condition as 
possible.

Keep the freezer door closed as much as possi-
ble.

Do not push food together too much, try to allow
air to circulate around each item.

Cool cooked food as quickly as possible but do
NOT place in the freezer until cool. (Leave food in
a place as cool as possible in order that it can
then be placed in the refrigerator as soon as pos-
sible).

Do not store food uncovered.

The best way to defrost food is to put it in the
refrigerator to thaw slowly.

Ensure that food placed in the freezer is dated
and labelled and used in date order to ensure that
food is consumed at its best.

It is important that food is used before its “best
before” date.

Always wash your hands with soapy water and
dry them with a clean towel before handling food.

Keep work surfaces clean and avoid cross conta-
mination by not using the same work surface or
knife, without washing them thoroughly in
between.

The foods to be frozen must be fresh and of the
best quality.

HEALTH AND SAFETY GUIDELINES

8

The size of each pack should be small enough to
ensure that it is used in one go. Small packs
freeze more quickly and uniformly and give better
results.

Frozen food, once thawed, must not be refrozen.
Lean food keeps better and longer than fatty
food, salt reduces the storage time.

Wrap the food in polythene or aluminium freezing
bags or foil so that they adhere to the food and
provide an airlight seal.

Packaging which is swollen or has traces of
refrozen water droplets on the pack could indicate
that the product has not been kept at a suitable
temperature and that it may have lost its original
quality. Partially thawed food must not be
refrozen, it must be consumed within 24 hours.
Never exceed the storage time indicated.

Never place bottles or cans of fizzy drink in the
freezer as they may explode. Containers with a
lid must not be filled to the brim.

Do not open the door or place extra fresh food in
the freezer next to food which is already frozen as
this could cause the temperature of the frozen
food to rise and its quality and storage life to
reduce.

Important

In the event of a power failure causing the temperature within your freezer to rise, do not re-
freeze the food without checking its condition. The following guidelines should assist you:

Ice-cream: once thawed should be discarded.

Fruits & Vegetables: if soft should be cooked and used up.

Breads & Cakes: can be re-frozen without danger.

Shellfish: should be refrigerated and used up quickly.

Cooked Dishes: i.e. casseroles should be refrigerated and used up.

Large Pieces of Meat: can be re-frozen providing there are still ice crystals remaining within them.

Small Joints: should be cooked and can then be re-frozen as cooked dishes.

Chicken: should also be cooked and re-frozen as a cooked dish.

Summary of Contents for ZV 48 RF

Page 1: ...FREEZER ZV 48 RF 2222693 24 INSTRUCTION BOOKLET ...

Page 2: ...ng 6 Ice making 6 Automatic defrost 6 Normal operating sounds 7 Health and safety guidelines 8 Maintenance and Cleaning 9 Internal cleaning 9 External cleaning 9 When the appliance is not use 9 Something not Working 10 Service and Spare Parts 11 Customer Care Department 11 Guarantee Conditions 12 Instructions for the Installer Technical Specifications 13 Installation 13 Positioning 13 Door reversa...

Page 3: ...ppliance is designed for domestic use only specifically for the storage of edible foodstuffs only It is not intended for commercial or industri al use Containers with flammable gases or liquids can leak at low temperatures Do not store any con tainers with flammable materials such as spray cans fire extinguisher refill cartridges etc in the freezer Frozen food should not be refrozen once it has th...

Page 4: ...calendar recomended storage times for frozen foods Freezing fresh food compartment Frozen food storage compart ments Thermometer 4 Your appliance is frost free which means there is no need to manually defrost your appliance as this will be carried out automatically C ...

Page 5: ...ble room conditions such as high tempera ture and frequent door openings it may be neces sary to select a more suitable setting To obtain a colder temperature turn the thermostat control to the higher numbers to obtain a warmer temperature turn the control to the lower numbers Thermometer This indicates the internal temperature of the freezer It may indicate a temperature above 18 C when large qua...

Page 6: ...ctivated about 24 hours before freezing fresh food This time can be shortened depending on the quantity of food to be frozen After the time has elapsed place the food to be frozen in the bottom drawer of the freezer as this is the cold est part The maximum amount of food which is freezable in 24 hours is indicated on the rating plate This is to be found on the bottom left hand side You should neve...

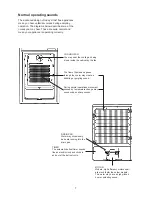
Page 7: ...n inside the cabinet by the fan The flow of liquids and gases through the cooler may create a bubbling or gurgling sound During normal operations movement caused by temperature change may cause sudden sharp sounds DRAIN PAN Water may occasionaly be heard running into the drain pan MOTOR Modern high efficiency motors oper ate much faster than older models The motor may have a high pitched hum or pu...

Page 8: ...niformly and give better results Frozen food once thawed must not be refrozen Lean food keeps better and longer than fatty food salt reduces the storage time Wrap the food in polythene or aluminium freezing bags or foil so that they adhere to the food and provide an airlight seal Packaging which is swollen or has traces of refrozen water droplets on the pack could indicate that the product has not...

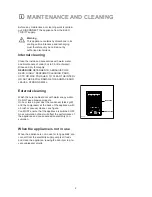
Page 9: ...O CLEAN THE INTERI OR AS THESE WILL DAMAGE THE SURFACE AND LEAVE A STRONG SMELL External cleaning Wash the outer cabinet door with warm soapy water Do NOT use abrasive products Once or twice a year dust the condenser black grill and the compressor at the back of the appliance with a brush or vacuum cleaner see figure You MUST ensure that the appliance is switched OFF An accumulation of dust will a...

Page 10: ... ambient conditions Check the ambient temperature is within the appliances operating limits of 10 C to 32 C Relocate the appliance if necessary Has the door just been opened If so leave for a few minutes to allow the air pressure to equalise Adjust the thermostat knob to give correct temperature control See page 5 Check that the door is closed Large quantities of food have recently been placed in ...

Page 11: ...ead the details under the heading Something Not Working When you contact the Service Centre you will need to give the following details 1 Your name address and post code 2 Your telephone number 3 Clear and concise details of the fault 4 The model serial no of the appliance found on the rating plate 5 The purchase date CUSTOMER CARE DEPARTMENT For general enquiries concerning your Zanussi appliance...

Page 12: ... incurred for calls to put right an appliance which is improperly installed or calls to appliances outside the United Kingdom Appliances found to be in use within a commercial environment plus those which are subject to rental agreements Products of Zanussi manufacture which are not marketed by Zanussi Limited European Guarantee If you should move to another country within Europe then your guarant...

Page 13: ...ources e g cookers radia tors boilers direct sunlight etc This also includes locations or rooms where the ambient temperature reaches above 32 C 90 F or drops below 10 C 50 F e g conservatories You should also ensure that air can circulate freely around the back and the top of the cabinet There must also be a minimum distance beween the top of the cabinet and any overhanging kitchen furniture as s...

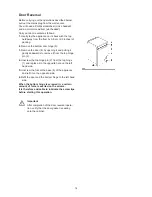
Page 14: ... and pulling it gently downwards to remove it from the top hinge pin 2 4 Unscrew the top hinge pin 2 from the top hinge 1 and replace it in the opposite hole on the left hand side 5 Unscrew the foot at the base 6 of the appliance and refit it on the opposite side 6 Refit the door and the bottom hinge to the left hand side When the bottom hinge is screwed in a certain amount of force is exerted on ...

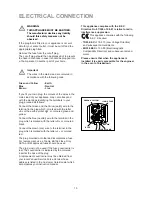
Page 15: ...utral wire to the terminal in the plug which is marked with the letter N or coloured black Connect the brown live wire to the terminal in the plug which is marked with the letter L or colured red The plug moulded onto the lead incorporates a fuse For replacement use a 13amp BS1362 fuse Only ASTA or BSI approved fuses should be used The plug must not be used if the fuse cover carrier is lost The co...

Page 16: ......

Reviews: