background image

12

What to do if

If you are unable to remedy the problem by following the above sug-
gestions, please contact your dealer or the Customer Care Depart-
ment.

1

Warning!

 Repairs to the appliance are only to be carried out by qualified 

service engineers. Considerable danger to the user may result from improp-
er repairs. 

3

If the appliance has been wrongly operated, the visit from the customer 
service technician or dealer may not take place free of charge, even during 
the warranty period.

Disposal

2

Packaging material

The packaging materials are environmentally friendly and can be recycled. 
The plastic components are identified by markings, e.g. >PE<, >PS<, etc. 
Please dispose of the packaging materials in the appropriate container at 
the community waste disposal facilities.

2

Old appliance

The symbol 

W

 on the product or on its packaging indicates that this prod-

uct may not be treated as household waste. Instead it shall be handed over 
to the applicable collection point for the recycling of electrical and electronic 
equipment. By ensuring this product is disposed of correctly, you will help 
prevent potential negative consequences for the environment and human 
health, which could otherwise be caused by inappropriate waste handling of 
this product. For more detailed information about recycling of this product, 
please contact your local city office, your household waste disposal service 
or the shop where you purchased the product.

Problem

Possible cause

Remedy

The cooking zones are not 
functioning. 

The desired heat setting is 
not set. 

Set the heat setting.

The fuse in the house’s elec-
trical wiring (fuse box) has 
been tripped.

Check the fuse.
If the fuses trip a number of 
times, please call an author-
ised electrician. 

The residual heat indicator is 
not displaying anything

The cooking zone was only 
on for a short time and is 
therefore not hot

If the cooking zone is sup-
posed to be hot, call the Cus-
tomer Service Department.

Summary of Contents for ZVM64N

Page 1: ...Ceramic glass hob ZVM64N X Installation and Operating Instructions g...

Page 2: ...e pass the user instructions on to any future owner of the appliance The following symbols are used in the text 1 Safety instructions Warning Information that affects your personal safety Important In...

Page 3: ...s 7 Control Knobs 7 Residual heat indicator 7 Operating the appliance 8 Setting the heat setting 8 Tips on Cooking and Frying 9 Cookware 9 Energy saving 9 Examples of cooking applications 10 Cleaning...

Page 4: ...t place or store flammable liquids highly inflammable materials or fusible objects e g plastic film plastic aluminium on or near the appli ance Children s safety Small children must be kept away from...

Page 5: ...safety reasons the cleaning of the appliance with steam jet or high pressure cleaning equipment is not permitted How to avoid damage to the appliance The glass ceramic can be damaged by objects fallin...

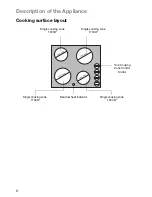
Page 6: ...ription of the Appliance Cooking surface layout Single cooking zone 1700W Hob Cooking Zone Control Knobs Single cooking zone 1700W Single cooking zone 1200W Residual heat indicator Single cooking zone...

Page 7: ...e residual heat indicator lights up as soon as one cooking zone is hot 1 Caution Risk of burns from residual heat After being switched off the cooking zones need some time to cool down Look at the res...

Page 8: ...unc tion or the life of the appliance Setting the heat setting 1 When boiling water searing food select a high heat setting 2 As soon as steam forms or the fat or oil is hot set a lower heat setting 3...

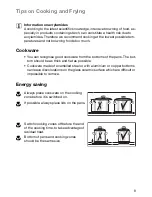
Page 9: ...good cookware from the bottoms of the pans The bot tom should be as thick and flat as possible Cookware made of enamelled steel or with aluminium or copper bottoms can leave discolorations on the gla...

Page 10: ...k dishes part way through cooking 3 4 Steaming Braising Steaming vegetables fish braising meat 20 45 mins With vegetables add only a little liquid a few tablespoons 4 5 Boiling Steaming potatoes 20 60...

Page 11: ...Remove residues by sliding the blade over the surface 3 Wipe the appliance with a damp cloth and a little washing up liquid 4 Rub the appliance dry using a clean cloth Scrapers and cleaners for glass...

Page 12: ...ay not be treated as household waste Instead it shall be handed over to the applicable collection point for the recycling of electrical and electronic equipment By ensuring this product is disposed of...

Page 13: ...is live Make electrical mains terminal free of voltage Observe connection schematic Observe electrical safety rules Ensure anti shock protection through correct installation by a qualified electrician...

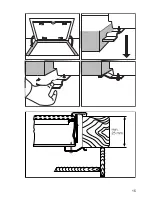
Page 14: ...14 Assembly...

Page 15: ...15...

Page 16: ...16 Rating Plates PEE2011 ZVM 64 X 5 8 kW 949 592 733 230 V 50 Hz ZANUSSI PEE2011 ZVM 64 N 5 8 kW 949 592 736 230 V 50 Hz ZANUSSI...

Page 17: ...s issued by Electrolux and is only used within the home i e is not used for commercial purposes The appliance is installed in accordance with all relevant regulations in force within your new country...

Page 18: ...io Gon alves Zarco Q 35 2774 518 Pa o de Arcos Romania 40 21 451 20 30 Str Garii Progresului 2 S4 040671 RO Schweiz Suisse Svizzera 41 62 88 99 111 Industriestrasse 10 CH 5506 M genwil Slovenija 38 61...

Page 19: ...rtment or one of our service partners In order to be able to assist you quickly we require the following information Model description Product number PNC Serial number S No for numbers see rating plat...

Page 20: ...www electrolux com www zanussi de www zanussi at www zanussi be 867 200 328 A 201206 01 Subject to change without notice...

Reviews: