background image

13

Installation Instructions

Safety instructions

The laws, ordinances, directives and standards in force in the country of use 
are to be followed (safety regulations, proper recycling in accordance with 
the regulations, etc.)
Installation may only be carried out by a qualified electrician.
The minimum distances to other appliances and units are to be observed.
Anti-shock protection must be provided by the installation, for example 
drawers may only be installed with a protective floor directly underneath the 
appliance.
The cut surfaces of the worktop are to be protected against moisture using 
a suitable sealant.
The sealant seals the appliance to the work top with no gap.
Do not use silicon sealant between the appliance and the work top.
Avoid installing the appliance next to doors and under windows. Otherwise 
hot cookware may be knocked off the rings when doors and windows are 
opened.

1

WARNING!

Risk of injury from electrical current.

The electrical mains terminal is live.

Make electrical mains terminal free of voltage.

Observe connection schematic.

Observe electrical safety rules.

Ensure anti-shock protection through correct installation by a qualified 
electrician.

The appliance must be connected to the electrical supply by a qualified 
electrician.

1

IMPORTANT!

Risk of injury from electrical current.
Loose and inappropriate plug and socket connections can make the termi-
nal overheat.

Have the clamping joints correctly installed by a qualified electrician.

Use strain relief clamp on cable.

In the event of single-phase or two-phase connection, the appropriate 
mains cable of type H05BB-F Tmax 90°C(or higher) must be used.

If this appliance’s mains cable is damaged, it must be replaced by a spe-
cial cable (type H05BB-F Tmax 90°C; or higher). The latter is available 
from the Customer Care Department.

A device must be provided in the electrical installation which allows the ap-
pliance to be disconnected from the mains at all poles with a contact open-
ing width of at least 3 mm.
Suitable isolation devices include line protecting cut-outs, fuses (screw type 
fuses are to be removed from the holder), earth leakage trips and contac-
tors.

Summary of Contents for ZVM64N

Page 1: ...Ceramic glass hob ZVM64N X Installation and Operating Instructions g...

Page 2: ...e pass the user instructions on to any future owner of the appliance The following symbols are used in the text 1 Safety instructions Warning Information that affects your personal safety Important In...

Page 3: ...s 7 Control Knobs 7 Residual heat indicator 7 Operating the appliance 8 Setting the heat setting 8 Tips on Cooking and Frying 9 Cookware 9 Energy saving 9 Examples of cooking applications 10 Cleaning...

Page 4: ...t place or store flammable liquids highly inflammable materials or fusible objects e g plastic film plastic aluminium on or near the appli ance Children s safety Small children must be kept away from...

Page 5: ...safety reasons the cleaning of the appliance with steam jet or high pressure cleaning equipment is not permitted How to avoid damage to the appliance The glass ceramic can be damaged by objects fallin...

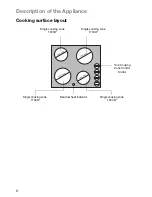
Page 6: ...ription of the Appliance Cooking surface layout Single cooking zone 1700W Hob Cooking Zone Control Knobs Single cooking zone 1700W Single cooking zone 1200W Residual heat indicator Single cooking zone...

Page 7: ...e residual heat indicator lights up as soon as one cooking zone is hot 1 Caution Risk of burns from residual heat After being switched off the cooking zones need some time to cool down Look at the res...

Page 8: ...unc tion or the life of the appliance Setting the heat setting 1 When boiling water searing food select a high heat setting 2 As soon as steam forms or the fat or oil is hot set a lower heat setting 3...

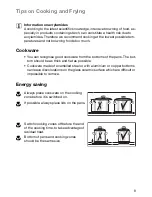
Page 9: ...good cookware from the bottoms of the pans The bot tom should be as thick and flat as possible Cookware made of enamelled steel or with aluminium or copper bottoms can leave discolorations on the gla...

Page 10: ...k dishes part way through cooking 3 4 Steaming Braising Steaming vegetables fish braising meat 20 45 mins With vegetables add only a little liquid a few tablespoons 4 5 Boiling Steaming potatoes 20 60...

Page 11: ...Remove residues by sliding the blade over the surface 3 Wipe the appliance with a damp cloth and a little washing up liquid 4 Rub the appliance dry using a clean cloth Scrapers and cleaners for glass...

Page 12: ...ay not be treated as household waste Instead it shall be handed over to the applicable collection point for the recycling of electrical and electronic equipment By ensuring this product is disposed of...

Page 13: ...is live Make electrical mains terminal free of voltage Observe connection schematic Observe electrical safety rules Ensure anti shock protection through correct installation by a qualified electrician...

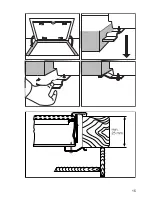
Page 14: ...14 Assembly...

Page 15: ...15...

Page 16: ...16 Rating Plates PEE2011 ZVM 64 X 5 8 kW 949 592 733 230 V 50 Hz ZANUSSI PEE2011 ZVM 64 N 5 8 kW 949 592 736 230 V 50 Hz ZANUSSI...

Page 17: ...s issued by Electrolux and is only used within the home i e is not used for commercial purposes The appliance is installed in accordance with all relevant regulations in force within your new country...

Page 18: ...io Gon alves Zarco Q 35 2774 518 Pa o de Arcos Romania 40 21 451 20 30 Str Garii Progresului 2 S4 040671 RO Schweiz Suisse Svizzera 41 62 88 99 111 Industriestrasse 10 CH 5506 M genwil Slovenija 38 61...

Page 19: ...rtment or one of our service partners In order to be able to assist you quickly we require the following information Model description Product number PNC Serial number S No for numbers see rating plat...

Page 20: ...www electrolux com www zanussi de www zanussi at www zanussi be 867 200 328 A 201206 01 Subject to change without notice...

Reviews: