background image

16

Zanussi 818 15 02--02/5

Electrical connection

Any electrical work required to install this
appliance should be carried out by a

qualified electrician or competent person.
This appliance must be earthed.

The manufacturer declines any liability should
these safety measures not be observed.

Electrical Requirements

Before switching on, make sure the electricity
supply voltage is the same as that indicated on the
appliance rating plate.
The appliance is supplied with a 13amp plug fitted.
In the event of having to change the fuse in the plug
supplied, a 13amp ASTA approved (BS1362) fuse
must be used.
Should the plug need to be replaced for any reason.
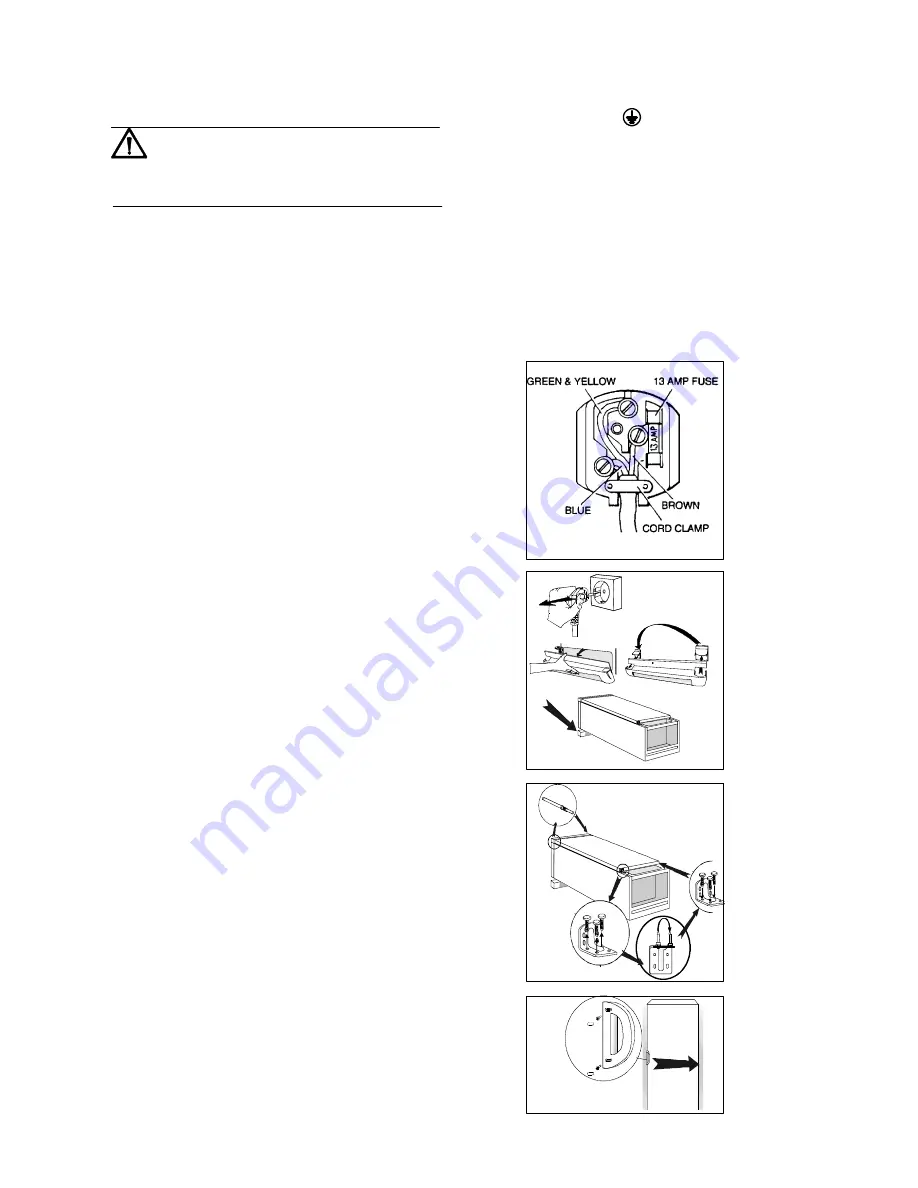
The wires in the mains lead are coloured in
accoordance with the following code:

Green and yellow

-Earth

Blue

-Neutral

Brown

-Live

The wire coloured green and yellow must be
connected to the terminal marked with the letter "E"
or by the earth symbol

or coloured greeen and

yellow.

The wire coloured blue must be connected to the
terminal marked "N" or coloured black

The wire coloured brown must be connected to the
terminal marked "L" or coloured red.

Upon completion there must be no cut, or stray
strands of wire present and the cord clamp must be
secure over the outer sheath.

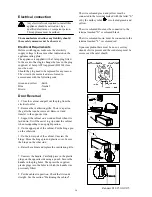
Door Reversal

1. Close the cabinet and pull out the plug from the
electrical outlet.
2. Remove the ventilation grille. There is a part on
the grille that can be removed. Remove it and
transfer to the opposite side.
3. Support the cabinet on a wooden block when it is
laid down. It will be easier to grip under the cabinet
when resupporting to an upright positon.
4. On the upper part of the cabinet. Put the hinge pin
on the other side.
5. On the lower part of the cabinet. Unscrew the
hinge. Move the hinge pin and plastic cover. Secure
the hinge on the other side.

6. Raise the cabinet and replace the ventilation grille.

7. Unscrew the handle. Carefully press in the plastic
plugs on the opposite side using a punch. Secure the
handle in the plug holes. Then press the supplied
plastic plugs into the holes to which the handle was
previously fitted.

8. Put the cabinet in position. Check that it stands
straight. See the section "Positioning the cabinet".

1

2

3

4

5

7

Summary of Contents for ZVR11R

Page 1: ...FREEZER ZVR11R INSTRUCTION BOOKLET 8181502 02 5 ...

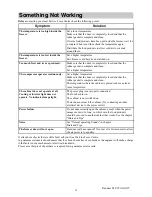
Page 2: ... designed for domestic use only specifically for the storage of edible foodstuffs only It is not intended for commercial or industrial use Containers with flammable gases or liquids can leak at low temperatures Do not store any containers with flammable materials such as spray cans fire extinguisher refill cartridges etc in the refrigerator or freezer Maintenance and Cleaning Before cleaning alway...

Page 3: ... Cleaning 8 Removing the ventilation grille 8 Internal Cleaning 8 External Cleaning 8 Defrosting the freezer 9 To Change the Light Bulb 9 When the appliance is not in use 9 Something Not Working 9 Service and Spare Parts 10 Customer Care Department 12 Guarantee Conditions 13 Instructions for the installer Technical specification 14 Installation 14 Unpacking 14 Cleaning 14 Installing the cabinet 14...

Page 4: ...AST FREEZE button Used to switch the Fast Freeze feature on and off D Green indicator light Lights when the freezer is operating E Thermostat control Use to switch on and set the desired temperature in the freezer Use GB Operation This appliance is designed for do mestic use only specifically for the storage of edible foodstuffs This appliance is designed to operate in ambient temperatures surrond...

Page 5: ...t control to the desired position 1 The lowest position of the thermostat control results in the highest temperature inside the cabinet 6 The highest position of the thermostat control results in the lowest temperature inside the cabinet 0 Off Allow the cabinet to run for a period of 24 hours whenever the temperature setting is changed This will allow the temperature to stabilise inside the cabine...

Page 6: ...er than 12 C Find out what caused the alarm and correct the situation The lamp goes out when it becomes colder than 13 C Suitable storage periods Food purchased in frozen condition Follow the advice on the maximum storage period indicated on the packaging Food frozen at home Fatty and salty food should not be kept frozen for more than three months Cooked food and low fat food may be kept up to abo...

Page 7: ...r or vacuum cleaner Avoid unnecessary frosting in the cabinet by packing all foodstuffs into airtight packages before placing them in the freezer Carefully follow the advice on freezing products in the section Use This will prevent wasting energy Do not set the temperature too low in the freezer A suitable temperature is in the range of 18 C to 20 C Defrost the freezer when the frost layer reaches...

Page 8: ...rille by pulling outward downward Then pull the grille straight out to completely remove it Internal Cleaning Clean the inside and the accessories with warm water and bicarbonate of soda 5 ml to 0 5 litre of water Rinse and dry thoroughly Do not use detergents abrasive powders high perfumed cleaning products wax polishes or cleaning products containing bleach or alcohol Regulary check the door sea...

Page 9: ... off the ice when it starts to thaw Use a wood or plastic scraper Do not use sharp objects as these may damage the interior When all the ice has melted clean and wipe the cabinet dry then push the drain spout back in place Switch on the cabinet and replace the frozen foodstuff Never use a hair dryer or other heating appliances to speed up defrosting Excessive heat may damage the plastic interior a...

Page 10: ... complete and clean The temperature where the cabinet is placed is above normal room temperature The cabinet does not operate at all Cooling or interior light does not operate No indicator lamps light The power plug is not properly connected The fuse has blown The cabinet is not switched on Power does not reach the cabinet Try connecting another electrical device to the power outlet Power failure ...

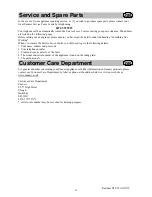
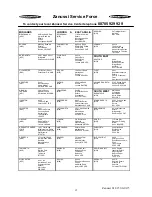
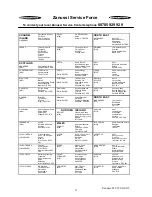
Page 11: ... When you contact the Service Force Centre you will need to give the following details 1 Your name address and post code 2 Your telephone number 3 Clear and concise details of the fault 4 The model and serial number of the appliance found on the rating plate 5 The purchase date Customer Care Department GB For general enquiries concerning your Zanussi appliance or further information on Zanussi pro...

Page 12: ...ad Fremington Barnstaple North Devon EX31 2NT ILKESTON M43 Unit 2 Furnace Road Ilkeston DE7 5EP HARPENDEN M46 Unit 4 Riverside Estate Coldharbour Lane Harpenden AL5 4UN BOURNEMOUTH M26 63 65 Curzon Road Bournemouth Dorset BH1 4PW LEICESTER M22 Unit 7 Oaks Ind Estate Coventry Road Narborough Leicestershire LE0 5GF LETCHWORTH M50 16 17 Woodside Ind Estate Works Road Letchworth Herts SG6 1LA BRIDGEWA...

Page 13: ...7 Hill Street Dunoon Argyll PA23 7AL WHALSAY OWN SALES Leask Electrical Harlsdale Symbister Whalsay Shetland ZE2 9AA NORTH EAST BIRKENHEAD M11 1 Kelvin Park Dock Road Birkenhead L41 1LT GLASGOW M04 20 Cunningham Road Clyde Estate Rutherglen Glasgow G73 1PP NORTHEN BELFAST M27 IRELAND Owenmore House Kilwee Business Park Upper Dunmury Lane Belfast BT17 0HD CARLISLE M10 Unit 7 James Street Workshops ...

Page 14: ...Costs incurred for calls to put right an appliance which is improperly installed or calls to appliances outside the United Kingdom Appliances found to be in use within a commercial environment plus those those which are subject to rental agreements Products of Zanussi manufacture which are not marked by Zanussi European Guarantee If you should move to another country within Europe then your guaran...

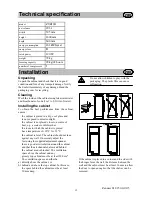
Page 15: ...d in a dry cool place and is not exposed to direct sunlight the cabinet is not placed close to a source of heat e g a cooker or dishwasher the room in which the cabinet is placed has a temperature of 10 C to 32 C the cabinet is level The cabinet should not lean against any wall If necessary adjust the feet using the supplied adjustment spanner there is good air circulation around the cabinet and t...

Page 16: ... marked N or coloured black The wire coloured brown must be connected to the terminal marked L or coloured red Upon completion there must be no cut or stray strands of wire present and the cord clamp must be secure over the outer sheath Door Reversal 1 Close the cabinet and pull out the plug from the electrical outlet 2 Remove the ventilation grille There is a part on the grille that can be remove...

Page 17: ......

Page 18: ......

Page 19: ......

Page 20: ...MARIESTAD U AV Electrolux Household Appliances Limited 2000 ...

Reviews: