background image

GETTING 
STARTED?

EASY.

User Manual

ZWD96SB4PW

EN User Manual

Washer Dryer

Summary of Contents for ZWD96SB4PW

Page 1: ...GETTING STARTED EASY User Manual ZWD96SB4PW EN User Manual Washer Dryer ...

Page 2: ...r lack of experience and knowledge if they have been given supervision or instruction concerning the use of the appliance in a safe way and understand the hazards involved Children between 3 and 8 years of age and persons with very extensive and complex disabilities shall be kept away from the appliance unless continuously supervised Children of less than 3 years of age should be kept away from th...

Page 3: ...llation process Make sure that the mains plug is accessible after installation The ventilation opening in the base must not be covered by a carpet mat or any floor covering WARNING The appliance must not be supplied through an external switching device such as a timer or connected to a circuit that is regularly switched on and off by a utility Ensure good air ventilation in the room where the appl...

Page 4: ...Do not dry unwashed items in the wash dryer Items such as foam rubber latex foam shower caps waterproof textiles and rubber backed articles and clothes or pillows fitted with foam rubber pads should not be dried in the washer dryer Fabric softeners or similar products should only be used as specified by the product manufacturer s instructions Remove all objects from items that could be a source of...

Page 5: ...the appliance Always pull the mains plug Do not touch the mains cable or the mains plug with wet hands This appliance is fitted with a 13 A mains plug If it is necessary to change the mains plug fuse use only a 13 A ASTA BS 1362 fuse UK and Ireland only WATER CONNECTION The inlet water shall not exceed 25 C Do not cause damage to the water hoses Before connection to new pipes pipes not used for a ...

Page 6: ...e note that some of these spare parts are only available to professional repairers and that not all spare parts are relevant for all models Concerning the lamp s inside this product and spare part lamps sold separately These lamps are intended to withstand extreme physical conditions in household appliances such as temperature vibration humidity or are intended to signal information about the oper...

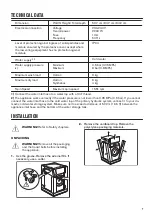
Page 7: ...pin speed 1551 rpm 1 Connect the water inlet hose to a water tap with a 3 4 thread 2 The appliance works correctly if the water pressure is not lower than 0 05 MPa 0 5 bar If you cannot connect the water inlet hose to the cold water tap of the primary hydraulic system connect it to your do mestic cold water storage system Make sure not to exceed a distance of 5 02 m 16 5 ft between the appliance i...

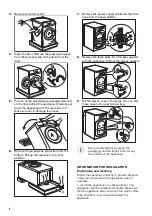
Page 8: ...e hose holders 8 Remove the three bolts Use the key supplied with the appliance Pull out the plastic spacers 9 Put the plastic caps in the holes You can find these caps in the user manual bag We recommend that you keep the packaging and the transit bolts for any movements of the appliance INFORMATION FOR INSTALLATION Positioning and levelling Adjust the appliance correctly to prevent vibration noi...

Page 9: ... to the cold water tap with 3 4 thread WARNING The inlet water shall not exceed 25 C Water drainage The drain hose should stay at a height of no less than 60 cm and not more than 100 cm You can extend the drain hose to maximum 400 cm Contact the authorised service centre for the other drain hose and the extension It is possible to connect the drain hose in different ways 1 Make a U shape with the ...

Page 10: ...mit vibration we recommend placing a waterproof wooden panel at least 15 mm thick under the appliance It should be screwed to at least 2 floor beams and should extend beyond the front feet If possible install the appliance where the floor is more stable ELECTRICAL CONNECTION At the end of installation you can connect the mains plug to the mains socket The rating plate and the Technical Data chapte...

Page 11: ...Drain Spin Rinse Wool Steam Synthetics Wool 60min Wash Dry Cottons 1 2 3 4 9 10 11 7 6 8 5 1 Programme knob 2 Spin speed reduction Spin 3 Temperature selection Temp 4 Display 5 Drying time selection Time Dry 6 Prewash phase Prewash 7 Additional rinse Extra Rinse 8 Automatic drying level Auto Dry 9 Start Pause 10 Delay start setting Delay Start 11 Time saving Flex Time DISPLAY A B E D F G H C 11 ...

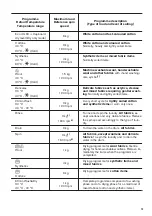
Page 12: ...tor D Door locked indicator E Indicators of dryness level F Steam indicator G Drying phase indicator H Washing phase indicator PROGRAMMES PROGRAMME CHART Programme Default temperature Temperature range Maximum load Reference spin speed Programme description Type of load and level of soiling Eco 40 60 Wash only mode 40 C1 9 kg 1600 rpm White cotton and fast coloured cotton Normally soiled items Eco...

Page 13: ... items 20min Wash 30 C 40 C 30 C 3 kg 1200 rpm A very short cycle for lightly soiled cotton and synthetic items or worn only once Rinse 9 kg4 1600 rpm 5 To rinse and spin the laundry All fabrics ex cept woollens and very delicate fabrics Reduce the spin speed accordingly to the type of laun dry Drain 9 kg To drain the water in the drum All fabrics Spin 9 kg4 1600 rpm5 All fabrics except woollens a...

Page 14: ...tion Values chapter The most efficient programmes in terms of energy consumption are generally those that per form at lower temperatures and longer duration 2 According to UK Ecodesign for Energy Related Products and Energy Information Regulations this pro gramme at default temperature and spin speed in washing and drying mode with rated capacity 6 kg and with Cupboard dry level performs the wash ...

Page 15: ...Drain Spin Wool Synthetics Cottons 60min Wash Dry Steam 1 Only the QUICK option is available Suitable detergents for each programme Programme Universal powder1 Liquid Universal Liquid for coloureds Delicates woollens Special Eco 40 60 Cottons Synthetics Delicates Wool 20min Wash 15 ...

Page 16: ...bes bath towels etc up to 6 kg For items to be stored Cottons and Linen bathrobes bath towels etc up to 6 kg Synthetics and mixed fab rics jumpers blouses underwear household and bed linen up to 4 kg Wool items woollen jumpers up to 1 kg Iron Dry Suitable for ironing Cottons and Linen sheets tablecloths shirts etc up to 6 kg TIMED DRYING Dryness Level Type of fabric Load kg Spin speed rpm Suggeste...

Page 17: ...ed indicator comes on There is a water in the drum when the programme is completed The drum turns regularly to prevent the laundry creases The door stays locked You must drain the water to unlock the door To drain the water refer to At the end of the programme TIME DRY With this option you can set the time for the fabrics you have to dry The display shows the set value Each time you press this tou...

Page 18: ...he indicator comes on goes off ACOUSTIC SIGNALS The acoustic signals operate when The programme is completed The appliance has a malfunction To deactivate activate the acoustic signals press and at the same time for 6 seconds If you deactivate the acoustic signals they continue operate when the appliance has a malfunction BEFORE FIRST USE During installation or before first use you may observe som...

Page 19: ...but we recommend that you do not exceed the maximum indicated level This quantity will however guarantee the best washing results 3 Carefully close the detergent drawer CHECK THE POSITION OF THE DETERGENT FLAP 1 Pull out the detergent dispenser until it stops A 2 Press the lever down to remove the dispenser 3 To use powder detergent turn the flap up 4 To use liquid detergent turn the flap down B W...

Page 20: ...elay you want to set The related indicator comes on the display 2 Press The appliance starts the countdown The door locks the display shows the indicator If the indicator flashes the door is locking If the display shows an alarm message after the indicator has flashed for a few seconds it indicates that the door is not properly locked for more details see Troubleshooting chapter When the countdown...

Page 21: ...he drum turns regularly to prevent the creases in the laundry The door lock indicator is on The indicator flashes The door stays locked You must drain the water to open the door To drain the water 1 If necessary decrease the spin speed If you set the appliance only drains 2 Press The appliance drains the water and spins 3 When the programme is completed and the door lock indicator goes off you can...

Page 22: ...ay shows 10 minutes Each time you press this touchpad the time value increases by 5 minutes The display shows the set time value for example After some seconds the display shows a new time value The appliance calculates also the duration of the anti crease and the cooling phases 2 Press to start the programme The display shows regularly a new time value The drying indicator starts to flash The dis...

Page 23: ...e does not let you set a too low spin speed for the items to be washed and dried 1 Press to set the drying time value The display shows 10 minutes The indicator comes on in the display The display shows the set drying value time for example After some seconds the display shows the final time value that is the total duration of the washing and drying cycles washing drying anti crease cooling phases...

Page 24: ...ribbons etc A very small load can cause balance problems with the spin phase leading to excessive vibration If this occurs interrupt the programme and open the door refer to Daily Use chapter manually redistribute the load so that the items are spaced evenly around the tub press the Start Pause button The spin phase continues Button up pillowcases close zippers hooks and poppers Tie up belts cords...

Page 25: ...t a lower temperature To use the correct quantity of detergent refer to the quantity suggested by the detergent producer and check the water hardness of your domestic system Refer to Water hardness WATER HARDNESS If the water hardness in your area is high or moderate we recommend that you use a water softener for washing machines In areas where the water hardness is soft it is not necessary to use...

Page 26: ...fil ter Twice a year Clean the inlet hose and the valve filter Twice a year 1 Refer to Fluff in the fabrics chapter The following paragraphs explain how you should clean each part REMOVING FOREIGN OBJECTS Make sure that pockets are empty and all loose elements are tied up before running your cycle Refer to The laundry load in Hints and tips Remove any foreign objects such as metal clip buttons coi...

Page 27: ...the clothes to be drained out with the water Regularly examine the seal Coins buttons other small items can be recovered at the end of the cycle Clean it when needed using ammonia cream cleanser agent without scratching the seal surface Always obey the instructions that you find on the packaging of the product Check and remove objects if there are any that could be trapped in the fold Make sure th...

Page 28: ...AIN FILTER Do not clean the drain filter if the water in the appliance is hot Repeat the steps 2 and 3 until the water stops flowing out Always keep a rag nearby to dry up any water spillage 1 2 180 3 2 1 4 1 2 5 6 28 ...

Page 29: ... contact the Author ised Service Centre Make sure also that you tighten the filter correctly to prevent leakages CLEANING THE INLET HOSE AND THE VALVE FILTER 1 1 2 3 2 3 4 45 20 EMERGENCY DRAIN Because of a malfunction the appliance cannot drain the water If this occurs do steps 1 through 8 of Cleaning the drain filter If necessary clean the pump 29 ...

Page 30: ...e 5 When the drain pump is empty install the inlet hose again WARNING Make sure that the temperature is higher than 0 C before you use the appliance again The manufacturer is not responsible for damages caused by low temperatures TROUBLESHOOTING WARNING Refer to Safety chapters ALARM CODES AND POSSIBLE FAILURES The appliance does not start or it stops during operation First try to find a solution ...

Page 31: ... properly closed Internal fail No commu nication between elec tronic elements of the appliance The programme was not finished properly or the appliance stopped too early Switch the appliance off and on again If the alarm code appears again contact the Authorised Service Cen tre The mains supply is un stable Wait until mains supply is stable If the display shows other alarm codes deactivate and act...

Page 32: ...ke sure that the packaging and or the transit bolts are removed Refer to Installation instruction Add more laundry in the drum The load may be too small The washing results are not satisfactory Increase the detergent quantity or use a different detergent Use special products to remove the stubborn stains before you wash the laundry Make sure that you set the correct temperature Decrease the laundr...

Page 33: ...e the drum is not too high Proceed with an emergency drain if necessary refer to Emergency drain in Care and cleaning chapter To open the door proceed as follows 1 Turn the selector to position to switch the appliance off 2 Disconnect the mains plug from the mains socket 3 Open the filter flap 4 Keep the emergency unlock trigger pulled downward and at the same time open the appliance door 5 Take o...

Page 34: ...Y RELATED PRODUCTS AND ENERGY INFORMATION REGULATIONS Washing only Eco 40 60 pro gramme kg kWh Litres h mm C rpm1 Full load 9 0 820 55 3 40 52 35 1551 Half load 4 5 0 540 45 2 35 52 33 1551 Quarter load 2 5 0 185 38 2 30 54 23 1551 1 Maximum spin speed Wash and dry cycle Eco 40 60 pro gramme and Cup board dry level kg kWh Litres h mm C rpm1 Full load 6 4 510 83 8 05 0 37 1551 Half load 3 2 630 51 ...

Page 35: ...ics 4 It also performs as quick washing cycle for lightly soiled laundry COMMON PROGRAMMES WASH AND DRY These values are indicative only Programme kg kWh Litres h mm C rpm1 Synthetics 40 C 4 2 80 85 5 00 1 40 1200 1 Reference indicator of the spin speed ENVIRONMENTAL CONCERNS Recycle materials with the symbol Put the packaging in relevant containers to recycle it Help protect the environment and h...

Page 36: ...WWW ZANUSSI COM SHOP 157039801 A 402021 ...

Reviews: