background image

8

The inlet hose must not be lengthened. If it is too
short and you do not wish to move the tap, you will
have to purchase a new, longer hose specially
designed for this type of use.

Water drainage

The end of the drain hose can be positioned in three
ways:

Hooked over the edge of a sink using the plastic
hose guide supplied with the machine

. In this

case, make sure the end cannot come unhooked
when the machine is emptying.
This could be done by tying it to the tap with a piece
of string or attaching it to the wall.

In a sink drain pipe branch

. This branch must be

above the trap so that the bend is at least 60 cm
above the ground.

Directly into a drain pipe at a height

of not less

than 60 cm and not more than 90 cm.
The end of the drain hose must always be

ventilated

, i.e. the inside diameter of the drain pipe

must be larger than the outside diameter of the drain
hose.

The drain hose must not be kinked. Run it along the
floor; only the part near the drainage point must be
raised.

P0023

P0022

Electrical connection

This machine is designed to operate on a 220-230 V,
single-phase, 50 Hz supply.

Check that your domestic electrical installation can
take the maximum load required (2.2 kW), also
taking into account any other appliances in use.

WARNING: THIS APPLIANCE MUST BE

EARTHED.

The manufacturer declines any liability

should this safety measure not be
observed.

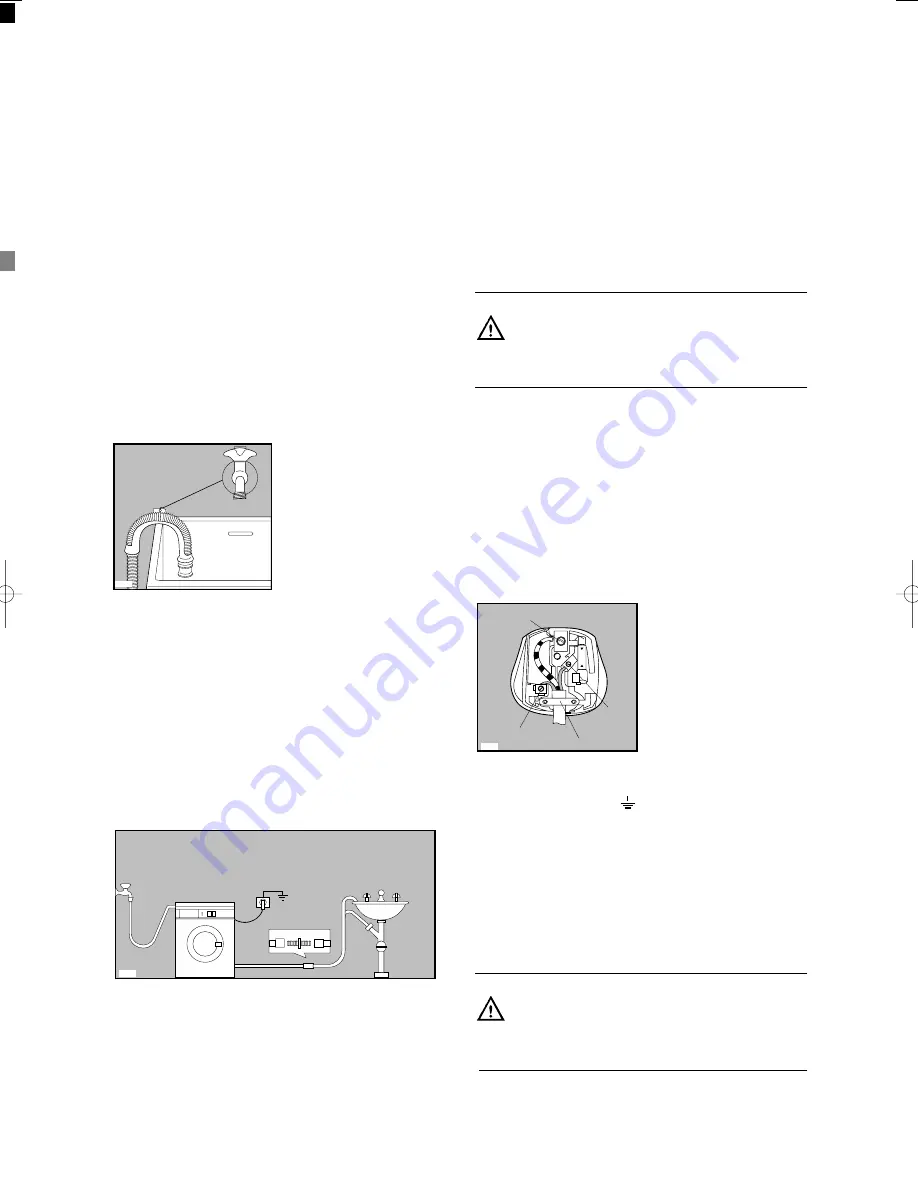
The appliance is supplied with a 13amp plug fitted.
In the event of having to change the fuse in the plug
supplied, a 13amp ASTA approved (BS1363A) fuse
must be used.
Should the plug need to be replaced for any reason,
proceed as described below.
The wires in the mains lead are coloured in
accordance with the following code:

Green and Yellow

- Earth

Blue

- Neutral

Brown

- Live

The wire coloured green and yellow must be
connected to the terminal marked with the letter «E»
or by the earth symbol 

or coloured green and

yellow.

The wire coloured blue must be connected to the
terminal «N» or coloured black.

The wire coloured brown must be connected to the
terminal marked «L» or coloured red.
Upon completion there must be no cut, or stray
strands of wire present and the cord clamp must be
secure over the outer sheath.

WARNING:

A cut off plug inserted into a 13 amp socket
is a serious safety (shock) hazard.
Ensure that the cut off plug is disposed of
safely.

GREEN & YELLOW

BROWN

CORD CLAMP

BLUE

13

A

P1041

E

N

L

132990240.qxd  20/02/2004  15:18  Pagina  8    (Nero/Process Black pellicola)

Summary of Contents for ZWM 150

Page 1: ...LY CYCLE COTTONS QUICK WASH WOOL RINSES SYNTHETICS and SPECIAL DELICATES B A B G 30 95 30 95 30 60 30 40 C SYNTHETICS with PREWASH SYNTHETICS 30 40 SHORT SPIN Plus A Q U A C Y C L E 30 60 30 60 COLOURS WHITES with PREWASH WHITES QUICK WASH COTTONS QUICK WASH SYNTHETICS and SPECIALS 30 60 SYNTHETICS with PREWASH SYNTHETICS 30 40 DRAIN SOFTENERS SPIN 30 40 40 850 850 INSTRUCTION BOOKLET 132990240 ...

Page 2: ... the Service Centre The symbols you will see on some paragraphs of this booklet have the following meaning The warning triangle and or the key words Warning Caution emphasize information that is particularly important for your safety or correct functioning of the appliance The information marked with this symbol provides additional instructions and practical tips on the use of the appliance Tips a...

Page 3: ...npacking 7 Positioning and levelling 7 Water inlet 7 Water drainage 8 Electrical connection 8 Your new washing machine 9 Description of the appliance 9 Detergent dispenser drawer 9 Programme chart 9 Use 10 Control panel 10 Controls 10 Washing hints 11 Sorting the laundry 11 Temperatures 11 Before loading the laundry 11 Maximum loads 11 Laundry weights 11 Removing stains 11 Detergents and additives...

Page 4: ...nts saturated with petroleum methylated spirits trichlorethylene etc If such fluids have been used to remove stains prior to washing wait until they have completely evaporated from the fabric before placing garments in the appliance Place small items such as socks belts etc in a cloth bag or pillowcase to prevent them getting trapped between the drum and the tub Use only the recommended quantities...

Page 5: ...eatment stains and limited soiling can be removed the laundry can then be washed at a lower temperature Measure out detergent according to the water hardness the degree of soiling and the quantity of laundry being washed Child safety Children are often not aware of how dangerous electrical appliances can be When the machine is working children should be carefully supervised and not be allowed to p...

Page 6: ...POWER SUPPLY VOLTAGE FREQUENCY 220 230 V 50 Hz TOTAL POWER ABSORBED 2200 W MINIMUM FUSE PROTECTION 10 A WATER PRESSURE Minimum 0 05 MPa Maximum 0 8 MPa This appliance complies with the following EEC Directives 73 23 EEC of 19 02 73 relating to low voltage 89 336 EEC of 03 05 89 relating to electromagnetic compatibility Technical specifications ...

Page 7: ...wards the left and then upwards P1127 P1126 P1123 2 3 1 P0001 P1129 6 Set the machine upright and remove the remaining rear screw Slide out the relevant pin 7 Plug all the holes with the plugs which you will find in the envelope containing the instruction booklet Positioning and levelling Install the machine on a flat hard floor Make sure that air circulation around the machine is not impeded by c...

Page 8: ...phase 50 Hz supply Check that your domestic electrical installation can take the maximum load required 2 2 kW also taking into account any other appliances in use WARNING THIS APPLIANCE MUST BE EARTHED The manufacturer declines any liability should this safety measure not be observed The appliance is supplied with a 13amp plug fitted In the event of having to change the fuse in the plug supplied a...

Page 9: ...le 5 Drain filter 6 Adjustable feet Detergent dispenser drawer Prewash Main wash Fabric softener starch Your new washing machine Description of the appliance 1 3 4 5 6 2 MADE IN ITALY ZWM 281 N K N M J K TEMPERATURE ON OFF HALF LOAD PROGRAMME SPIN REDUCTION RINSE HOLD C K J G B A M N 30 60 30 60 RINSES WHITES with PREWASH WHITES DAILY CYCLE COTTONS QUICK WASH WOOL RINSES SYNTHETICS and SPECIAL DEL...

Page 10: ...ng To drain the water and gently spin the laundry depress this button again To drain water only select programme 7 TEMPERATURE selector dial Turn this dial to select the washing temperature Position cold wash 8 PROGRAMME selector dial To select the required programme turn this dial clockwise until the programme letter is exactly opposite the pointer Before selecting a programme or changing a progr...

Page 11: ...ics and woollens drum no more than one third full Washing a maximum load makes the most efficient use of water and energy For heavily soiled laundry reduce the load size Laundry weights The following weights are indicative bathrobe 1200 g napkin 100 g quilt cover 700 g sheet 500 g pillow case 200 g tablecloth 250 g towelling towel 200 g tea cloth 100 g night dress 200 g ladies briefs 100 g man s w...

Page 12: ...s 60 C max for all types of fabric or special for woollens only The detergent and any additives must be placed in the appropriate compartments of the dispenser drawer before starting the wash programme If using concentrated powder or liquid detergents a programme without prewash must be selected The washing machine incorporates a recirculation system which allows an optimal use of the concentrated...

Page 13: ...rature 30 C Hand wash Do not wash at all Bleaching Bleach in cold water Do not bleach Ironing Hot iron max 200 C Warm iron max 150 C Lukewarm iron max 110 C Do not iron Dry cleaning Dry cleaning in all solvents Dry cleaning in perchlorethylene petrol pure alcohol R 111 R 113 Dry cleaning in petrol pure alcohol and R 113 Do not dry clean Drying Flat On the line On clothes hanger Tumble dry high tem...

Page 14: ...remove any manufacturing residue from the drum and tub Pour half a measure of detergent into the main wash compartment and start up the machine 1 Place the laundry in the drum Open the door Place the laundry in the drum one item at a time shaking them out as much as possible Close the door 2 Measure out the detergent Pull out the dispenser drawer until it stops Measure out the amount of detergent ...

Page 15: ...ne will drain and spin Wait one or two minutes before opening the door to give the electric locking mechanism time to release it Depress the ON OFF button again to switch the machine off Remove the laundry Turn the drum by hand to make sure it is completely empty so as to avoid any forgotten items being damaged in a subsequent wash e g shrinking or their colour running into a load of whites Releas...

Page 16: ...rmally soiled Wash at 30 95 C 3 rinses Long spin B Coloureds without prewash normally soiled Wash at 30 60 C 3 rinses Long spin 30 95 30 60 HALF LOAD SPIN REDUCTION RINSE HOLD HALF LOAD SPIN REDUCTION RINSE HOLD HALF LOAD SPIN REDUCTION RINSE HOLD C Daily Cycle lightly soiled cottons Wash at 30 60 C 3 rinses Long spin 30 60 HALF LOAD SPIN REDUCTION RINSE HOLD HALF LOAD SPIN REDUCTION RINSE HOLD G ...

Page 17: ... Possible options K Synthetics without prewash normally soiled Wash at 30 60 C 3 rinses Stop with water in the tub Quick wash for lightly soiled laundry Wash at 30 40 C 3 rinses Stop with water in the tub M Synthetics with prewash heavy soiled N J Wash at 30 40 C 3 rinses Stop with water in the tub 30 40 Delicates 30 60 30 60 30 40 Prewash Wash at 30 60 C 3 rinses Stop with water in the tub Short ...

Page 18: ...insing it under a running tap To remove the drawer from the machine press the button in the rear left hand corner To facilitate cleaning the top part of the additive compartments can be removed C0018 C0019 P1050 Detergent can also accumulate inside the drawer recess clean it with an old toothbrush Refit the drawer after cleaning Drain filter The drain filter collects threads and small objects inad...

Page 19: ...le the appliance is built in the kitchen furniture slightly loosen the drain filter after placing a bowl on the floor to let the water come out slowly At the end screw the filter again P1090 Frost precautions If the machine is installed in a place where the temperature could drop below 0 C proceed as follows Close the water tap and unscrew the water inlet hose from the tap Place the end of the dra...

Page 20: ...th water in the tub has been performed The drain filter is clogged The RINSE HOLD option has been selected There is water on the floor Too much detergent or unsuitable detergent creates too much foam has been used Check whether there are any leaks from one of the inlet hose fittings It is not always easy to see this as the water runs down the hose check to see if it is damp The drain hose is damag...

Page 21: ... number and purchase date of your machine the Service Centre will require this information Mod Prod No Ser No Mod Prod No Ser No P0042 Problem Possible cause Water is not visible in the machine The machine which is the result of modern technology runs in a very economical way with low water consumption Performance is nevertheless excellent ...

Page 22: ...MADE IN ITALY ...

Reviews: