background image

26

2.  Onto a sink outlet spigot.

If the outlet spigot has not been used before, remove
any blanking plug that may be in place.

Push the drain hose onto the spigot and secure with a
clip if required, ensure a loop is formed in the drain
hose (see diagram) to prevent waste from the sink
entering the washing machine.

The drain hose may be extended to a maximum of 4
metres. An additional drain hose and joining piece is
available from your local Service Force Centre. 
The joining piece must have an internal diameter of
18mm.

Important

Before connecting up the machine to new pipework or
to pipework that has not been used for some time, run
off a reasonable amount of water to flush out any debris
that may have collected in the pipes.
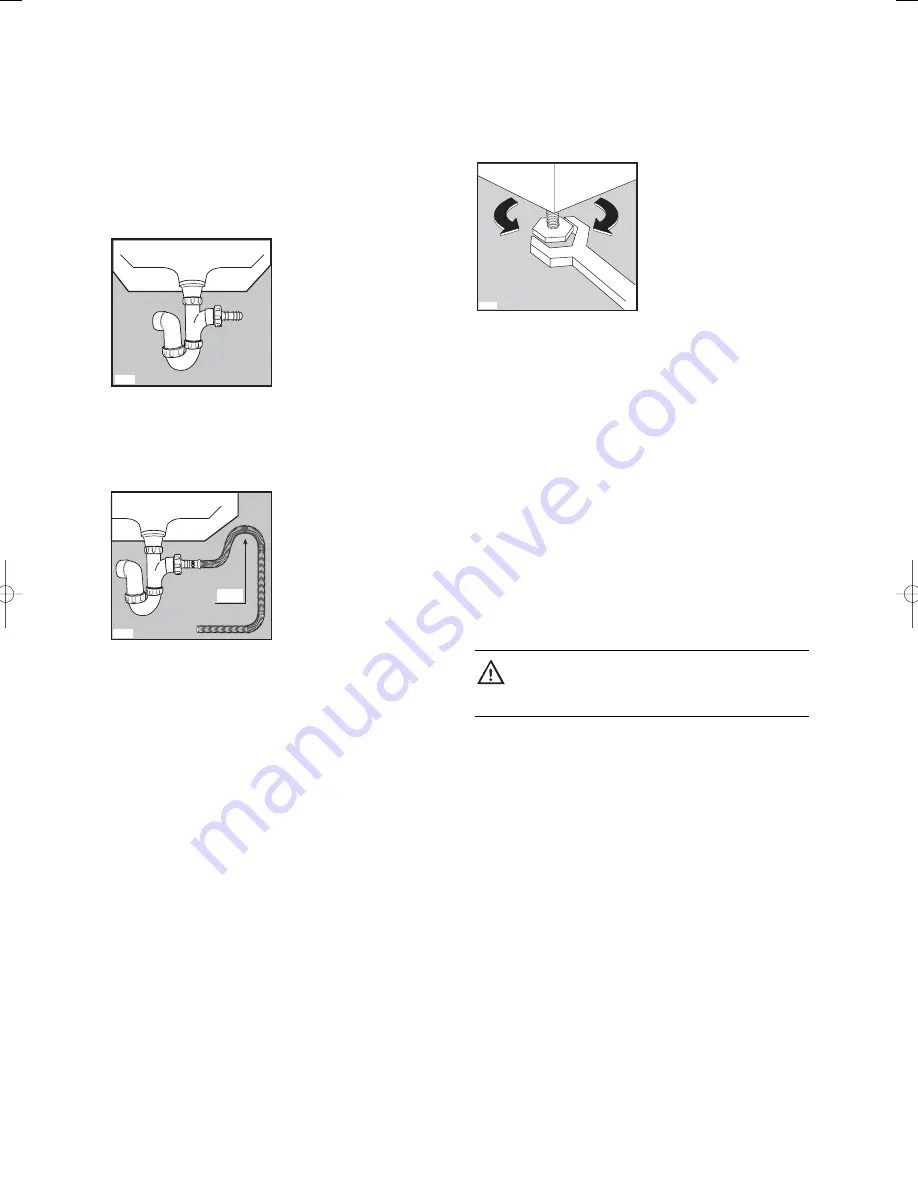
Levelling

Level the washing machine by raising or lowering the
feet. The feet may be tight to adjust as they incorporate
a self locking nut, but the machine MUST be level and
stable (check diagonally).

P1198

Loop

P1197

Any necessary adjustment can be made with a spanner.
Accurate levelling prevents vibration, noise and
displacement of the machine during operation.
Some vibration is inevitable, especially if mounted on a
wooden floor.
Sprung wooden floors are particularly susceptible to
vibration. For advice, consult a builder. If possible,
always place the machine on a solid floor.

Special conditions

If the floor is carpeted or covered with crumbly or soft
material, insert a rigid support base under the feet to
prevent noise, vibration or displacement. The base
should protrude a few centimetres beyond the edges of
the machine.

Warning

The machine should NOT be placed on deep pile

carpeting.

Note

Please ensure that when the appliance is installed it is
easily accessible for the engineer in the event of a
breakdown.

In the interest of the environment

Washing machines and dishwashers should be
connected to the FOUL drainage system, the water will
then be taken to a sewage works for treatment before
being discharged safely into a river.
It is essential that these appliances are not connected to
the surface water drainage system as this water is
discharged directly into a river or stream and may cause
pollution.

P1051

132983440.qxd  18/10/2005  10:11  Pagina  26

Summary of Contents for ZWN 1220

Page 1: ... Rinses Drain Spin Wash Prewash ZWN 1220 W Delay On Off Night Cycle 40 AA Soak Fabric Temperature Spin Speed Options Skip Reset Quick Extra 95 C Prewash Super Rinse Start Pause 1200 Handwash INSTRUCTION BOOKLET 132983440 GB Quick Installation Guide visit our WEB SITE to view an install video www video uk electrolux com ...

Page 2: ...at stains such as paint ink rust and grass before washing Underwired bras must NOT be machine washed Any objects such as coins safety pins nails screws stones or any other hard sharp material can cause extensive damage and must not be placed into the machine Garments which have been in contact with volatile petroleum products should not be machine washed If volatile cleaning fluids are used care s...

Page 3: ...programme 13 End of programme 13 Washing Hints 14 15 Which detergent 15 And in which form 15 Wash Care Symbols 16 Washing Programmes 17 Maintenance and Cleaning 18 19 Descaling 18 After each wash 18 Maintenance Wash 18 External cleaning 18 Cleaning the dispenser drawer 18 Cleaning the drawer recess 18 Cleaning the filter 18 19 Cleaning the water inlet filter 19 The dangers of freezing 19 Emergency...

Page 4: ...ocal Council or Environmental Health Office to see if there are facilities in your area for re cycling this appliance When the appliance is to be scrapped cut off the power supply cable and make the door lock device unusable to prevent young children from being trapped inside Help to keep your country tidy use authorised disposal sites for your old appliance The symbol on the product or on its pac...

Page 5: ...ature to prevent small children from being trapped inside the machine To activate this device rotate the button without pressing it inside the door clockwise until the groove is horizontal If necessary use a coin To disable this device and restore the possibility of closing the door rotate the button anti clockwise until the groove is vertical 1 2 3 4 5 6 Synthetics Delicates Cottons Wool 60 C 40 ...

Page 6: ...y the washing machine 6 The Control Panel 1 2 3 4 5 6 7 8 9 10 11 Synthetics Delicates Cottons Wool 60 C 40 C 30 C Cold 1200 900 700 500 Rinses Drain Spin Wash Prewash ZWN 1220 W Delay On Off Night Cycle 40 AA Soak Fabric Temperature Spin Speed Options Skip Reset Quick Extra 95 C Prewash Super Rinse Start Pause Handwash The relevant light will light up Maximum temperatures are 95 C for cotton 60 C...

Page 7: ...e washing to your laundry By pressing the Delay button the soak time can be extended up to a maximum of 10 hours After this time the wash cycle will automatically start This function is not available for wool and hand wash cycles The soak ends with a short spin at 650 rpm in programmes for cotton and synthetic fabrics whereas in the programme for delicate fabrics the water is only drained If you h...

Page 8: ...0 E20 8 Duration of washing programme in hours and minutes after you have selected a programme While the programme is running after you have pressed the Start Pause button the displayed time value decreases by one unit every minute The washing machine has stopped with water in the tub at the end of a programme with the Night cycle option this is indicated by a flashing zero The washing machine has...

Page 9: ...tton This button performs two functions Clears the memory Selects special programmes At the end of every programme the Reset button must be pressed once or repeatedly to clear the programme memory This will be confirmed by three dashes flashing in the display If the previous programme is not cleared the display will show a 0 flashing and an audible signal will sound when you switch the machine on ...

Page 10: ...delay time proceed as follows set the washing machine to Pause by pressing the Start Pause button press the Delay button until the display shows the symbole 0 press the Start Pause button again Wash Rinses Spin Drain Prewash Wash Rinses Spin Drain Prewash Important If the Soak option has been chosen the selected delay will correspond to the soak time If no delay time is selected the soak programme...

Page 11: ...rked without exceeding the MAX mark C0065 C0064 P1084 Close the drawer gently 4 Switch the machine on Press the On Off button to switch the machine on The display will show three flashing dashes or a flashing zero The light above the button will light up 5 Select the desired programme fabric Press the Fabric button repeatedly in order to select the desired programme fabric The relevant light will ...

Page 12: ...xtra Quick option Spin Speed 1400 1200 900 700 Night Cycle Spin Speed 1200 900 700 500 Night Cycle 60 C 40 C 30 C Cold 95 C Temperature The relevant light illuminates 9 Select the Super Rinse or 40 AA option If you wish the laundry to undergo an extra rinse select the Super Rinse option If your laundry is lightly or normally soiled and it is necessary to prolong the washing time select the 40 AA o...

Page 13: ...oes off and the door can be opened Should it not be possible to open the door and should it be absolutely necessary to do so switch the machine off by pressing the On Off button After approximately 3 minutes you can open the door Pay attention to the level and temperature of the water in the washing machine When you close the door and press the On Off button again the washing machine will resume t...

Page 14: ...est temperature White items should not be washed with coloured items Very small items handkerchiefs ribbons socks etc should be washed in a washing bag or a pillow case Use a good quality detergent suitable for automatic washing machines Use the correct quantities of detergent For wool use gentle detergent only in small quantities Bleach is very corrosive it should be used with care and kept out o...

Page 15: ...shing machine washer dryer The liquid fabric softener should be poured into the compartment marked with the symbol Follow the manufacturer s dosage instructions and never exceed the MAX level Bounce conditioning sheets for use in a tumble dryer We recommend the conditioning sheets are pinned using a safety pin to an article of laundry and placed in the tumble dryer Which detergent To ensure you ob...

Page 16: ...ioner entering the machine prematurely When using liquid detergent and a prewash programme place the detergent into the correct compartment in the dispenser drawer after the prewash has finished 95 60 50 40 40 40 Chlorine bleach may be used May be tumble dried with high heat setting with low heat setting A cross through any symbol means DO NOT May be dry cleaned Other letters and or a bar beneath ...

Page 17: ...ight Cycle Spin speed Night Cycle White cotton e g sheets tablecloths household linen Coloured cotton e g shirts blouses towels underwear house hold linen White Fast Coloured cotton e g shirts blouses towels underwear Synthetic fabrics and blends e g shirts blouses underwear Delicate fabrics e g acrylic fabrics viscose polyester synthetic blends Wool Handwash 30 40 30 40 30 40 50 60 30 40 60 30 40...

Page 18: ...tton wash programme Use a normal measure of detergent must be a powder such as Ariel Futur External cleaning Clean the exterior cabinet of the appliance with soap and water only and then dry thoroughly Cleaning the dispenser drawer The washing powder and additive dispenser drawer should be cleaned regularly C0067 C0066 Remove the drawer by pressing the catch downwards and by pulling it out Flush i...

Page 19: ...rush Tighten up the inlet hose The dangers of freezing If the machine is exposed to temperatures below 0 C certain precautions should be taken Turn off the water tap Unscrew the inlet hose Place the end of the emergency emptying hose and that of the inlet hose in a bowl placed on the floor and let water drain out Screw the water inlet hose back on and reposition the emergency emptying hose after h...

Page 20: ...he main fuse or the fuse in the plug has blown The Start Pause button has not been depressed The Delay option has been selected The machine does not fill The water tap is closed E E1 10 0 The filter in the inlet hose is blocked E E1 10 0 The inlet hose may be squashed or kinked E E1 10 0 The door has not been closed E E4 40 0 The machine fills then empties immediately The end of the drain hose is ...

Page 21: ...se visit the website at www serviceforce co uk For Customer Service in Ireland please contact us at the address below Zanussi Electrolux Electrolux Group Irl Ltd Long Mile Road Dublin 12 Republic of Ireland Tel 353 0 1 4090751 Email service eid electrolux ie To buy accessories consumables and spare parts at our online shop please visit http www zanussi electrolux co uk Before calling out an engine...

Page 22: ...ental agreements Products of Zanussi Electrolux manufacture which are NOT marketed by Zanussi Electrolux European guarantee If you should move to another country within Europe then your guarantee moves with you to your new home subject to the following qualifications The guarantee starts from the date you first purchased your product The guarantee is for the same period and to the same extent for ...

Page 23: ...ol and Handwash 2 kg SPIN SPEED MaximumZ 16 S 1200 rpm ZWN 1220 W 1400 rpm ZWN 1420 W ZWN 1420G CONSUMPTION DATA FOR WASHING Energy 1 19 kWh 7 KG NORMALLY SOILED COTTON Water 56 litres ITEMS AT 60 C 40 AA option selected Time 160 minutes This appliance complies with the following E E C Directives 73 23 EEC of 19 2 73 Low Voltage Directive and subsequent modifications 89 336 EEC of 3 5 89 Electroma...

Page 24: ... in the hoses must be pumped out Positioning Install the machine on a flat hard floor Make sure that air circulation around the machine is not impeded by carpets rugs etc Check that the machine does not touch the wall or other kitchen units Never place cardboard wood or similar materials under the machine to compensate for any unevenness in the floor Your new washing machine has been designed to b...

Page 25: ... leaks Water drainage This appliance is designed to be permanently plumbed into your home s drainage system using one of the following methods 1 Into a drainage standpipe Firstly form a hook in the end of the drain hose using the U piece supplied P0021 P1088 Place the drain hose into your standpipe which should have an internal diameter of approximately 38mm thus ensuring there is an air break bet...

Page 26: ...e made with a spanner Accurate levelling prevents vibration noise and displacement of the machine during operation Some vibration is inevitable especially if mounted on a wooden floor Sprung wooden floors are particularly susceptible to vibration For advice consult a builder If possible always place the machine on a solid floor Special conditions If the floor is carpeted or covered with crumbly or...

Page 27: ...nce with the following code Green and Yellow Earth Blue Neutral Brown Live The wire coloured green and yellow must be connected to the terminal marked with the letter E or by the earth symbol or coloured green and yellow The wire coloured blue must be connected to the terminal marked N or coloured black The wire coloured brown must be connected to the terminal marked L or coloured red Upon complet...

Page 28: ...argest producer of powered appliances for kitchen cleaning and outdoor use More than 55 million Electrolux Group products such as refrigerators cookers washing machines vacuum cleaners chain saws and lawn mowers are sold each year to a value of approx USD 14 billion in more than 150 countries around the world ...

Reviews: