background image

1)   Channel Select   

The top section of the PC screen allows you to determine which 

available channels you will be programming. The number of options will be determined 
by the Zapco Digital item you are programming. The Zapco Digital Control will identify 
which unit you are programming and how many channels are available. You can adjust 
the channels individually, or in stereo pairs as required. Simply move the mouse to your 
choice and click it on.

2)   Function/Graph   

In this section you can turn the processing functions on or off to 

compare the sound of your modified response to the unprocessed sound by clicking the 
buttons on of off with your mouse. You can also monitor the graph to see, in real time, 
how your adjustments will affect the input signal.

3)   Equalizer   

In this section you can make the adjustments to the parametric equalizer.

The top row sets the level of boost or cut at the center frequency, up to±15dB The next 
row sets the Q (shape) of the equalization. A low Q affects a wide range of frequencies 
while a high Q affects a narrow range of frequencies. The Graph screen will let you see 
how the different Qs affect your response. The bottom row of the EQ screen sets the 
center frequencies. The EQ section is a true parametric EQ. We have set factory defaults 
at about ½ octave intervals. However you can alter the center frequencies to fit the 
requirements of your car.

4)   Mute   

The Mute buttons allow you to temporarily turn off some of the active channels. 

This is very handy in tuning when you want to hear the response of an individual channel.

5)   Crossover   

For each channel, when you have turned on the crossover function, you 

can choose to run a High pass, a Low pass, or a Band pass crossover. You can also choose 
a crossover slope of 6dB,12dB, 24dB, or 36dB per octave. from the drop-down menu, 
and you can choose to use a Butterworth or a Linkwitz-Riley filter.

6)   Voltage Sensitive EQ   

Allows you to set one parametric EQ filter for each channel 

or channel pair that will come on only then the system reaches a pre determined volume. 
This is most often used in factory integration when the factory system rolls off the bass 
frequencies to protect the factory woofer.
See more under 

Getting Started 

later in this manual

7)   Input   

This lower section of the screen contains the Input Commutator, Source 

Selector and Phase control
          

Channel 

At the top of the screen you picked the channel you would adjust. Here 

you can pick which channel you will use as input for the chosen channel. In this way you
can assign the same channel pair as input to all channels of multi-channel amps. 

NOTE: Ch5+6 

(as above) means you will 

"

sum

"

 the two channels to a single mono input. 

Ch5/6 

means you will use channels 5 and 6 as a stereo input pair.

Also: 

The


Input Channel selector gives you the option of summing 2 or 3 stereo pair into 

one single stereo pair for OEM integration. This lets you combine highs, mids, and lows 
from a factory system into a single stereo output and eliminate the factory crossover.
          

Sensitivity: 

After picking the inputs for your channels, you can set the channel

'

sensitivity for maximum signal with minimum noise. Input voltage should be set to match 
the head unit's output.
          

Selector: 

Allows you to choose from the Main input, the Analog Aux-in, or the 

Digital SPDIF input

-13-

Summary of Contents for DC-352

Page 1: ...Owner s manual DC series Before operating the unit please read this manual throughly and retain it for future reference Sound Quality Integration Amplifiers With Full On Board Processing and Zapco DPN...

Page 2: ...Protect your Investment Note your information below for reference Model Serial Date Purchased And Register your Zapco product now At www zapco com...

Page 3: ...tion in our test certificates as you will with other brands Precision resistors also reduce distortion and improve channel matching Capacitors Capacitors are similar to batteries Like a battery they s...

Page 4: ...has more resolution allowing adjustments down to 3mm Direct Muting has been added and can be used by individual channels or by channel pairs The new DSP Z8 accepts speaker level inputs through its ba...

Page 5: ...t of high sound quality processing in the late 70 s when we created the PEQ This was a high voltage preamp EQ with and audiophile input stage and 9 bands of equalization for each channel It brought a...

Page 6: ...has more resolution allowing adjustments down to 3mm Direct Muting has been added and can be used by individual channels or by channel pairs The new DSP Z8 accepts speaker level inputs through its ba...

Page 7: ......

Page 8: ......

Page 9: ...ix In Eight Out Channel Digital Signal Processor Specifications THD Analog 0 0015 Digital 0 0008 Sensitivity 0 5V to 22V S N Ratio Digital 100dB Analog 99dB Control Input Mini USB Dimensions 220mm L x...

Page 10: ...analog Aux in 6 Data Connectors Two RG connectors provide Data in out for network cables and DRC control input 7 Power Connector Provides Power Ground Turn On and Aux 12 volt out Note To use speaker...

Page 11: ...annels together to sum their signals for integrating actively crossed over signals to a single full range signal All DSP functions may be applied to each channel independently or they may be applied i...

Page 12: ...rop down arrows to make choices or simply highlight the box you want to change and type in your choice manually Most small boxes are switches and are switched by placing the mouse over them and clicki...

Page 13: ...dividual channel 5 Crossover For each channel when you have turned on the crossover function you can choose to run a High pass a Low pass or a Band pass crossover You can also choose a crossover slope...

Page 14: ...eed to equal the furthest speaker and note how many inches are needed for each 4 Now just dial in the delay to match the added inches for each speaker and your delay is set Program Upgrades The Zapco...

Page 15: ...the Aux D input in your system you should set your head unit to maximum unclipped output usually about 3 4 volume and use the Z8 R as your main volume control This way switching from Main input to Au...

Page 16: ...8 4 4 4 2 7 Ft 12 10 8 8 4 4 4 2 10 Ft 12 8 8 4 4 4 4 2 13 Ft 10 8 4 4 4 2 2 2 16 Ft 10 4 4 4 2 2 2 0 19 Ft 8 4 4 4 2 2 0 0 22 Ft 8 4 4 4 2 2 0 0 28 Ft 8 4 4 2 0 0 0 0 You can certainly save money by...

Page 17: ...n pot fully counter clockwise with a small screwdriver Then turn on the head unit and turn up the volume If you achieve clean sound and more volume than you want you don t need to make any adjustments...

Page 18: ...B input for PC control Signal input RCA connectors Optional digital programming network Ducted flow cooling Heavy Duty high current insulated terminal blocks Space saving flush wiring connections Tree...

Page 19: ...lated MOSFET power supply Quality ZAPCO construction DC 656 The amp s DIP Switch allows you to address each amplifier to its own location on the network Then when you call up the amp for programming i...

Page 20: ...ing RCA RCA connector wires CONNECTION DC 352 DC 752 DC 364 DC 1004 HI LOW INPUT CH1 INPUT CH3 INPUT CH2 CH4 POWER PROTECT INPUT CLIP ADDRESS PC CONTROL I O DATA HI LOW LOW Z 1 2 3 4 5 6 ON HEAD UNIT...

Page 21: ...channels The RCA input connector should be used when connecting the radio cassette line out and this connection is usually made using RCA RCA connector wires HEAD UNIT 21 HEAD UNIT ZAPCO digital progr...

Page 22: ...12V Power Connect the 12V terminal of the amplifier to the terminal of the battery using the same diameters the ground cable making sure you install in line fuse holder approximately 300 or 400 mm Fr...

Page 23: ...Bridged Speaker Impedance 2 8 ohms Speaker Impedance 4 8 ohms CH1 MONO SUBWOOFER 2 Channel Stereo CH2 CH1 SPEAKER CONNECTION Speaker Impedance 4 8 ohms CH3 MONO SUBWOOFER 3 Channel Tri Mode CH2 CH1 S...

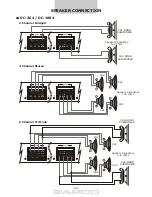
Page 24: ...BRIDGE CH1 CLIP CH2 CLIP CH3 CLIP CH4 CLIP CH3 CH4 BRIDGE SPEAKER CONNECTION 2 Channel Bridged 4 Channel Stereo 6 Channel Tri Mode Speaker Impedance 4 8 ohms CH2 MONO SUBWOOFER CH1 MONO SUBWOOFER CH2...

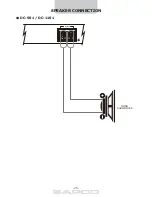
Page 25: ...SPEAKER CONNECTION CLIP SPEAKER DC 501 DC 1101 MONO SUBWOOFER 25...

Page 26: ...3 Channel Mode Speaker Impedance 4 8 ohms SUBWOOFER SUBWOOFER SUBWOOFER Speaker Impedance 2 8 ohms 5 Channel Stereo CH2 CH1 Speaker Impedance 4 8 ohms SUBWOOFER CH4 CH3 SPEAKER CONNECTION CH6 CLIP CH...

Page 27: ...CH5 CLIP CH1 CLIP CH2 CLIP CH3 CLIP CH4 CLIP CH3 CH4 BRIDGE CH1 CH2 BRIDGE 6 Channel Mode Speaker Impedance 2 8 ohms SPEAKER CONNECTION DC 656 27 CH2 CH1 CH4 CH3 CH6 CH5 Speaker Impedance 2 8 ohms Spe...

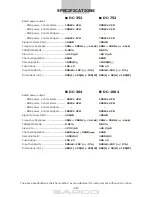
Page 28: ...ithout prior notice DC 752 200W x 2CH 370W x 2CH 780W x 1CH 90dB 20Hz 20KHz 0 5dB 0 05 40 V S 60dB 1000 4 30A x 3 560mV 10V 5 600 L x 55 H x 180 W Rated power output RMS power 4 ohms stereo RMS power...

Page 29: ...KHz 0 5dB 0 013 25 V S 600 4 20A x 3 500mV 10V 5 340 L x 55 H x 180 W DC 501 DC 1101 800W x 1CH 1200W x 1CH 95dB 20Hz 20KHz 0 5dB 0 03 40 V S 800 4 40A x 3 500mV 10V 5 600 L x 55 H x 180 W Rated power...

Page 30: ...good ground connection is present Most engine noises are caused by grounding issues Hissing noise is most often caused by gain issues Proper gain matching is usually required to eliminate hissing noi...

Page 31: ...actory for a Return Materials Authorization RMA number We will ask you for information that will include your name return shipping address daytime phone number model and serial number and a detailed d...

Page 32: ...ARPA of America Corporation 3037 E Palm Ave Suite 102 Manteca CA 95337 Phone 800 47 Force The Zapco DC Series is a joint venture of ARPA of America and ARPA Italy and manufactured in Korea...

Reviews: