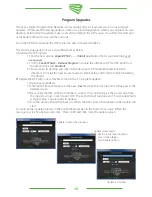
1) Channel Select:
The top section of the PC screen allows you to determine which channels you
will be programming. You can adjust the channels individually, or in stereo pairs as required. Simply
move the mouse to your choice and click it on. The active channels will light up.
2) Function/Graph:
In this section you can turn the processing functions on or off to compare the
sound of your modified response to the unprocessed sound by clicking the buttons above the graph on
of off with your mouse. You can also monitor the graph to see, in real time, how your adjustments will
affect the input signal.
3) Equalizer:
In this section you can make the adjustments to the parametric equalizer. The top row
sets the level of boost or cut at the center frequency, up to ±15dB. The next row sets the Q (shape) of
the equalization. A low Q affects a wide range of frequencies while a high Q affects a narrow range of
frequencies. The Graph screen will let you see how the value of Q will affect your response. Note in the
graph section the wide boost at 125Hz (Q1) and the narrow sharp boost at 500Hz (Q10). The bottom
row of the EQ screen sets the center frequencies. The EQ section is a true parametric EQ. We have set
factory defaults at about 1 octave intervals. However you can alter the center frequencies to fit the
requirements of your car. with the drop-down menu or by typing in the frequency you want.
Mute:
Under the EQ controls are the mute buttons which allow you to temporarily turn off some of
the active channels. This is very handy in tuning when you want to hear the response of an individual
channel. you can mute by Channel pairs or by individual Channel.
4) Crossover:
For each channel, when you have turned on the crossover function, you can choose to
run a High pass, a Low pass, or a Band pass crossover. You can also choose a crossover slope of 6dB,
13


