background image

9

English

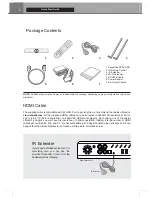
● Please use alkaline AA batteries. Please observe polarity when inserting batteries.


● Please 

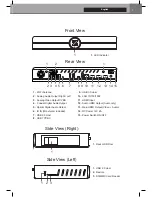
Remove the plastic film 

from the Z logo of the front panel. The IR led is located behind.

● If RC functions only at short distances or stops functioning,

 make sure to replace the batteries.

● Point the remote control at the Zappiti. There must be no obstacles between the RC and the media player.
● Some RC buttons may be available only in certain player m

odes or only during playback of a certain content.

Getting Started 

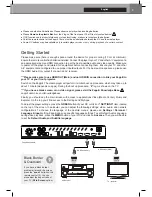
Please make sure there is enough space around the device for proper cooling (10 cm at minimum). 

Ensure the remote control has batteries installed. Connect the player to your TV and other A/V equipment 

in 

an appropriate way. Use HDMI connection to get the best possible audio and video quality. Make sure 

to power off the player and related A/V equipment before connecting them. Ensure your TV and other 

A/V equipment are configured to use proper inputs/outputs. For the best audio experience, please use 

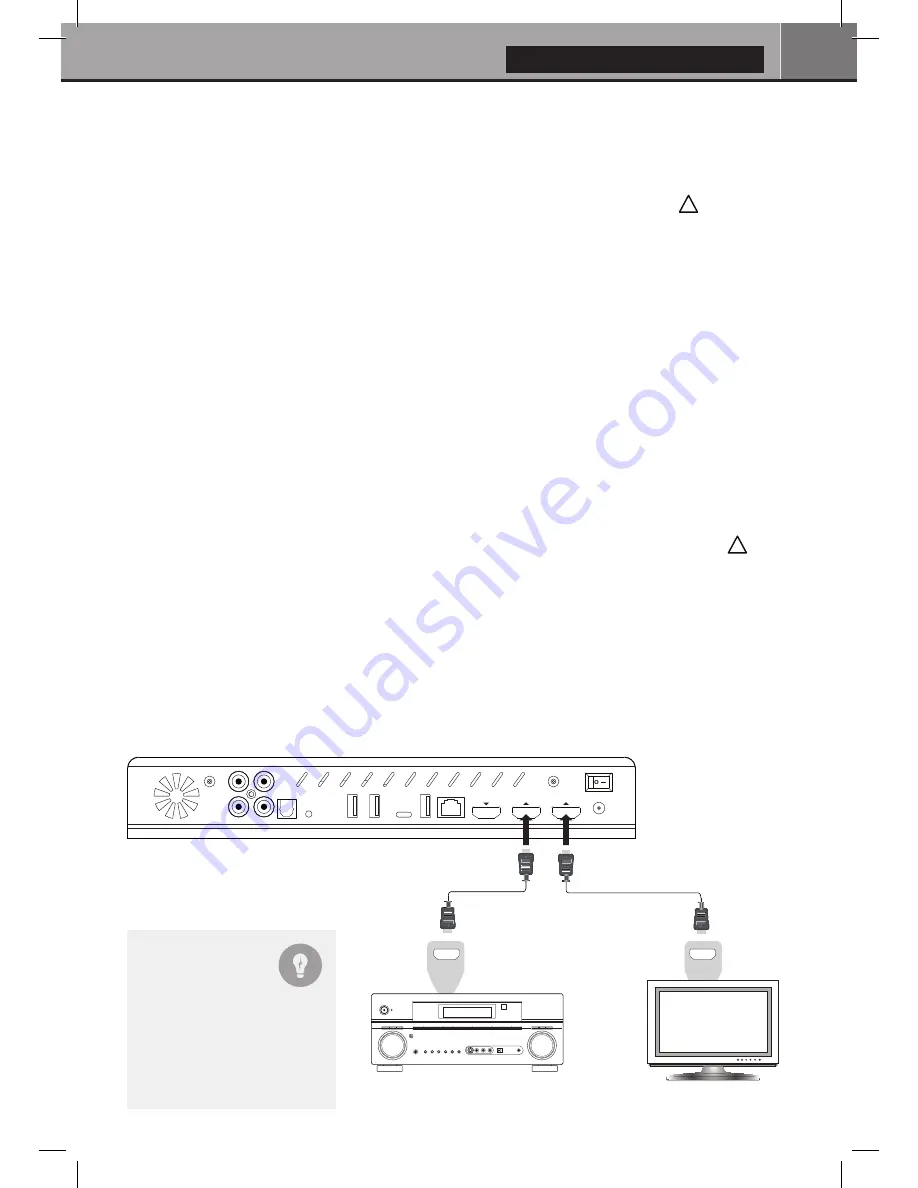
the HDMI Audio Only output if you own an AV receiver.

***Please make sure to use HDMI OUT (Main) and not HDMI IN connection to link your Zappiti to 

your TV or your front projector.

Switch on the Zappiti. The media player will perform its initial boot up procedure, which may take up to 

about 1 minute (depends on apps). During the boot up procedure, “

Z

” logo is shown on the TV.

***If you have a black screen or no video signal, please visit the Zappiti Knowledge Base.

zappiti.uservoice.com/knowledgebase

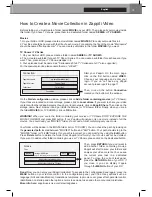
Finally, you should see the main screen with access to applications Video (Media Center), Music and 

Explorer. On the top you’ll find access to the Settings and MyApps.
To adjust the player settings, press the 

GREEN 

button of your RC or click on 

“SETTINGS” 

item located 

on the top of the screen. In particular, you can adjust the following settings: video, audio, and network 

configurations.


To  choose  the  language  of  the Android  menus,  please  use: 

Settings / Personal / 

Language & input

 setting. Zappiti apps use specific language settings. To set Default Audio Language, 

during video playback, press the 

MENU 

button of your RC,


and click on 

Advance

. Then you will be able 

to set the 

Default Audio and Subtitle language

.

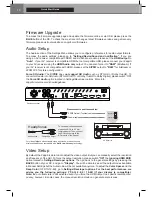
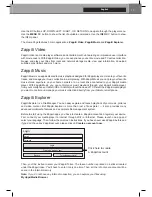
HDMI IN

HDMI Video (Main)

HDMI Audio Only

Zappiti back panel

AV Receiver

TV / projector

AUDIO/VIDEO  MULTI-CHANNEL  RECEIVER

 HDMI IN

Black Border

& Overscan

If you have a black border 

problem all around the screen, 

press the "

zoom

" button on the 

remote control (3). You can 

also adjust the aspect ratio of 

your TV (

Fit to Screen

 option).

!

!

Summary of Contents for One Se4K

Page 1: ...nder license from Dolby Laboratories Dolby and the double D symbol are trademarks of Dolby Laboratories DTS the Symbol DTS and the Symbol together are registered trademarks DTS 2 0 Digital Out is a tr...

Page 2: ...d to improve the movie watching experience in residential and commercial environments all over the globe To ensure the ultimate performance all Zappiti devices are supplied to authorized resellers thr...

Page 3: ...ity 17 How to Create a Movie Collection in Zappiti Video 4 Lista de contenidos Castellano Gu a de inicio r pido 18 19 20 21 22 23 24 25 26 26 27 27 27 27 28 28 29 30 Introducci n funciones principales...

Page 4: ...USB storage devices USB Port 3 0 and Type C Read or copy your files in ultra high speed Full Range of A V Connectors S PDIF coaxial and optical audio output audio analog RCA RCVBS HDMI 2 0 CEC HDMI Au...

Page 5: ...e movies as children s and block access to other movies with a PIN code Thus your children can safely access only their movies In addition the child mode provides direct access to movies for greater e...

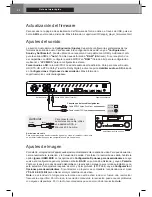
Page 6: ...port as following Zappiti back panel IR Extender HDMI Cable The supplied cable is compatible with 4K HDR For longer lengths we recommend the cables offered on store zappiti com All the proposed HDMI...

Page 7: ...ncluded 9 USB 3 0 Host 10 LAN 10 100 1000 11 HDMI Input 12 Audio HDMI Output Audio only 13 Main HDMI Output Video Audio 14 DC Power 12V 2A 15 Power Switch ON OFF 7 USB 2 0 Host 8 USB TYPE C Rear View...

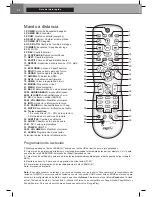
Page 8: ...36 AUDIO Audio track switch 37 41 TV TV remote 37 POWER Toggle power ON OFF 38 39 VOLUME Increase Decrease volume 41 LEARN Record an external RC RC BACKLIT Activate backlit 1 4 5 8 11 14 18 17 20 23...

Page 9: ...TV or your front projector Switch on the Zappiti The media player will perform its initial boot up procedure which may take up to about 1 minute depends on apps During the boot up procedure Z logo is...

Page 10: ...iti uservoice com knowledgebase Video Setup By default the Zappiti is able to auto adjust the video output But you can manually select the resolution and frequency of the GUI To force the output resol...

Page 11: ...e or tablet iOS or Android without the need of TV Select the Zappiti media player you want to control and manage your music collection directly from your tablet or smartphone Zappiti Explorer Zappiti...

Page 12: ...u to use USB 3 0 or USB Type C not available on Zappiti Mini 4K HDR model Note A dedicated USB icon located on the home page can help you to detect if the drive is connected correctly Power provided b...

Page 13: ...ettings inclu ding the frame time transitions and effects press the MENU button on the remote control slide show off To add a music to a slide show simply place an audio file in the folder contai ning...

Page 14: ...g your Tablet Smartphone You can also control the Music and Video playback using the dedicated apps named Zappiti Video Control and Zappiti Music Control available for iOS and Android To install them...

Page 15: ...y one movie Your folder will be added in the MOVIE folder list or TV SHOW You can check the path by looking on the generated path located between MOVIES button and Edit button Your path should stop to...

Page 16: ...ely named correctly But day after day Zappiti Db will become more and more reliable as users will manually identify files of movies and TV series Press MENU of the RC and select X to Identify You ll s...

Page 17: ...nge the subtitle display options such as color position or sync press the MENU button on the remote control during video playback then go to Subtitle and change the desired option To change the vertic...

Page 18: ...red local PC MAC Linux o NAS a trav s de SMB Tomas USB Conecte f cilmente discos duros unidades flash USB lectores de tarjetas y otros dispositi vos USB Toma USB Type C Lea o copie sus archivos a alt...

Page 19: ...ilia o disco duro y cambie f cilmente de uno a otro Control parental Con la funci n Control parental puede etiquetar sus pel culas como pel cula infantil y bloquear el acceso a otras pel culas con un...

Page 20: ...estra aqu Parte trasera del Zappiti Extensor IR 1 5 2 7 6 3 4 Cable HDMI El cable suministrado es compatible con 4K HDR Para longitudes m s largas recomendamos los cables que se ofrecen en store zappi...

Page 21: ...LAN 11 Entrada HDMI 12 Salida HDMI audio Audio nicamente 13 Salida HDMI principal Video Audio 14 Conector de alimentaci n 12V 2A 15 Bot n de encendido apagado ON OFF 7 Toma USB 2 0 8 USB TYPE C Parte...

Page 22: ...sta de audio 37 41 TV Teclas programables 37 POWER ON OFF 38 39 VOLUMEN Modificar el volumen 41 LEARN Programaci n de las teclas Pulsaci n r pida tecla de retroiluminaci n 1 4 5 8 11 14 18 17 20 23 22...

Page 23: ...able HDMI compruebe que sea compatible con 4K y especialmente certificado 18 Gb s HDMI 2 0 Aseg rese de apagar el reproductor y todo el equipo de audio y video antes de hacer cualquier conexi n Aseg r...

Page 24: ...ajustar autom ticamente la salida de video Pero puede seleccio nar manualmente la resoluci n y la frecuencia de salida Para forzar la resoluci n de salida habilite la opci n Ignorar HDMI EDID en las...

Page 25: ...V con una tablet o smartphone iOS o Android Zappiti Explorer Zappiti Explorer es un administrador de archivos Esta aplicaci n permite explorar y ejecutar de forma sencilla la reproducci n de sus archi...

Page 26: ...0 Mbps Si desea transferir archivos le recomendamos utilizar los puertos USB 3 0 o USB tipo C Nota Un icono de USB ubicado en la esquina superior derecha de la p gina de inicio puede ayudarle a detect...

Page 27: ...nes y los efectos pulse el bot n MEN en el mando presentaci n de diapositivas desactivada Para asociar m sica con una presentaci n de diapositi vas simplemente coloque un archivo de audio en la carpet...

Page 28: ...ar la reproducci n de m sica y video usando las aplicaciones Zappiti Video Control y Zappiti Music Control disponibles para iOS Android Instalaci n encienda su tablet smartphone luego vaya a Play Stor...

Page 29: ...u carpeta se agregar a la lista de carpetas para escanear El nombre de la carpeta agregada debe aparecer entre el bot n Pel culas o Series y el bot n Editar Si la ruta de la carpeta no parece correc t...

Page 30: ...el campo de b squeda puede volver a introducir el nombre de la pel cula y haga clic en Buscar Pero otra t cnica 100 confiable es introducir el c digo de identificaci n nico de la pel cula en lugar del...

Page 31: ...clic en la siguiente opci n Visto En progreso o No visto Opciones de visualizaci n de subt tulos Para clasificar sus pel culas pulse la tecla MEN Luego en la secci n Filtros y clasificaci n haga clic...

Page 32: ...zappiti com zappiti uservoice com knowledgebase...

Reviews: