background image


Install the hardware and connect all cables 

a. Wall mounting and Ceiling mounting 


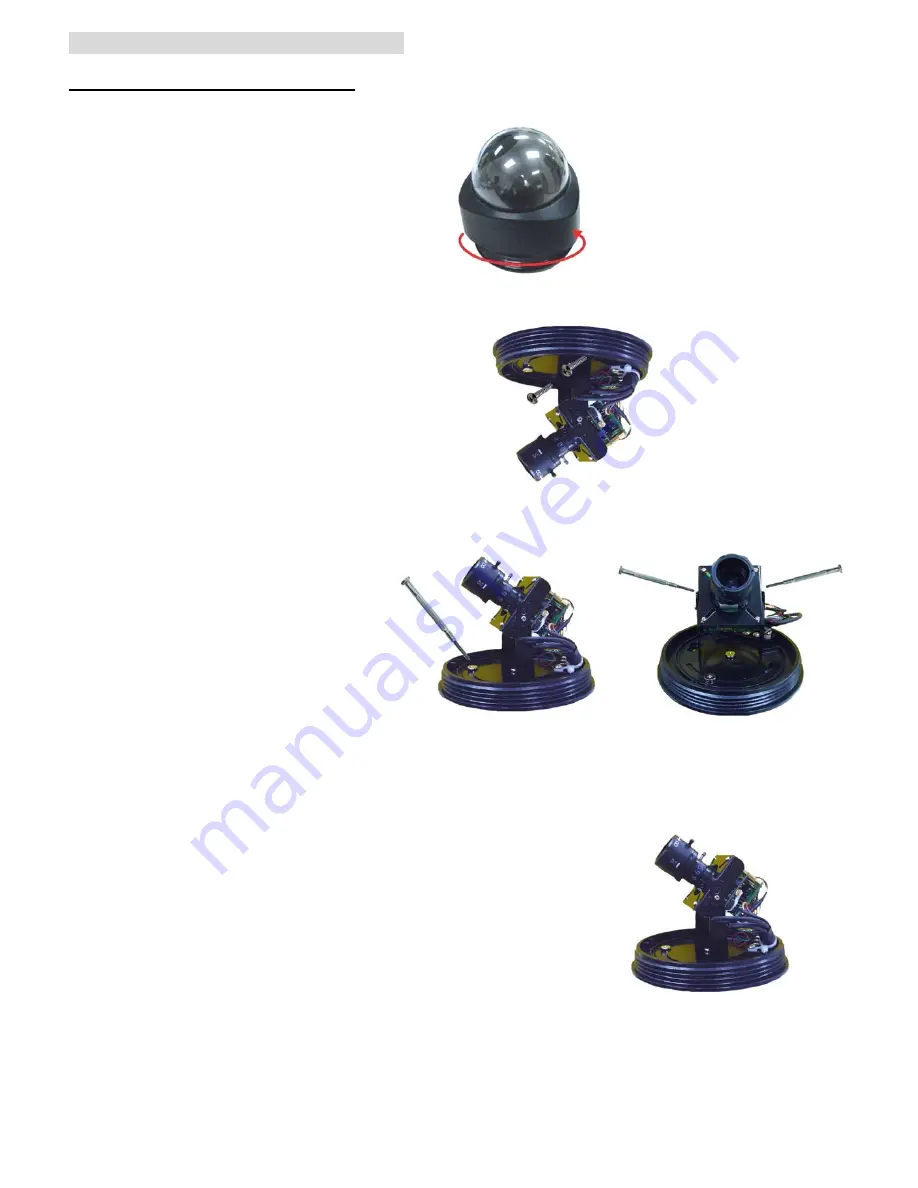
1. Unfasten the cover of the Dome IP Camera. 

Be careful do not scratch the cover glass. 

2. Use the 2 supplied screws to fix the base of the 

  IP Camera to a flat surface. (vertical or horizontal) 

3. Unscrew the pan screw; adjust the lens to 

your desired pan angle and then tighten the pan 

screw.  

Unscrew the tilt screws; adjust the lens to   

your desired tilt angle and then screw tight the 

tilt screw. 

4. Turn the lens to the desired direction. Loosen the zoom puller and rotate the 

room and determine desired zoom position. Loosen focus puller and focus the 

image. After determining zoom and focus, lock the zoom puller and focus 

puller. Use soft cloth to clean dome cover glass to remove dust and finger 

prints and also use blower to remove dust from the lens. 


Summary of Contents for D-510E-varifocal lens

Page 1: ......

Page 2: ...tic IP Dynamic IP or both See P 9 For more information please check the User Manual available in the Software CD or you can download the latest software from http www zavio com Package Contents Camera...

Page 3: ...your desired pan angle and then tighten the pan screw Unscrew the tilt screws adjust the lens to your desired tilt angle and then screw tight the tilt screw 4 Turn the lens to the desired direction L...

Page 4: ...k cable connect the IP Camera to a normal Hub Switch Router Microsoft OS Use the software CD to install Intelligent IP Installer Power on your PC and insert the CD ROM The setup page will show up auto...

Page 5: ...ault Level b Browser s Internet Properties Privacy Uncheck Pop up Blocker 2 Click the Intelligent IP Installer Icon on your desktop The main page will show up listing all active camera and video serve...

Page 6: ...ormation bar appears below the address bar This website wants to install the following add on AxvideoView cab from Zavio Inc 5 Click the information bar and select Install ActiveX control 6 Click Inst...

Page 7: ...setting can be changed into 50Hz Or if you wish to use this IP Camera in an outdoor environment this setting can be changed into Outdoor mode Go to Setting Basic Camera General choose the environment...

Page 8: ...3gp b 2 5G Mobile Phone Viewing b1 WAP viewing For 2 5G WAP mobile phone viewing type http IP mobile wml into your 2 5G web browser b1 Browser viewing For 2 5G mobile phone browser viewing type http I...

Page 9: ...ll camera icon Then choose View a new contact s webcam 9 The IP Camera automatically accepts your invitation and its live video is displayed 10 Click Action button and choose Start control panel to us...

Page 10: ...ternet Connectivity of the IP Camera can be established through PPPoE Point to Point Protocol over the Ethernet by inputting the username and password from your Internet Service Provider ISP within th...

Page 11: ...UPnP Internet Gateway Device IGD turn on the UPnP function within the UPnP section Please go Setting Basic Network UPnP Note If you turn on the UPnP Port Forwarding function RTSP Real Time Streaming...

Page 12: ...Memo...

Page 13: ...Memo...

Page 14: ...Memo...

Reviews: