Zaxcom Fusion User’s Manual______________________________________________________Chapter 2
55
Sample Rate page
Page purpose:
Selects the sampling-rate being recorded to Fusion's primary drive.
How to get here:
(
SHIFT
+
SETUP
keys
Sample Rate
button
)
(
MENU
key
Setup
button
Sample Rate
button
)
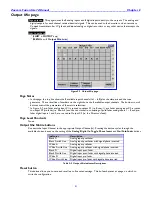
Figure 2-18 Sample Rate page
Page Notes
When using 192000, it is recommended that you do a Factory Restore Defaults to erase all possible settings that
may be draining digital signal processing horsepower. If the unit does NOT boot, hold the
0
(zero)
key
while
booting to force 48 kHz.
Page Level Shortcuts
None
Sample-rate buttons
NOTE:
You should select the highest sampling-rate that will be used on any device.
Except for when recording at the ‟pull up' or 'pull down' sampling-rates, where you can mix and match any of
those sampling-rates among any of the drives, use the highest sampling-rate that will be used on any device. For
example, if you want to write a FireWire DVD at 96 kHz, then this setting must be at least 96 kHz. All other
sampling-rates will be extrapolated from this one. If you record at 48 kHz on the primary drive, but wish to
mirror a DVD-RAM at 48.048 kHz, that is perfectly acceptable. But when using two vastly different sampling-rates,
set the primary drive for the higher of those rates. Default setting: 48000
Sample Rate Reference button
Internal
– This locks the Fusion to its own internal reference. Select this mode when recording using the
analog inputs.
AES 1/2
– In this mode, Fusion syncs with the timing signal being received on digital input 1 or 2. If the AES
signal is lost or not present, it defaults to Internal. Make sure Fusion‟s sample-rate setting
ALWAYS matches that of the incoming AES signal


