ZPrinter
®
450 Hardware Manual
Setup And Print The Build
25
All Rights Reserved
10/2/07
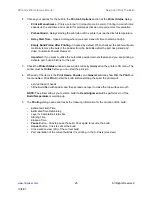
2. Choose your options for the build in the
Print Job Options
section of the
Printer Status
dialog.
•
Print in Monochrome
- Prints a color part in monochrome (no color). Printing in monochrome
speeds up the print time and is useful for prototypes that do not require color for evaluation.
•
Preheat Build
- Delays starting the print job until the printer has reached its full temperature.
•
Delay Start Time
- Opens a dialog where you enter a specific time to start a print job.
•
Empty Build Piston After Printing
- Checked by default. When checked, the printer will auto-
matically remove the bulk of the powder from the Build Bed after the part has printed and
dried. (Automatic Powder Removal)
Important:
If you want to utilize the automatic powder removal feature and you are printing a
delicate part, build a Fixture for the part.
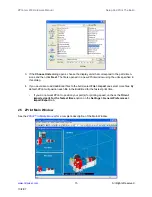
3. Check the
Printer Status
window to see what is currently displayed on the printer LCD menu. The
printer must be
Online
before you can start the print job.
4. When all of the items in the
Print Heads
,
Powder
, and
General
sections show
OK
, the
but-
ton is enabled. Click
to start the build. Before starting the build, the printer will:
•
service the print heads
•
fill the Build Bed with powder and then spread one layer to make the top surface smooth
NOTE:
The printer allows you to start a build if a
Head Alignment
will be performed, or if the
Build Temperature
is warming up.
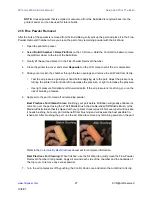
5. The
Printing
dialog opens and tracks the following information for the duration of the build:
•
Estimated Finish Time
•
Estimated Time Remaining
•
Layer % Completion status bar
•
Starting Time
•
Elapsed Time
•
Pause
Button - Click to pause the build. Click again to resume the build
•
Cancel
Button - Click to cancel the build
•
Cross-section view (2D) of the current build
•
Part orientation of the current build as it is printing, in the X-Z Axis (side view)

