STBi3 User ’s Manual
|
Page 7
2 Quick Setup
Connect the STBi3 to power and connect the STBi3 to a display using an
HDMI cable. Use a standard Ethernet cable to connect to the Network
Router or Switch. If streaming RF signals; connect a Coax cable from the
modulated signal network.
Prior to streaming video, you must first configure the Network settings on
the STBi3.
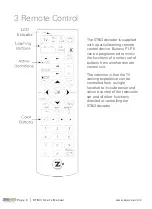
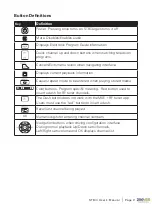
Using the remote control, hit the MENU button to access the Main options
screen. Using the arrow keys navigate to the setup icon (the GEARS) and
click there. See details below in the section “Configuring the Network”.
Tip:
The STBi3 can make use of a USB HID device. Simply connect a standard USB
keyboard to one of the USB-Type A ports on the STBi3. The on-screen keyboard
can be used with the remote control, but it is slow and cumbersome for anything
more than a single box.
Note:
It is critical to ensure that the STBi3 is assigned an IP address either
statically or using DHCP before you will be able to stream video.
Once the Network is configured the STBi3 will automatically detect and
add to the channel lineup any multicast video stream from ZyPerMX,
ZyPerMX2/4, HDbridge and ZvPro iSeries devices on the same network. To
add video streams from other sources the Channel Guide must be updated
manally. Please see the “Channel Guide File Specification” chapter for
details.
See the section on Configuring RF channels to add RF channels to the
lineup.
Note:
The STBi3 cannot be configured to receive IP streams over a WiFi
Network. WiFi networks do not provide enough bandwidth and reliability
for streaming to the STBi3.


