12 - EN
5. Installation
When carrying out any work on the unit, make
sure the power is disconnected and cannot be
inadvertently reconnected.
Always take ESD-inhibiting measures when
dealing with PCBs, (printed circuits boards) such
as wearing an antistatic wristband.
After fitting and commissioning, a number of checks
must be carried out. At the back of this document
is an installation report stating the points requiring
checking.
5.1 Mounting
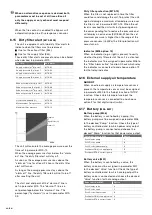
1. Set the height of the unit and ensure it stands level.
Make sure the unit is evenly supported.
In units with (adjustable) feet, all (adjustable) feet
must be supported.
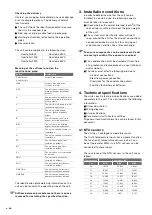
2. Remove the socket screws (A) from the maintenance
doors.
3. Insert the seal plugs (B) (supplied).
4. Fit the seal cap (C) (supplied).
5. Lock the hinges/clamps.
5.2 Air ducts
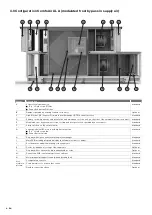
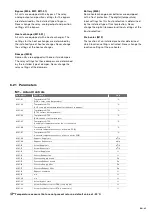
EHA
SUP
ODA
ETA
Left-hand version
ODA
ETA
EHA
SUP
Right-hand version
Legend
Code
Decription
ODA
Outdoor air
SUP
Supply air
ETA
Extract air
EHA
Exhaust air
The following aspects must be taken into account,
while installing the air ducts:
�
Install the air ducts with as little air resistance as
possible and free from air leakage;
�
Install a silencer straight directly onto the supply
and return air connections. For relevant advice,
please contact Zehnder;
�
Insulate the outdoor air and the air exhaust duct
between the roof/wall passage to render the
unit damp proof. This prevents the formation of
condensation on the outside of the ducts;
�
To prevent unnecessary temperature loss in either
the summer or the winter, we recommend fitting
thermal and damp-proof insulation to the supply
ducts from the unit up to the supply valves;
�
Make sure the inside of the air ducts do not have
an obstruction of any sort. Air ducts may not
have sharp bents, dents or long screws inside.
Obstructions will compromise the performance
and maintenance of the system.
Summary of Contents for ComfoAir 800
Page 1: ...ComfoAir XL ComfoAir Eco Manual Cooling Fresh Air Clean Air Heating...
Page 45: ...EN 45...
Page 46: ...46 EN...
Page 47: ...EN 47...

