EN
9
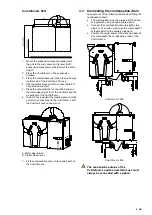
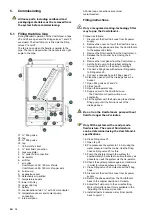
Comfofond-L 550:
1 Mount the suspension bracket supplied with
the unit to the wall, ensuring it is level. Both
suspension brackets must be fitted at the same
height.
2. Place the Comfofond-L in the suspension
bracket.
3. Place the metal sleeve joint (A) on the niche pipe
(outdoor air) of the ComfoAir 550 Luxe.
4. Use the plastic sleeve joint to connect both 90º
connection bends (B).
5. Place the connected 90º connection bends on
the metal sleeve joint (A) of the ComfoAir and the
air exhaust of the Comfofond-L.
6. Tape off (not included) the plastic sleeve joint (B)
and all air connections on the Comfofond-L and
the ComfoAir Luxe vapour-proof.
A
A. Metal sleeve joint
B. Plastic sleeve joint
7. Fit the condensation drain to the underneath of
the Comfofond-L.
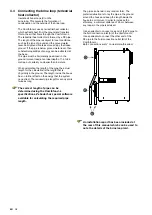
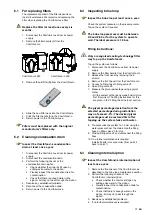
4.3 Connecting the condensation drain
Take account of the following factors when fitting the
condensation drain:
• The condensation must be drained off frost-free,
at a gradient, using an appropriate siphon;
• Connect the condensation drain (air-tight) via a
pipe or a hose with a siphon (with a water seal of
at least 60mm) to the sanitary pipework;
• Position the upper edge of the siphon at least 40
mm underneath the condensation drain of the
Comfofond-L.
Comfofond-L 350
Comfofond-L 550
The condensation drains of the
Comfofond-L and the ComfoAir Luxe must
always be connected with a siphon.
Summary of Contents for ComfoFond-L
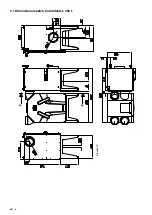
Page 8: ...EN 4 3 1 Dimensional sketch Comfofond L 350 L Elevation P...
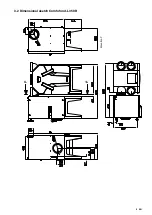
Page 9: ...EN 5 3 2 Dimensional sketch Comfofond L 350 R Elevation P...
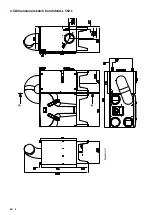
Page 10: ...EN 6 3 3 Dimensional sketch Comfofond L 550 L Elevation P...
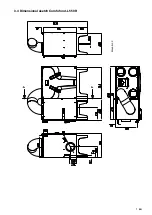
Page 11: ...EN 7 3 4 Dimensional sketch Comfofond L 550 R Elevation P...
Page 31: ...EN 27 II Maintenance log Date Activity Initials...


